
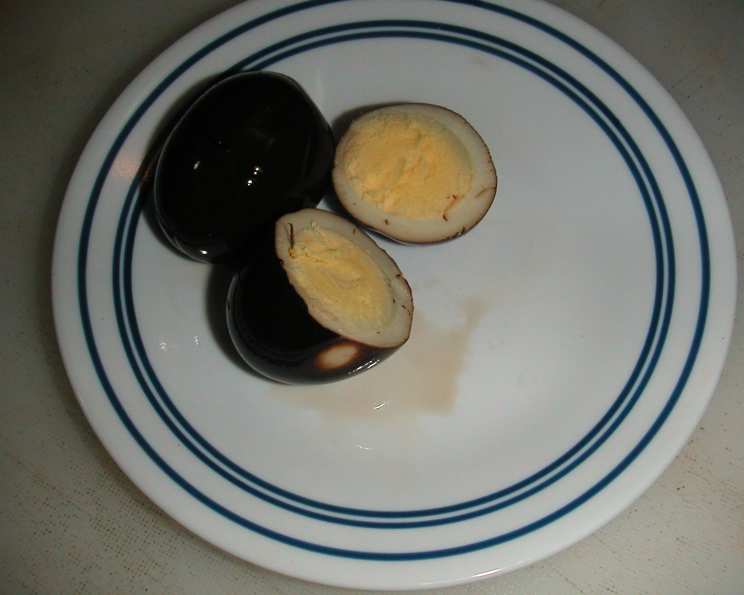
Pierre’s Black Eggs: A Culinary Adventure in Pickling
The first time I saw a black egg, it was nestled amongst a vibrant charcuterie board at a tiny tapas bar in Madrid. Its inky hue was mesmerizing, a stark contrast to the bright yellows and reds surrounding it. Intrigued, I had to try it. The tangy, slightly sweet, and deeply savory flavor was unlike anything I’d ever tasted. It was that single bite that sparked my own journey into the world of pickling, leading me down paths of experimentation and flavor exploration. Now, I’m excited to share one of my favorite discoveries: Pierre’s Black Eggs.
Recipe Overview
- Prep Time: 20 minutes
- Cook Time: 25 minutes
- Total Time: 3 weeks (includes pickling time)
- Servings: 16
- Yield: 2 quart jars
- Dietary Type: Gluten-Free, Dairy-Free
Ingredients
- 18 large eggs, at room temperature
- 2 cups balsamic vinegar
- 1 cup water
- 2 tablespoons pickling spices, tied in cheese cloth
- 8-10 cloves garlic, peeled
- 4 serrano chilies, seeded, deveined, quartered lengthwise
- 2 bay leaves, one per jar
- 1 small yellow onion, thinly sliced
- 12 dried tepin chilies or 6 dried japone chilies
Equipment Needed
- Large pot
- Pin or needle
- Large bowl
- Slotted spoon
- Small saucepan
- Sterile 2 quart jars with lids
- Cheese cloth
Instructions
-
Begin by preparing the eggs. Fill a large pot about halfway with water and add 1 tablespoon of Kosher salt. Bring the water to a rolling boil. This salt helps prevent the eggs from cracking.
-
While the water is heating, gently pierce the large end of each egg with a pin or needle. This releases air and prevents the eggs from exploding during cooking. This seemingly small step is critical.
-
Prepare an ice bath by filling a large bowl halfway with water and adding 2-3 trays of ice cubes. This will quickly stop the cooking process and make the eggs easier to peel.
-
Once the water is boiling vigorously, carefully spoon the eggs into the pot to avoid cracking.
-
Set a timer for 11 minutes. This will ensure the eggs are hard-boiled but still have a slightly creamy yolk, ideal for pickling.
-
When the timer goes off, use a slotted spoon to transfer the eggs immediately to the ice water bath. Allow them to cool completely. This usually takes about 15-20 minutes.
-
While the eggs are cooling, prepare the pickling brine. In a small saucepan, combine the balsamic vinegar and water.
-
Place the pickling spices in a square of cheesecloth and tie it into a bundle with kitchen twine. This makes it easy to remove the spices later. Add the spice bag to the vinegar mixture.
-
Bring the vinegar mixture to a boil for 3-4 minutes. This infuses the vinegar with the spices and slightly reduces the liquid.
-
Remove the saucepan from the heat and allow the vinegar mixture to cool slightly while you prepare the jars.
-
Sterilize two quart jars by boiling them in water for 10 minutes, or running them through a sterilizing cycle in your dishwasher.
-
In the sterile jars, place the garlic cloves, serrano chilies, a bay leaf, the sliced onion, and the tepin (or japone) chilies, dividing them evenly between the two jars. These ingredients provide layers of flavor and heat to the pickled eggs.
-
Once the eggs are cool enough to handle, carefully peel them under running water. This helps to remove any small shell fragments.
-
Add the peeled eggs to the jars, packing them in tightly but gently.
-
Remove the pickling spice bag from the vinegar mixture and discard it.
-
Carefully pour the scalding vinegar mixture into the jars, ensuring the eggs are completely submerged. Leave about 1/2 inch of headspace at the top of the jar.
-
Seal the jars tightly with their lids and let them cool to room temperature on the counter.
-
Once cooled, refrigerate the jars for at least one week, but preferably two weeks, before serving. This allows the eggs to fully absorb the flavors of the pickling brine. The longer they sit, the more intensely flavored they become.
Expert Tips & Tricks
- For easier peeling, add a teaspoon of baking soda to the boiling water when cooking the eggs. This helps to separate the egg white from the shell membrane.
- Don’t skip piercing the egg! It’s tempting to skip this step, but it significantly reduces the chances of your eggs cracking during cooking.
- If you can’t find tepin or japone chilies, you can substitute with other dried red chilies, such as arbol chilies, but adjust the quantity according to your desired level of spiciness.
- For a milder flavor, remove the seeds and membranes from the serrano chilies before adding them to the jars.
- If you prefer a sweeter pickle, add a tablespoon of sugar or honey to the vinegar mixture while it is simmering.
- Be patient! The eggs need time to absorb the flavors of the pickling brine. The longer they sit, the better they taste.
Serving & Storage Suggestions
Serve Pierre’s Black Eggs chilled as part of a charcuterie board, antipasto platter, or alongside other pickled vegetables. They are also delicious sliced and added to salads or deviled egg preparations. The striking color makes them a conversation piece at any gathering.
Store the pickled eggs in the refrigerator for up to two months. Once opened, consume within two weeks for the best quality. The eggs should always be submerged in the vinegar mixture. They are not suitable for freezing.
Nutritional Information
| Nutrient | Amount per Serving | % Daily Value |
|---|---|---|
| Calories | 113 kcal | 6% |
| Total Fat | 5.4 g | 7% |
| Saturated Fat | 1.8 g | 9% |
| Cholesterol | 209.2 mg | 70% |
| Sodium | 88.2 mg | 4% |
| Total Carbohydrate | 6.8 g | 3% |
| Dietary Fiber | 0.2 g | 1% |
| Sugars | 5.2 g | – |
| Protein | 7.4 g | 15% |
Note: Nutritional information is an estimate and may vary based on specific ingredients and preparation methods.
Variations & Substitutions
- Spicy Black Eggs: Increase the number of serrano or tepin chilies for a more intense heat. You could also add a pinch of red pepper flakes to the vinegar mixture.
- Sweet and Tangy Black Eggs: Add a tablespoon or two of brown sugar or maple syrup to the vinegar mixture for a sweeter flavor.
- Herb Infused Black Eggs: Add fresh herbs, such as thyme, rosemary, or oregano, to the jars along with the other ingredients.
- Garlic Lovers Black Eggs: Double the amount of garlic cloves for an even more pungent flavor. Consider adding roasted garlic cloves for a sweeter, mellower garlic taste.
FAQs (Frequently Asked Questions)
Q: Why are the eggs black?
A: The balsamic vinegar is responsible for the striking dark color. Over time, the eggs absorb the vinegar, turning them a deep, almost black hue.
Q: How long do the eggs need to pickle before they are ready to eat?
A: While you can eat them after a week, two weeks is ideal for allowing the flavors to fully penetrate the eggs.
Q: Can I use regular vinegar instead of balsamic?
A: You can, but you won’t get the same characteristic color and flavor. Regular vinegar will result in a more traditional pickled egg.
Q: Do I have to use serrano chilies?
A: No, you can use any chili pepper you like, depending on your preference for heat. Jalapeños or even banana peppers are suitable alternatives.
Q: Can I reuse the pickling brine?
A: It’s generally not recommended to reuse pickling brine due to the risk of bacterial contamination. It’s best to discard it after use.
Final Thoughts
Pierre’s Black Eggs are more than just pickled eggs; they’re an experience. The unique flavor profile, combined with their striking appearance, makes them a memorable addition to any culinary adventure. So, gather your ingredients, embrace the pickling process, and prepare to be amazed by the transformation. I encourage you to experiment with the variations and find your own perfect combination of flavors. Don’t be afraid to share your creations and experiences – pickling is a journey best shared!