
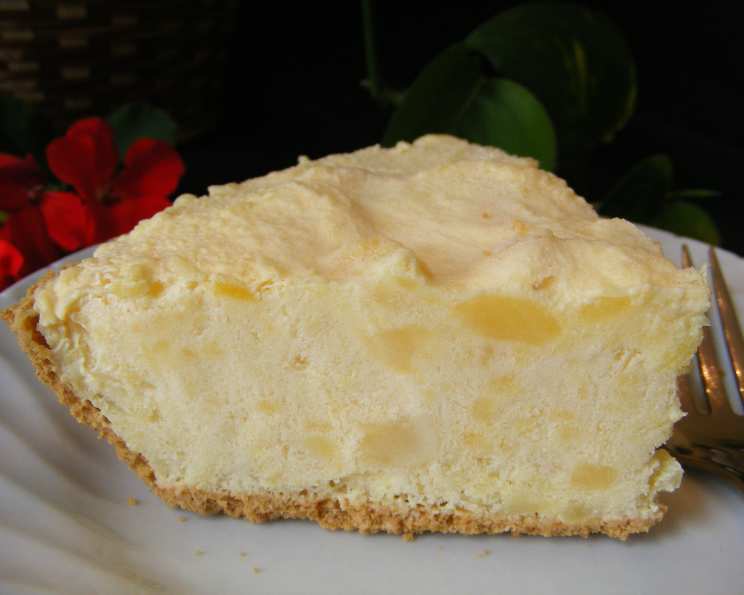
Pineapple Ice Cream Pie: A Taste of Sunshine
I remember my grandmother always having a secret weapon for summer gatherings: a frosty, vibrant pie pulled straight from the freezer. It was always Pineapple Ice Cream Pie, and even now, decades later, the mere thought of its tangy sweetness and creamy coolness transports me back to those sun-drenched afternoons, surrounded by family, laughter, and the sheer joy of uncomplicated deliciousness. It was a dish that brought everyone together, and now, I am thrilled to share this treasured recipe with you.
Recipe Overview
- Prep Time: 20 minutes
- Cook Time: 5 minutes
- Total Time: 6 hours 25 minutes (includes chilling time)
- Servings: 16
- Yield: 2 pies
- Dietary Type: Can be adapted to be Gluten-Free.
Ingredients
- 1 cup sugar
- 1 (17 ounce) can crushed pineapple, undrained
- 2 eggs, well beaten
- 1 (3 ounce) package lemon Jell-O gelatin
- 1 (12 ounce) can evaporated milk
- 2 graham cracker pie crusts
Equipment Needed
- Medium saucepan
- Whisk
- Electric mixer
- 2 Pie plates
- Measuring cups and spoons
Instructions
- In a medium saucepan, combine the sugar, crushed pineapple (undrained), and well-beaten eggs.
- Place the saucepan over medium heat and bring the mixture to a boil. Allow it to boil just long enough to cook the eggs, stirring constantly to prevent scorching. This usually takes about 1-2 minutes. You’ll know the eggs are cooked when the mixture thickens slightly.
- Remove the saucepan from the heat and immediately stir in the lemon Jell-O gelatin. Continue stirring until the gelatin is completely dissolved, ensuring there are no lumps.
- Allow the mixture to cool thoroughly at room temperature. This is a crucial step; otherwise, the hot mixture will melt the evaporated milk in the next step. It usually takes about an hour.
- While the pineapple mixture is cooling, chill the can of evaporated milk in the freezer until it’s just icy. Be careful not to let it freeze solid, as this will affect its ability to whip properly. This step takes approximately 30-45 minutes, depending on your freezer.
- Once the evaporated milk is chilled and the pineapple mixture is cool, use an electric mixer to beat the chilled evaporated milk until it becomes fluffy and forms soft peaks. This should take about 3-5 minutes. If the milk isn’t cold enough, it won’t whip properly.
- Gently fold the whipped evaporated milk into the cooled pineapple mixture. Be careful not to deflate the whipped milk; fold it in gently until just combined.
- Pour the mixture evenly into the 2 graham cracker pie crusts.
- Let the pies cool completely in the refrigerator for at least 6 hours before serving. This allows the gelatin to set and the flavors to meld together. For an even firmer texture, you can freeze the pies until ready to serve.
- If freezing, remove the pie from the freezer about 15-20 minutes before serving to allow it to soften slightly.
Expert Tips & Tricks
- Preventing a Soggy Crust: To prevent the graham cracker crust from becoming soggy, you can brush the bottom of the crust with melted chocolate before pouring in the filling. The chocolate acts as a barrier against the moisture.
- Whipping the Evaporated Milk: Getting the evaporated milk to whip properly is key to a light and airy pie. Make sure it’s thoroughly chilled but not frozen. Also, use a clean, dry bowl and beaters.
- Speeding Up the Cooling Process: To speed up the cooling process of the pineapple mixture, you can place the saucepan in an ice bath, stirring occasionally.
- Enhancing the Flavor: For a more intense pineapple flavor, you can add a teaspoon of pineapple extract to the mixture. You can also add a dash of rum extract or coconut extract for more unique flavor combinations.
- Evenly Distributed Filling: Ensure the filling is evenly distributed between both pie crusts for a consistent final product. Use a measuring cup to ensure the amounts are the same in each crust.
Serving & Storage Suggestions
Serve the Pineapple Ice Cream Pie chilled or partially frozen, straight from the refrigerator or freezer. You can garnish it with a dollop of whipped cream, a sprinkle of toasted coconut, or a few fresh pineapple chunks for an extra touch.
Leftover pie can be stored in the refrigerator for up to 3 days, covered tightly with plastic wrap. If frozen, it can be stored for up to 2 months. Thaw in the refrigerator for several hours before serving. Do not leave the pie at room temperature for more than 2 hours, as it contains dairy and eggs.
Nutritional Information
| Nutrient | Amount per Serving | % Daily Value |
|---|---|---|
| Calories | 435 kcal | |
| Calories from Fat | 139 kcal | |
| Total Fat | 15.5 g | 23% |
| Saturated Fat | 4.4 g | 21% |
| Cholesterol | 52.2 mg | 17% |
| Sodium | 363.4 mg | 15% |
| Total Carbohydrate | 69.9 g | 23% |
| Dietary Fiber | 1.1 g | 4% |
| Sugars | 52.7 g | 210% |
| Protein | 6.4 g | 12% |
Note: Nutritional information is an estimate and can vary based on specific ingredients and serving sizes.
Variations & Substitutions
- Gluten-Free: Use gluten-free graham cracker crusts.
- Dairy-Free: While this recipe relies heavily on dairy from the evaporated milk, it is difficult to create a dairy-free alternative that will whip in the same manner. You can experiment with using chilled coconut cream (the thick part from a can of full-fat coconut milk), but the results may vary.
- Lower Sugar: While the recipe calls for a cup of sugar, you can substitute with Splenda or another sugar substitute, but be aware that it may change the texture and flavor slightly. Consider adding a touch of Stevia if needed.
- Other Gelatin Flavors: Although lemon Jell-O is the most commonly used flavor, you can substitute it with other flavors like pineapple, lime, or orange for a different twist.
- Crustless Pie: For a lighter version, skip the crust altogether and pour the mixture into individual dessert cups or ramekins.
FAQs (Frequently Asked Questions)
Q: Can I use fresh pineapple instead of canned?
A: While you can use fresh pineapple, make sure to cook it well to tenderize it. Canned pineapple is already cooked and softened, making it a more convenient option.
Q: Why is it important to chill the evaporated milk before whipping?
A: Chilling the evaporated milk is crucial because it allows the fat molecules to solidify, which helps the milk whip into a light and fluffy texture.
Q: Can I freeze this pie for longer than 2 months?
A: While it’s safe to freeze the pie for longer, the quality and texture may start to degrade after 2 months.
Q: Can I make this pie without gelatin?
A: Gelatin is essential for setting the pie, so it’s not recommended to make it without. However, you can try using agar-agar, a vegetarian alternative to gelatin, but the results may vary.
Q: How do I prevent the pie from cracking on top?
A: To prevent cracking, avoid overbaking the filling and let the pie cool gradually in the refrigerator before freezing. Quick temperature changes can cause cracks.
Final Thoughts
This Pineapple Ice Cream Pie is a guaranteed crowd-pleaser, perfect for any occasion – from summer barbecues to holiday gatherings. Its simplicity belies its incredible flavor, and the ability to prepare it ahead of time makes it a stress-free dessert option. I encourage you to try this recipe and experience the joy of creating a dish that’s both refreshing and comforting. Don’t hesitate to experiment with different variations and share your creations with family and friends. Maybe serve alongside some grilled chicken or fish for a fresh contrasting meal! I’m confident that this pie will become a cherished family favorite, just as it has been for mine. Happy baking!