
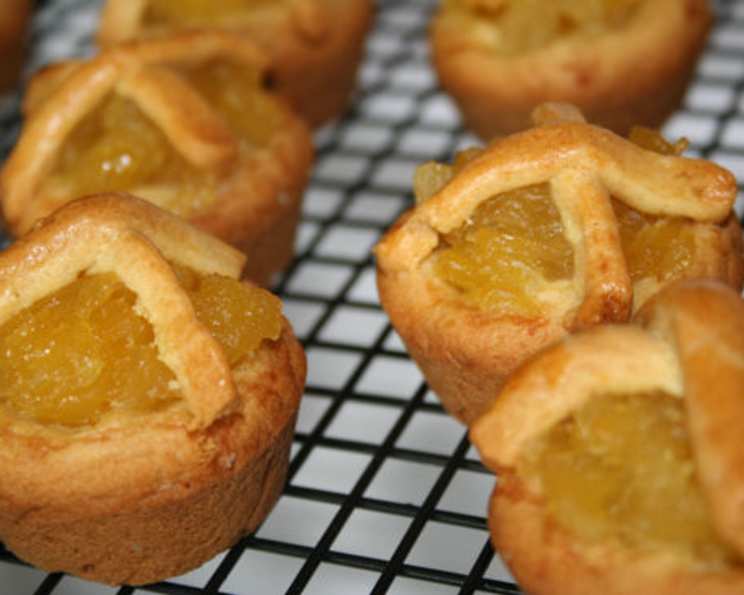
Golden Pineapple Tarts: A Taste of Sunshine
The scent of pineapple tarts always whisks me back to my grandmother’s kitchen, a whirlwind of flour dust and sweet aromas. Her hands, weathered but nimble, would deftly pinch and shape the buttery dough around the tangy pineapple filling. These weren’t just pastries; they were edible sunshine, a symbol of warmth and family that filled every Chinese New Year celebration with joy. I can almost feel the warmth of the oven on my face as I bring that memory to life again with each tart.
Recipe Overview
- Prep Time: 1 hour 30 minutes
- Cook Time: 25 minutes
- Total Time: 1 hour 55 minutes
- Servings: 24
- Yield: 24 mini tarts
- Dietary Type: Not specified in original data
Ingredients
For the Filling:
- 2 (20 ounce) cans crushed pineapple in juice
- 1 (8 ounce) can crushed pineapple in juice
- ¾ cup granulated sugar
- 2 cinnamon sticks
For the Pastry:
- 4 tablespoons cream cheese
- ½ cup unsalted butter, softened
- ½ cup powdered sugar
- 2 eggs
- 1 teaspoon baking soda
- 1 teaspoon vanilla extract
- 2 ½ cups all-purpose flour
- ½ teaspoon salt
For Assembly:
- Cooking spray
- 1 egg yolk
- 2 teaspoons water
Equipment Needed
- Colander
- Large pot
- Mixer
- Mini-muffin tins
- Small bowl
- Pastry brush
Instructions
-
Prepare the Pineapple Filling: Start by thoroughly draining the crushed pineapple. Place it in a colander and press firmly to extract as much juice as possible. This step is crucial to prevent soggy tarts.
-
Cook the Filling: Transfer the drained pineapple to a large pot. Add the granulated sugar and cinnamon sticks.
-
Simmer and Reduce: Cook the mixture over medium-low heat, stirring frequently. Continue to stir for approximately 1 hour, or until the sugar begins to crystallize along the sides of the pot. The filling should be thick and jam-like.
-
Cool the Filling: Remove the cinnamon sticks and allow the pineapple filling to cool completely. This can be done at room temperature or in the refrigerator to speed up the process.
-
Make the Pastry Dough: In a mixer, combine the cream cheese, softened butter, and powdered sugar. Beat at medium-high speed until light and fluffy. This creaming process is essential for a tender crust.
-
Incorporate Wet Ingredients: Add the eggs, baking soda, and vanilla extract to the mixture. Beat until everything is well incorporated.
-
Add Dry Ingredients: Reduce the mixer speed to low. Gradually add the flour and salt, mixing until just combined and a dough begins to form a ball. Avoid overmixing, which can result in a tough crust.
-
Refrigerate the Dough: Wrap the dough in plastic wrap and refrigerate for 30 to 60 minutes. This chilling period allows the gluten to relax, making the dough easier to handle.
-
Preheat the Oven: Preheat your oven to 350°F (180°C).
-
Prepare the Muffin Tins: Lightly spray mini-muffin tins with cooking spray. This will prevent the tarts from sticking and ensure easy removal.
-
Make the Egg Wash: In a small bowl, whisk together the egg yolk and water to create an egg wash. This will give the tarts a beautiful golden-brown color.
-
Assemble the Tarts: Take approximately a 1-inch ball of dough and press it into the bottom and up the sides of each mini-muffin cup.
-
Fill the Tarts: Spoon a small amount of the cooled pineapple filling into each tart shell.
-
Create the Lattice Top (Optional): Roll out the remaining dough thinly and cut it into narrow strips, less than 1/8 inch wide. Arrange the strips over the pineapple filling in a double lattice pattern. Alternatively, you can create a simple crosshatch pattern or leave the tarts open-faced.
-
Brush with Egg Wash: Brush the lattice top (or the entire top of the open-faced tarts) with the egg wash.
-
Bake the Tarts: Bake for 25 minutes, or until the crust is golden brown and the filling is bubbly.
-
Cool and Serve: Remove the tarts from the oven and let them cool in the muffin tins for a few minutes before transferring them to a cooling rack to cool completely.
Expert Tips & Tricks
- Draining the Pineapple: Don’t skip the draining step! Excess moisture will result in soggy tarts. Consider using cheesecloth to squeeze out even more liquid.
- Chilling the Dough: Chilling the dough is essential. It prevents the butter from melting too quickly in the oven, which helps create a flaky crust.
- Even Baking: To ensure even baking, rotate the muffin tins halfway through the baking time.
- Lattice Perfection: For a neat lattice, use a pizza cutter or sharp knife to create even strips. A ruler can also be helpful.
- Freezing for Later: You can freeze unbaked tarts for up to 2 months. Bake directly from frozen, adding a few extra minutes to the baking time.
Serving & Storage Suggestions
Serve these golden pineapple tarts warm or at room temperature. They make a delightful addition to afternoon tea, a festive treat for holidays, or a satisfying dessert any time of the year. Store any leftover tarts in an airtight container at room temperature for up to 3 days, or in the refrigerator for up to a week. While they can be reheated, they are best enjoyed fresh to maintain their crispness.
Nutritional Information
| Nutrient | Amount per Serving | % Daily Value |
|---|---|---|
| Calories | 166.4 kcal | N/A |
| Calories from Fat | 48 g | 29% |
| Total Fat | 5.4 g | 8% |
| Saturated Fat | 3.2 g | 15% |
| Cholesterol | 38.3 mg | 12% |
| Sodium | 115.6 mg | 4% |
| Total Carbohydrate | 27.7 g | 9% |
| Dietary Fiber | 0.8 g | 3% |
| Sugars | 17 g | 67% |
| Protein | 2.4 g | 4% |
Note: Nutritional information is approximate and based on available data.
Variations & Substitutions
- Gluten-Free: Use a gluten-free all-purpose flour blend for the pastry. You may need to add a binder like xanthan gum for better texture.
- Dairy-Free: Substitute the cream cheese and butter with dairy-free alternatives. Look for vegan cream cheese and a high-quality plant-based butter.
- Different Fillings: While pineapple is traditional, experiment with other fruit fillings like mango, strawberry, or even a spiced apple filling for a fall twist.
- Spiced Dough: Add a pinch of ground ginger, cardamom, or cloves to the pastry dough for a warmer, more aromatic flavor.
FAQs (Frequently Asked Questions)
Q: Can I use fresh pineapple instead of canned?
A: Yes, but be sure to cook it down thoroughly to remove excess moisture. Canned pineapple is preferred as it’s already been cooked and is more consistent in texture.
Q: Why is it important to drain the pineapple so well?
A: Excess moisture in the pineapple will make the tarts soggy and prevent the crust from crisping up properly.
Q: Can I make the dough ahead of time?
A: Absolutely! The dough can be made up to 2 days in advance and stored in the refrigerator. Just bring it back to room temperature slightly before rolling it out.
Q: What if my crust cracks while baking?
A: A little cracking is normal, but if it’s excessive, it could be due to overmixing the dough. Try not to overwork the dough next time.
Q: Can I skip the lattice top?
A: Yes, you can leave the tarts open-faced or create a simpler design, such as a small star cut-out on top.
Final Thoughts
These golden pineapple tarts are more than just a sweet treat; they’re a slice of tradition and a reminder of cherished moments. I encourage you to try this recipe and create your own memories in the kitchen. Don’t be afraid to experiment with variations and make it your own! Share your creations and experiences – I can’t wait to hear how your pineapple tarts turn out.