
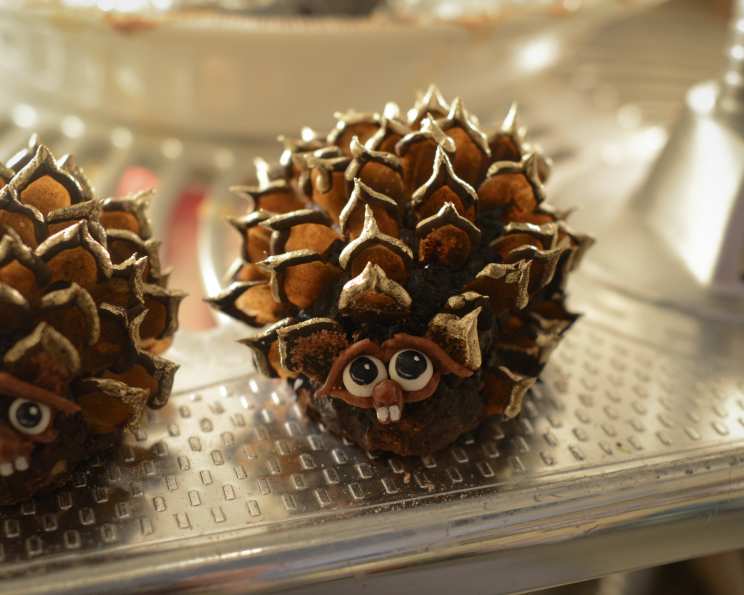
Pinecone Critters: An Edible Woodland Fantasy
The scent of cocoa and toasted almonds always transports me back to my childhood Christmases. My grandmother, a woman of boundless creativity, would transform our kitchen into a wonderland of edible art. Among her most whimsical creations were these Pinecone Critters—brownie “pinecones” adorned with almond scales and charming little faces. They weren’t just desserts; they were tiny edible sculptures, each with its unique personality, sparking joy in every bite. Making these now brings back those feelings.
Recipe Overview:
- Prep Time: 4 hours
- Cook Time: 30 minutes
- Total Time: 5 hours 40 minutes
- Yields: 8 critters
- Dietary Type: Not specified
Ingredients:
- 10 tablespoons unsalted butter
- 1 ½ cups sugar
- ½ cup brown sugar
- ¾ cup plus unsweetened cocoa powder
- ¼ teaspoon salt
- 2 cold large eggs
- ½ cup all-purpose flour
- 1 cup almonds, diced and toasted
ADDITIONAL TOOLS
- Toasted blanched slivered almonds
- Melted chocolate chips, to adhere almond slivers and brownies
- Brown edible spray on paint food coloring
- White modeling chocolate
- Royal icing, for pinecones tips and facial expressions
- Edible gold, black, and white powder paints food coloring
- Unflavored vodka to be used with powder paint to apply faces and accents
Equipment Needed:
- Medium saucepan
- 10×10 inch baking sheet
- Parchment paper
- Sharp knife
- Fine brush
- Piping bag (optional)
Instructions:
-
Begin by toasting the diced almonds and salt. Preheat your oven to 400 degrees Fahrenheit. Spread the almonds and salt on a baking sheet and toast for approximately 5 minutes, keeping a close watch to prevent burning. The goal is a light golden color and a fragrant aroma. Remove from oven and set aside.
-
Next, prepare the brownie batter. Preheat your oven to 325 degrees Fahrenheit. Line a 10×10 inch baking sheet with parchment paper, leaving an overhang on the sides for easy removal. Lightly butter the parchment paper; this prevents the brownies from sticking and aids in clean removal.
-
In a medium saucepan over medium heat, melt the butter. Add both the granulated sugar and brown sugar, stirring constantly to prevent scorching. Once the sugars are incorporated, add the cocoa powder and continue mixing until the mixture turns a deep, rich brown color. Be cautious not to overheat, as this can make the brownies dry. Turn off the heat.
-
Remove the saucepan from the heat and let it cool slightly for a minute or two. Then, add the vanilla extract and the cold large eggs, one at a time, mixing well after each addition. It is important to use cold eggs because the warmth will cook the eggs before baking, this will affect the final texture of your brownie.
-
Incorporate the dry ingredients. Gradually add the all-purpose flour to the wet ingredients, mixing until just combined. Be careful not to overmix, as this can develop the gluten in the flour and result in tough brownies.
-
Gently fold in the toasted almonds to the brownie batter, ensuring they are evenly distributed throughout.
-
Pour the brownie batter into the prepared 10×10 inch baking sheet and spread it evenly using a spatula or spoon.
-
Bake in the preheated oven for 25 minutes. To check for doneness, insert a toothpick into the center of the brownies. If it comes out with moist crumbs attached, the brownies are done. The top should appear slightly shiny and set.
-
Remove the brownies from the oven and let them cool completely in the baking sheet. Once cooled, cover the baking sheet with plastic wrap and refrigerate until firm, about 2-3 hours or overnight. Chilling is crucial for easy cutting and shaping.
-
Once the brownies are thoroughly chilled, remove them from the baking sheet using the parchment paper overhang. Cut the brownies into 2×2.5 inch squares.
-
To assemble the “pinecones,” stack two brownie squares on top of each other, using a small amount of melted chocolate chips as “glue” to adhere them together. You should end up with 8 double-layered brownie stacks.
-
Using a sharp knife, carefully trim the edges of each brownie stack to create an egg-like shape, mimicking the form of a pinecone.
-
With the same knife, make small, shallow slices into the top surface of each brownie, all going in the same direction. These slices will serve as guides for inserting the almond slivers.
-
Prepare the almond scales. Dip the pointed end of each toasted blanched slivered almond into the melted chocolate chips and then insert it into one of the pre-cut slices on the brownie. Repeat this process, working row by row, until the entire surface of the brownie is covered with almond slivers, resembling the scales of a pinecone.
-
Add a touch of realism with royal icing. Using a piping bag fitted with a small round tip (or a makeshift piping bag made from a plastic bag with a small hole cut in the corner), pipe a thin line of royal icing along the top edges of the pine cones to mimic the snow-covered tips.
-
Enhance the color and texture. Using brown edible spray on paint food coloring, lightly spray the assembled pinecones to enhance their color and add a more realistic, weathered look.
-
Bring the critters to life with white modeling chocolate. Shape small pieces of modeling chocolate into eyes and adhere them to the front of each pinecone using a dab of melted chocolate.
-
Create the facial details. Mix edible black and white powder paints with a drop or two of unflavored vodka to create a thin, paintable consistency. Using a fine brush, carefully paint pupils and highlights onto the modeling chocolate eyes to give each pinecone critter a unique expression. Consider adding rosy cheeks or a tiny smile for extra charm.
-
For a final touch of elegance, lightly dust the ridges of the pinecones with edible gold powder paint, using a dry brush. This will add a subtle shimmer and highlight the texture of the almond scales.
Expert Tips & Tricks:
- Toast almonds carefully: Watch the almonds closely while toasting, as they can burn quickly. A light golden color is ideal.
- Chill brownies thoroughly: Chilling the brownies completely before cutting and shaping is crucial for clean cuts and prevents them from crumbling.
- Melt chocolate chips in small batches: Melt only a small amount of chocolate chips at a time to prevent it from hardening before you can use it.
- Use a sharp knife: A sharp knife will make it easier to cut and shape the brownies without tearing them.
- Customize the faces: Get creative with the facial expressions of your pinecone critters! Use different colors of edible paint and modeling chocolate to create unique characters.
- Make ahead: The brownie base can be made a day or two in advance and stored in the refrigerator. Assemble the pinecone critters closer to serving time.
- Troubleshooting royal icing: If your royal icing is too thick, add a drop of water at a time until it reaches the desired consistency. If it’s too thin, add a small amount of powdered sugar.
Serving & Storage Suggestions:
Serve your Pinecone Critters as a whimsical dessert for parties, holidays, or any special occasion. Arrange them on a platter lined with parchment paper or festive napkins. Store leftover Pinecone Critters in an airtight container at room temperature for up to 3 days, or in the refrigerator for up to a week. The almond scales may soften slightly during refrigeration. They can be made ahead of time and stored in the freezer for up to a month.
Nutritional Information:
| Nutrient | Amount per Serving | % Daily Value |
|---|---|---|
| Calories | 492 kcal | N/A |
| Calories from Fat | 231 g | 47% |
| Total Fat | 25.8 g | 39% |
| Saturated Fat | 10.9 g | 54% |
| Cholesterol | 84.7 mg | 28% |
| Sodium | 156.9 mg | 6% |
| Total Carbohydrate | 65.4 g | 21% |
| Dietary Fiber | 4.8 g | 19% |
| Sugars | 51.8 g | 207% |
| Protein | 7.8 g | 15% |
Variations & Substitutions:
- Gluten-Free: Substitute the all-purpose flour with a gluten-free flour blend for a gluten-free version. Be sure to check the other ingredients to ensure they are also gluten-free.
- Dairy-Free: Use a dairy-free butter substitute and dairy-free chocolate chips to make this recipe dairy-free.
- Nut-Free: Replace the almonds with sunflower seeds or pumpkin seeds for a nut-free alternative. Ensure all chocolate used is processed in a nut-free facility.
- Flavor Variations: Experiment with different extracts, such as peppermint or orange, to add a unique flavor to the brownies.
- Seasonal Adaptations: Decorate the pinecones with edible glitter or colored sprinkles for a festive touch. Add a dusting of powdered sugar to mimic snow.
FAQs (Frequently Asked Questions):
Q: Why are my brownies dry?
A: Overbaking or using too much flour can result in dry brownies. Be sure to measure the flour accurately and check for doneness by inserting a toothpick into the center. If the toothpick comes out with moist crumbs, the brownies are done.
Q: Can I use a different type of nut?
A: Yes, you can substitute the almonds with other nuts such as walnuts, pecans, or hazelnuts. Just be sure to toast them before adding them to the batter.
Q: How do I prevent the chocolate from seizing when melting?
A: Melt the chocolate chips gently over low heat or in the microwave in short intervals, stirring in between. Avoid adding any water or liquid to the chocolate, as this can cause it to seize.
Q: Can I make the modeling chocolate eyes ahead of time?
A: Yes, you can make the modeling chocolate eyes ahead of time and store them in an airtight container at room temperature until ready to use.
Q: What is the best way to adhere the almond slivers to the brownies?
A: Using melted chocolate chips as “glue” works well. Make sure the chocolate is not too hot, as this can melt the brownie. Dip the pointed end of each almond sliver into the melted chocolate and then press it firmly into the brownie.
Final Thoughts:
I hope these Pinecone Critters bring as much joy to your kitchen as they did to mine growing up. Don’t be afraid to get creative with the decorations and let your imagination run wild. These little edible sculptures are a labor of love, but the smiles they bring are worth every minute. Give this recipe a try, share your creations, and let me know what you think! Perhaps pair them with a warm cup of spiced cider or a scoop of vanilla ice cream for a truly enchanting dessert experience.