
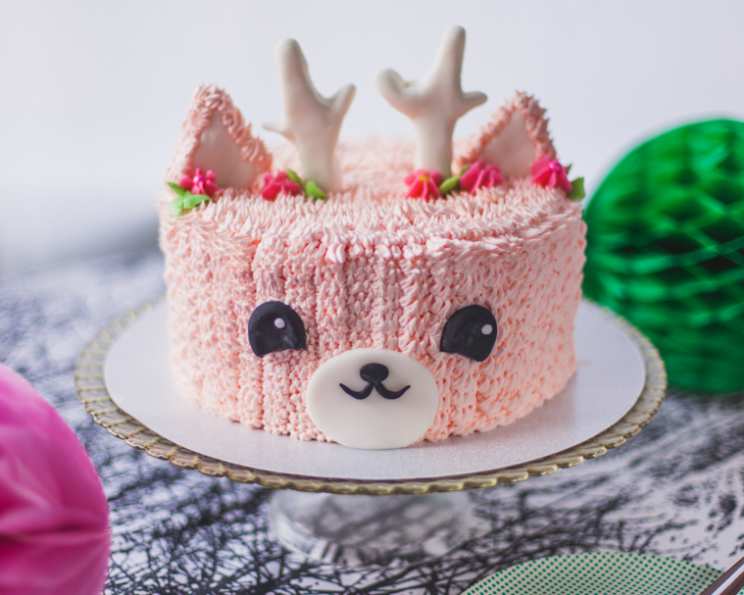
Pink Reindeer Cake: A Whimsical Holiday Delight
I remember one Christmas Eve, many years ago, watching a snowstorm swirl outside our kitchen window as my grandmother meticulously decorated a cake. It wasn’t a reindeer cake, but the way she layered the frosting, with such care and a touch of magic, made me believe anything was possible. The kitchen filled with the warm, comforting scent of peppermint, and I knew, even then, that baking was more than just following a recipe; it was about creating memories. This Pink Reindeer Cake, with its playful design and delicious flavors, aims to capture that very spirit—a touch of whimsy, a whole lot of love, and the joy of sharing something special.
Recipe Overview
- Prep Time: 1 hour
- Cook Time: 35 minutes
- Total Time: 1 hour 40 minutes
- Yields: 1 cake
- Dietary Type: Not Gluten-Free
Ingredients
For the Chocolate Cake:
- 1 3⁄4 cups all-purpose flour, plus more for pans
- 2 cups sugar
- 1 cup Dutch-processed cocoa powder
- 2 teaspoons baking soda
- 1 teaspoon baking powder
- 1 teaspoon kosher salt
- 1 cup buttermilk, shaken
- 1⁄2 cup vegetable oil
- 2 large eggs, at room temperature
- 1 teaspoon pure vanilla extract
- 1 cup freshly brewed hot coffee (I used two shots of espresso topped up with hot water equal to 1 cup)
For the Pink Peppermint Buttercream:
- 2 1⁄2 cups unsalted butter, at room temperature
- 6 cups icing sugar
- 1 1⁄2 teaspoons peppermint extract
- 1⁄8 teaspoon pink food coloring, gel
For Decoration:
- Commercial store-bought fondant (white and black)
- Wooden skewers
- Green food coloring, gel
- Sprinkles (optional)
Equipment Needed
- Three 8 x 2 inch round cake pans
- Vegetable oil spray
- Parchment paper circles
- Electric mixer (stand or hand-held)
- Rubber spatula
- Cooling rack
- Cake board or cake plate
- Offset spatula
- Cake bench scraper (optional)
- Large 18 inch piping bag
- Large multi-opening grass tip (e.g., Wilton #234)
- Circular cookie cutter or glass (for fondant face)
- Small piping bags
- Open star piping tip
- Leaf piping tip
Instructions
-
Preheat your oven to 350 degrees Fahrenheit (175 degrees Celsius). Prepare three 8 x 2 inch round cake pans by spritzing them with vegetable oil and lining the bottoms with parchment paper circles. This ensures easy release after baking.
-
In the bowl of an electric mixer fitted with a paddle attachment, sift together the flour, sugar, cocoa, baking soda, baking powder, and salt. Mix on low speed until everything is fully combined. Sifting eliminates lumps and ensures a lighter cake.
-
In a separate bowl, combine the buttermilk, oil, eggs, and vanilla extract. Whisk until the mixture is uniform.
-
With the mixer on low speed, slowly add the wet ingredients to the dry ingredients. Once combined, with the mixer still on low, add the hot coffee and stir just to combine. Scrape the bottom of the bowl with a rubber spatula to ensure no dry ingredients remain unincorporated. The hot coffee enhances the chocolate flavor and helps to create a moist cake.
-
Pour the batter evenly into the prepared pans. Bake for 35 to 40 minutes, or until a cake tester (toothpick or skewer) inserted into the center comes out clean. If the tops start to brown too quickly, loosely tent the pans with foil.
-
Cool the cakes in the pans for 30 minutes. Then, turn them out onto a cooling rack and cool completely before frosting. Cooling completely prevents the frosting from melting.
-
To make the Pink Peppermint Buttercream, cover the bowl of your stand mixer with the ingredients inside with a damp tea towel. In the bowl of a stand mixer, beat the butter, icing sugar, and peppermint extract until light and fluffy, about two minutes. Start on low speed to prevent a sugar cloud, then increase the speed.
-
Remove and reserve an 1/8 cup of buttercream to tint green for piped leaves later on. Tint the rest of the buttercream with the pink gel food coloring. Beat the color into the buttercream until you achieve your desired shade of pink, about twenty seconds.
-
Now it’s time to frost and layer your cakes. Add a small dollop of buttercream to a cake board or cake plate. Place the first cake layer on top, pressing gently to adhere. Using an offset spatula, apply a generous layer of buttercream to the top of the layer. Place the second layer on top of the first. Add another layer of buttercream. Finally, place the third layer on top and press gently to adhere.
-
Frost the entire exterior of the cake, using a cake bench scraper or offset spatula to smooth it. This is called a crumb coat, and it seals in any loose crumbs. You can chill the cake for 15-20 minutes at this stage to firm up the crumb coat.
-
Fill a large 18 inch piping bag with a large multi-opening grass tip, such as Wilton #234, with the remainder of the pink peppermint buttercream.
-
Begin piping lines of “fur” on the outside of the cake. Hold the piping bag at a 90 degree angle against the cake and squeeze the piping bag and pull away, creating a short “spurt” of fur. Cover the entire cake with fur. Practice the piping method first on a plate or piece of parchment paper, then move to the cake once you feel comfortable. Consistency is key!
-
Make the fondant pieces: using commercial store-bought fondant, with clean and completely dry hands, mold the antler pieces and the triangular ears. Place wooden skewers cut to size into the bottoms of the antlers and ears and set aside to firm up. The skewers provide stability when inserting them into the cake.
-
Make the face – roll fondant to ¼ inch thick, then using a circular cookie cutter or glass, punch out a circle shape and gently coax it into an oval shape using your fingers. Set aside. Using black fondant, make a nose and a smiley face. Make the eyes by rolling a 1 inch piece into a ball, flattening it gently and cutting off the bottom to curve it.
-
Use a very tiny amount of water to stick the black nose and smile to the white face piece. Let dry.
-
Apply the fondant to the cake! Decide what the front of your cake will be. Then, gently press the face piece and eyes into the buttercream to create the face. Place the ears and antlers into the top. Pipe fur around the ears to blend them in seamlessly.
-
Optional: add drop stars, sprinkles and piped leaves! Add a little remaining pink buttercream into a small bowl and add a few more drops of pink gel color to darken. Place into a piping bag fitted with an open star tip.
-
Color the reserved buttercream with a little green gel color for leaves. Place the green buttercream into a piping bag fitted with a leaf piping tip.
-
Pipe drop stars and leaves along the antlers and ears, adding a few sprinkles here and there for color and festive sparkle!
Expert Tips & Tricks
- Room Temperature Ingredients: Ensure that your butter and eggs are at room temperature. This helps them emulsify properly, resulting in a smoother batter and buttercream.
- Hot Coffee Secret: Don’t skip the hot coffee in the cake batter! It deepens the chocolate flavor without making the cake taste like coffee.
- Piping Practice: If you’re new to piping, practice your fur technique on a plate before applying it to the cake. This will help you achieve a consistent and professional look.
- Fondant Firming: Allow the fondant antlers and ears to firm up completely before inserting them into the cake. This will prevent them from drooping or breaking. You can even make them a day ahead.
- Cake Leveling: To ensure your cake layers are perfectly even, use a serrated knife to trim any domes from the tops of the baked cakes before frosting.
Serving & Storage Suggestions
Serve this Pink Reindeer Cake chilled or at room temperature. It’s best enjoyed within 2-3 days of baking. Store leftover cake in an airtight container in the refrigerator for up to 5 days. For longer storage, you can freeze the cake (unfrosted or frosted) for up to 2 months. Thaw overnight in the refrigerator before serving. Before serving a refrigerated cake, let it sit at room temperature for about 30 minutes to soften the buttercream.
Nutritional Information
| Nutrient | Amount per Serving | % Daily Value |
|---|---|---|
| Calories | 887 kcal | 44% |
| Total Fat | 49.6 g | 76% |
| Saturated Fat | 26.5 g | 133% |
| Cholesterol | 133.5 mg | 45% |
| Sodium | 476 mg | 20% |
| Total Carbohydrate | 112.5 g | 38% |
| Dietary Fiber | 2.9 g | 12% |
| Sugars | 93.3 g | N/A |
| Protein | 5.4 g | 11% |
Note: Nutritional information is an estimate and may vary based on specific ingredients and portion sizes.
Variations & Substitutions
- Gluten-Free: Substitute the all-purpose flour with a gluten-free blend designed for baking. Be sure to add a binding agent like xanthan gum if the blend doesn’t already include it.
- Dairy-Free: Replace the buttermilk with a non-dairy alternative like almond milk or soy milk, adding a tablespoon of lemon juice or vinegar to curdle it. Use a dairy-free butter alternative for the buttercream.
- Different Flavors: Experiment with different extracts in the buttercream, such as vanilla, almond, or raspberry.
- Cake Flavor Swaps: Consider using a vanilla or red velvet cake as an alternative base for the pink reindeer.
- Seasonal Adaptations: For a fall-themed reindeer, use warm spices like cinnamon and nutmeg in the cake batter and replace the peppermint extract with maple extract in the buttercream.
FAQs (Frequently Asked Questions)
Q: Can I make the cake layers ahead of time?
A: Absolutely! Bake the cake layers a day or two in advance, wrap them tightly in plastic wrap, and store them at room temperature or in the refrigerator. This can save you time on the day you plan to decorate the cake.
Q: How do I prevent the cake from drying out?
A: Make sure not to overbake the cake. Check for doneness using a cake tester, and remove the cake from the oven as soon as the tester comes out clean. You can also brush the cooled cake layers with simple syrup for extra moisture.
Q: Can I use pre-made frosting instead of making my own buttercream?
A: While homemade buttercream is always best, you can use store-bought frosting in a pinch. Look for a high-quality brand and add peppermint extract and pink food coloring to customize it.
Q: What if my fondant is too sticky?
A: If your fondant is too sticky, knead in a small amount of cornstarch or powdered sugar until it reaches a workable consistency.
Q: How do I get the “fur” to look even all around the cake?
A: Practice makes perfect! Start by piping a test strip on a piece of parchment paper to get a feel for the pressure and motion required. Use consistent pressure and a steady hand as you pipe around the cake.
Final Thoughts
This Pink Reindeer Cake is more than just a dessert; it’s a centerpiece, a conversation starter, and a symbol of holiday cheer. Don’t be intimidated by the slightly involved decorating process—embrace the fun of creating something unique and whimsical. Whether you’re an experienced baker or just starting out, this recipe offers a chance to express your creativity and share a delicious, joyful treat with your loved ones. So, gather your ingredients, put on some festive music, and get ready to spread some holiday magic, one delicious bite at a time. And please, share your creations with me! I’d love to see your unique takes on this charming reindeer cake.