
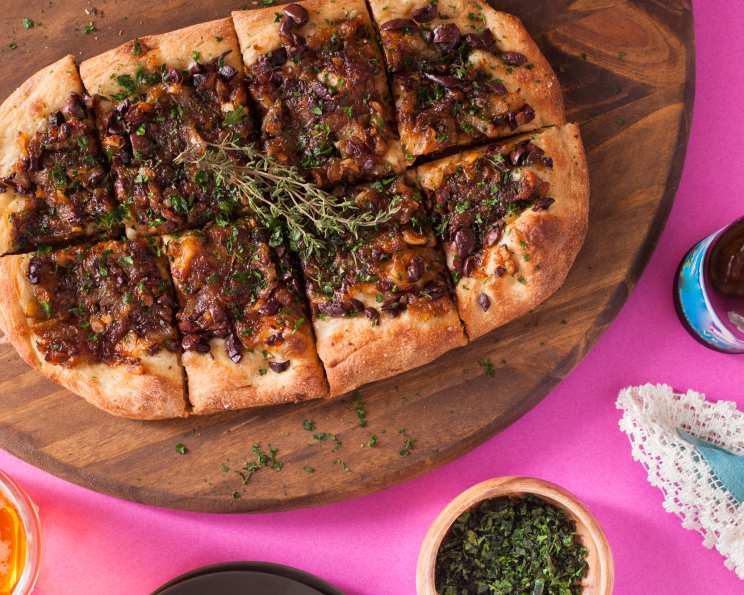
Pissaladiere: A Taste of the French Riviera in Your Kitchen
The first time I tasted Pissaladiere, I was wandering through a sun-drenched market in Nice. The air was thick with the scent of herbs, olives, and freshly baked bread. I spotted a rustic tart, its surface glistening with caramelized onions and dotted with salty anchovies and briny olives. One bite and I was transported. The sweetness of the onions, the salty tang of the anchovies, the earthy olives, all resting on a crisp, golden crust – it was a symphony of flavors that sang of the Mediterranean. Now, I’m thrilled to share this beloved recipe, so you can create a little piece of the Riviera in your own kitchen.
Recipe Overview
- Prep Time: 30 minutes
- Cook Time: 40 minutes
- Total Time: 1 hour 10 minutes (+ 1 to 1.5 hours for dough to rise)
- Servings: 16 pieces (2 tarts)
- Yield: 2 tarts
- Dietary Type: Varies (see notes in ingredients)
Ingredients
Dough
- 2 cups bread flour, plus extra for dusting work surface
- 1 teaspoon instant yeast
- 1 teaspoon table salt
- 1 tablespoon olive oil, plus additional oil for brushing dough and greasing hands
- 1 cup warm water (about 110°F)
Onions
- 2 tablespoons olive oil
- 2 lbs yellow onions, sliced 1/4 inch thick
- 4 garlic cloves
- 1⁄2 teaspoon table salt
- 1 teaspoon brown sugar
- 2 teaspoons balsamic vinegar
- 1 tablespoon water
Toppings
- 1⁄2 teaspoon ground black pepper
- 1⁄2 cup Nicoise olives, pitted, chopped coarse
- 8 anchovy fillets, rinsed, patted dry, chopped coarse
- 2 teaspoons fresh thyme leaves, minced
- 1 tablespoon marjoram leaves, minced (optional)
- 1 teaspoon fennel seed (optional)
- 1 tablespoon fresh parsley leaves, minced (optional)
Equipment Needed
- Food processor
- 12-inch nonstick skillet
- 1-quart measuring cup or small bowl
- Dough scraper
- Baking stone
- Pizza peel or inverted rimless baking sheet
- Parchment paper
Instructions
-
Prepare the dough: In the workbowl of a food processor fitted with the plastic dough blade (you can use the metal blade if necessary), pulse the flour, yeast, and salt to combine, about five 1-second pulses. With the machine running, slowly add the olive oil, then the warm water, through the feed tube. Continue to process until the dough forms a ball, about 15 seconds.
-
Knead the dough: Generously dust a work surface with flour. Using floured hands, transfer the dough to the work surface and knead lightly, shaping the dough into a ball.
-
Let the dough rise: Lightly oil a 1-quart measuring cup or small bowl. Place the dough in the measuring cup, cover tightly with plastic wrap, and set aside in a draft-free spot until doubled in volume, 1 to 1 1/2 hours. For a longer rise, use 1/2 teaspoon of instant yeast and refrigerate for 16-24 hours.
-
Caramelize the onions: While the dough is rising, heat the olive oil in a 12-inch nonstick skillet over high heat until shimmering but not smoking. Stir in the onions, garlic, salt, and brown sugar and cook, stirring frequently, until the moisture released by the onions has evaporated and the onions begin to brown, about 10 minutes.
-
Continue cooking the onions: Reduce the heat to medium-low and cook, stirring frequently. After 15 minutes, remove the garlic cloves, mince them, and then return them to the pan, along with the balsamic vinegar. Stir and continue cooking for 5 more minutes, until the onions have softened and are medium to golden brown.
-
Deglaze the pan: Off the heat, stir in the water. Transfer the caramelized onions to a bowl and set aside. This can be done a day ahead and refrigerated.
-
Preheat the oven: When the dough has doubled, adjust the oven rack to the lowest position, set a baking stone on the rack, and heat the oven to 500°F. Make sure the baking stone is thoroughly heated for the best crust.
-
Divide the dough: Remove the dough from the measuring cup and divide it into 2 equal pieces using a dough scraper.
-
Shape the dough balls: Working with one piece at a time, form each piece into a rough ball by gently pulling the edges of the dough together and pinching to seal. With floured hands, turn the dough ball seam-side down. Cupping the dough with both hands, gently push the dough in a circular motion to form a taut ball. Repeat with the second piece.
-
Rest the dough: Brush each ball lightly with olive oil, cover with plastic wrap, and let rest for 10 minutes. Meanwhile, cut two 20-inch lengths of parchment paper and set aside.
-
Stretch the dough: Coat the fingers and palms of your hands generously with olive oil. Using a dough scraper, loosen 1 piece of dough from the work surface. With well-oiled hands, hold the dough aloft and gently stretch it to a 12-inch length (like a very large breadstick). Place on a parchment sheet and gently dimple the surface of the dough with your fingertips. Using oiled palms, push and flatten the dough into a 14×8 inch oval.
-
Add the toppings: Brush the dough with olive oil and sprinkle with 1/4 teaspoon of pepper. Leaving a 1/2-inch border around the edge, sprinkle 1/4 cup of the olives, 1 tablespoon of the chopped anchovies, and 1 teaspoon of thyme evenly over the dough, then evenly scatter with half of the caramelized onions. Sprinkle with fennel seeds and marjoram, if using.
-
Bake the first tart: Slip the parchment with the tart onto a pizza peel (or inverted rimless baking sheet), then slide it onto the hot baking stone. Bake until deep golden brown, 13 to 15 minutes.
-
Prepare the second tart: While the first tart is baking, shape and top the second tart.
-
Cool and serve: Remove the tart from the oven with the peel or pull the parchment onto a baking sheet; transfer the tart to a cutting board and slide the parchment out from under the tart. Cool for 5 minutes; sprinkle with 1 1/2 teaspoons of parsley, if using. Cut the tart in half lengthwise, then cut crosswise to form 8 pieces; serve immediately. While the first tart cools, bake the second tart.
Expert Tips & Tricks
- Slow and Low for Onions: Patience is key for perfectly caramelized onions. Don’t rush the process. The low heat allows the natural sugars in the onions to develop, creating a deep, rich flavor.
- Salt Your Onions Early: Adding salt at the beginning of the caramelization process helps to draw out moisture from the onions, speeding up the process and enhancing their flavor.
- Don’t Overcrowd the Pan: If you don’t have a large enough skillet, caramelize the onions in batches. Overcrowding the pan will steam the onions instead of caramelizing them.
- Anchovy Prep: Rinsing the anchovies removes excess salt, preventing them from overpowering the other flavors. Patting them dry ensures they crisp up nicely in the oven.
- Hot Stone is Crucial: A preheated baking stone is essential for achieving a crispy crust. Allow at least 30 minutes for the stone to heat up properly.
Serving & Storage Suggestions
Serve Pissaladiere warm or at room temperature. It’s delicious as an appetizer, a light lunch, or a snack.
- Serving: Garnish with a sprinkle of fresh parsley or thyme for a pop of color and freshness. A simple green salad complements the richness of the tart.
- Storage: Leftover Pissaladiere can be stored in an airtight container in the refrigerator for up to 2 days.
- Reheating: Reheat in a 350°F oven for 5-10 minutes, or until warmed through. You can also reheat individual slices in a skillet over medium heat.
Nutritional Information
| Nutrient | Amount per Serving | % Daily Value |
|---|---|---|
| Calories | 880.3 kcal | N/A |
| Calories from Fat | 213 g | 24% |
| Total Fat | 23.7 g | 36% |
| Saturated Fat | 3.6 g | 17% |
| Cholesterol | 13.6 mg | 4% |
| Sodium | 2359.9 mg | 98% |
| Total Carbohydrate | 144.3 g | 48% |
| Dietary Fiber | 12 g | 48% |
| Sugars | 22.7 g | N/A |
| Protein | 23.9 g | 47% |
Note: Nutritional information is an estimate and may vary based on specific ingredients and portion sizes.
Variations & Substitutions
- Vegan Pissaladiere: Omit the anchovies or substitute with marinated artichoke hearts or sun-dried tomatoes for a similar salty, savory flavor. Use a plant-based dough recipe.
- Gluten-Free Crust: Use a gluten-free bread flour blend for the crust. You may need to adjust the amount of liquid.
- Cheese Addition: A sprinkle of grated Parmesan or Gruyère cheese during the last few minutes of baking adds a delicious nutty flavor (not traditional, but tasty!).
- Seasonal Onions: While yellow onions are classic, try using a mix of red and yellow onions for a sweeter, more complex flavor.
- Herb Variations: Experiment with different herbs, such as rosemary or oregano, in addition to or instead of thyme and marjoram.
FAQs (Frequently Asked Questions)
Q: Can I make the dough ahead of time?
A: Yes, you can prepare the dough a day in advance. After the first rise, punch down the dough, wrap it tightly in plastic wrap, and refrigerate. Let it come to room temperature for about 30 minutes before shaping and baking.
Q: Can I freeze Pissaladiere?
A: Yes, you can freeze baked Pissaladiere. Let it cool completely, then wrap it tightly in plastic wrap and foil. Freeze for up to 2 months. Reheat in a 350°F oven until warmed through.
Q: What if I don’t have a baking stone?
A: If you don’t have a baking stone, you can use a baking sheet. Preheat the baking sheet in the oven before placing the Pissaladiere on it. The crust may not be quite as crispy, but it will still be delicious.
Q: Can I use different types of olives?
A: While Nicoise olives are traditional, you can use other types of olives, such as Kalamata or Castelvetrano, if you prefer. Just be sure to pit them and chop them coarsely.
Q: Is it necessary to rinse the anchovies?
A: Rinsing the anchovies is recommended to remove excess salt, which can overpower the other flavors. However, if you prefer a saltier taste, you can skip this step.
Final Thoughts
Pissaladiere is more than just a tart; it’s a celebration of Mediterranean flavors. The sweet onions, salty anchovies, and briny olives create a harmonious blend that’s both comforting and exciting. Don’t be intimidated by the process – it’s easier than you think! So, gather your ingredients, preheat your oven, and prepare to transport yourself to the sun-kissed shores of the French Riviera. I encourage you to try this recipe and experience the magic of Pissaladiere for yourself. Share your creations, and let me know what you think! Pair it with a crisp glass of rosé for the ultimate taste of Provence.