
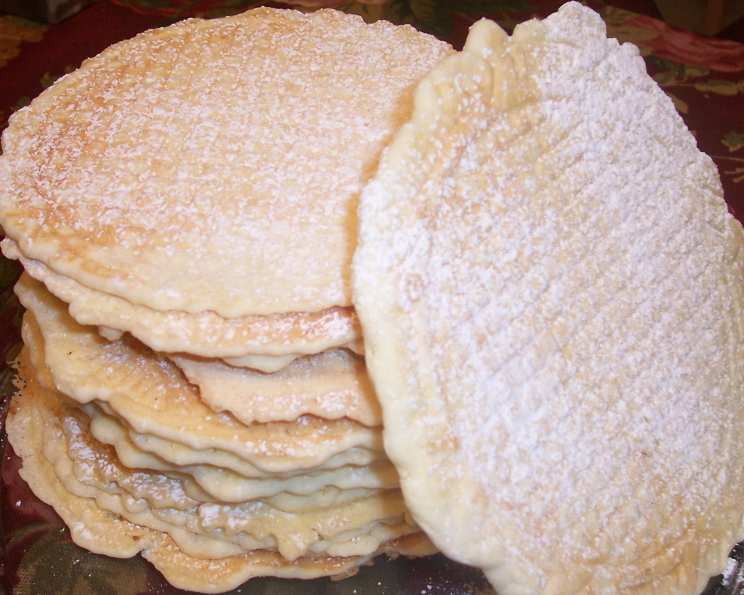
Pizelles: A Taste of Italian Tradition
The first time I tasted a pizelle, I was transported. It wasn’t just the delicate crunch or the subtle sweetness, but the waft of anise that filled the air. My grandmother, Nonna Emilia, had carefully laid out a stack of these golden, snowflake-like cookies on a lace doily. The aroma mingled with the scent of her lavender soap and the ever-present pot of espresso simmering on the stove. As I bit into the crisp cookie, I felt an instant connection to my heritage, a sweet link to generations past. Those simple, elegant cookies whispered stories of family gatherings, shared laughter, and the comforting embrace of home.
Recipe Overview
- Prep Time: 15 minutes
- Cook Time: 25 minutes
- Total Time: 40 minutes
- Servings: Varies (approximately 60 pizelles, depending on iron size)
- Yield: About 60 cookies
- Dietary Type: Not specified (can be adapted to dairy-free by using a dairy-free margarine)
Ingredients
- 6 large eggs, beaten
- 2 cups granulated sugar
- 1/2 cup margarine, melted (not butter, for authentic flavor)
- 1/2 cup canola oil
- 1 teaspoon vanilla extract, to taste
- 1 teaspoon almond extract, to taste (optional)
- 3 tablespoons anise extract (one whole 1 ounce bottle)
- 4 cups all-purpose white flour
- 4 teaspoons baking powder
- Powdered sugar, to dust cookies (optional)
Equipment Needed
- Pizelle iron
- Mixing bowls
- Measuring cups and spoons
- Whisk
- Cooling rack
- Tongs
Instructions
-
Begin by preparing your pizelle iron according to the manufacturer’s instructions. This usually involves preheating the iron to the correct temperature. A light coating of non-stick spray is a good idea, even if your iron is non-stick.
-
In a large mixing bowl, thoroughly beat the eggs until they are light and frothy. This is best done with a whisk for a lighter texture, but an electric mixer can speed up the process.
-
Gradually add the granulated sugar to the beaten eggs, continuing to beat until the mixture is well combined and slightly thickened.
-
Gently blend in the melted margarine. Ensure that the margarine has cooled slightly so that it doesn’t cook the eggs. A temperature that is warm to the touch is sufficient.
-
Add the canola oil to the mixture and stir until well incorporated.
-
Now, it’s time to add the extracts. Stir in the vanilla extract, the optional almond extract (if using), and the anise extract. The anise is a defining flavor of pizelles, so don’t skimp on it!
-
In a separate bowl, whisk together the all-purpose flour and baking powder. This ensures that the baking powder is evenly distributed throughout the flour, resulting in a lighter, more consistent cookie.
-
Gradually add the flour mixture to the wet ingredients, about 1 cup at a time, mixing slowly and thoroughly after each addition. This prevents lumps from forming and ensures a smooth batter. The batter will be quite thick, similar to pancake batter.
-
Once your pizelle iron is heated, carefully pour small ladlefuls of batter onto the iron. The amount of batter will depend on the size of your iron, so start with a small amount and adjust as needed. You want the batter to spread evenly across the patterned surface without overflowing.
-
Cook the pizelles for just 30 seconds to 1 minute, or according to the directions on your specific pizelle iron. Cooking times can vary slightly depending on the iron and the desired level of crispness.
-
The pizelles are done when they are lightly golden brown but still soft. Use tongs to quickly remove the cookies from the iron and place them on a cooling rack.
-
As the next pizelle is baking, the first cookie will cool and crisp up. While the cookies are still slightly warm, you can dust both sides with powdered sugar, if desired.
-
Once cooled and crisped, remove the pizelles from the cooling rack and arrange them on a plate.
-
Serve with coffee, tea, or your favorite dessert wine.
Expert Tips & Tricks
- Temperature is key: Make sure your pizelle iron is properly preheated for even cooking.
- Don’t overfill: Too much batter will result in messy, overflowing cookies. Start with a small amount and adjust as needed.
- Crispness control: For crispier pizelles, cook them for a few seconds longer. For softer pizelles, reduce the cooking time slightly.
- Flavor variations: Experiment with different extracts, such as lemon or orange, to customize the flavor.
- Rolling Technique: Immediately after removing the pizelle from the iron, you can quickly roll it into a cone shape using a wooden dowel. This creates a festive and delicious treat that can be filled with whipped cream or pastry cream.
- Prevent Sticking: If your pizelles are sticking to the iron, ensure the iron is properly seasoned or use a light coating of cooking spray.
- Even Cooking: For consistent results, ensure your batter is thoroughly mixed and free of lumps.
- Batch Testing: Do a test batch or two to get the cooking time and batter quantity just right for your specific pizelle iron. This prevents wasting ingredients and ensures a perfect final product.
Serving & Storage Suggestions
Pizelles are traditionally served as a light dessert or snack, often alongside coffee or espresso. They can be enjoyed plain, dusted with powdered sugar, or served with a dollop of whipped cream or ricotta cheese.
Store cooled pizelles in an airtight container at room temperature. They will stay crisp for several days. For longer storage, you can freeze them in a single layer on a baking sheet, then transfer them to a freezer bag. Frozen pizelles can be reheated in a low oven or toaster oven until crisp.
Nutritional Information
| Nutrient | Amount per Serving (approximate) | % Daily Value (approximate) |
|---|---|---|
| Calories | 85 kcal | 4% |
| Total Fat | 3.5 g | 5% |
| Saturated Fat | 0.5 g | 3% |
| Cholesterol | 20 mg | 7% |
| Sodium | 45 mg | 2% |
| Total Carbohydrate | 12 g | 4% |
| Dietary Fiber | 0.1 g | 0% |
| Sugars | 6 g | N/A |
| Protein | 1.3 g | 3% |
Note: Nutritional information is an estimate and may vary based on specific ingredients and portion sizes.
Variations & Substitutions
- Gluten-Free Pizelles: Substitute the all-purpose flour with a gluten-free blend. Be sure to add a binder like xanthan gum to improve the texture.
- Dairy-Free Pizelles: Use a dairy-free margarine in place of regular margarine.
- Lemon Pizelles: Substitute the anise extract with lemon extract for a bright, citrusy flavor. Add a teaspoon of lemon zest for extra zestiness.
- Chocolate Pizelles: Add 2 tablespoons of cocoa powder to the dry ingredients for a chocolatey twist.
- Spice it up: Add a pinch of cinnamon or nutmeg to the batter for a warm, festive flavor.
- Orange Pizelles: Substitute anise extract with orange extract. Grated orange zest also complements the flavor.
FAQs (Frequently Asked Questions)
Q: Can I make pizelles without a pizelle iron?
A: Unfortunately, no. A pizelle iron is essential for creating the thin, patterned cookies.
Q: Why are my pizelles sticking to the iron?
A: Make sure the iron is properly preheated and lightly greased, even if it’s non-stick. Overfilling the iron can also cause sticking.
Q: How do I store pizelles to keep them crisp?
A: Store them in an airtight container at room temperature. Avoid storing them in the refrigerator, as this can make them soft.
Q: Can I make the batter ahead of time?
A: It’s best to make the batter fresh for the best results. However, you can prepare it a few hours in advance and store it in the refrigerator. Let it come to room temperature before using.
Q: Why are my pizelles not getting crispy?
A: Ensure the iron is hot enough and that you are not overcrowding the iron. Also, allow the pizelles to cool completely on a wire rack, as they crisp up as they cool.
Final Thoughts
These delicate pizelles are more than just cookies; they’re a taste of tradition, a sweet reminder of family and heritage. Whether you’re a seasoned baker or a kitchen novice, I encourage you to give this recipe a try. The simple act of creating these beautiful, fragrant cookies can bring a touch of Italian warmth to your home. Gather your loved ones, share a cup of coffee, and enjoy the delightful crunch of homemade pizelles. And don’t be afraid to experiment with flavors and variations to create your own family tradition!