
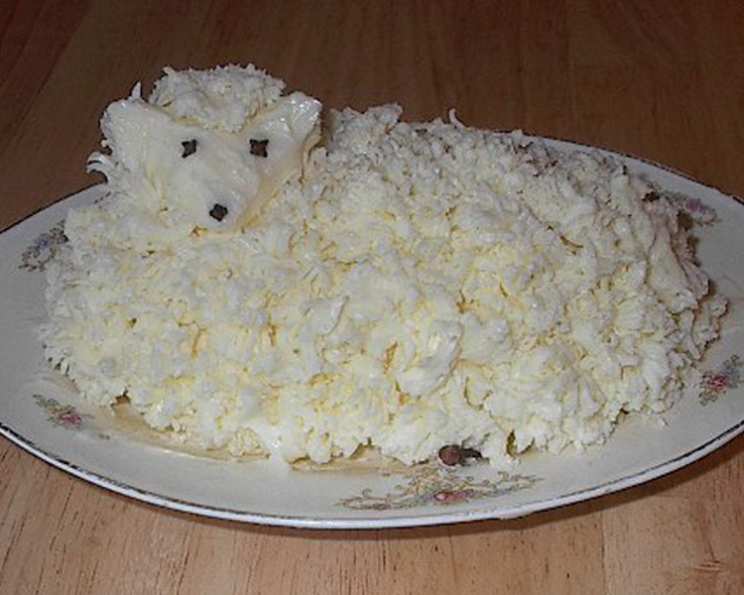
The Easter Butter Lamb: A Polish Tradition
My earliest memories of Easter are filled with the scent of beeswax candles, the vibrant colors of painted eggs, and the centerpiece of our family’s feast: the Butter Lamb. Not just any butter, mind you, but a meticulously sculpted, snowy white lamb, its innocent face punctuated with cloves, standing proudly on a bed of greenery. As a child, I was always mesmerized by its delicate, seemingly impossible form, a testament to my grandmother’s patience and artistry. This wasn’t just food; it was edible art, a symbol of spring, renewal, and the cherished traditions that bound our family together. The Easter Butter Lamb remains a centerpiece, a cherished symbol that continues to grace our table each year, evoking the warmth and joy of generations past.
Recipe Overview
- Prep Time: 60 minutes
- Cook Time: 0 minutes
- Total Time: 2 hours
- Servings: 10
- Yield: 1 Lamb
- Dietary Type: Vegetarian
Ingredients
- 1 lb salted European Butter
- 4 whole cloves
Equipment Needed
- Serving plate
- Small, sharp knife
- Strainer with fine mesh
- Freezer
Instructions
- Begin with a solid block of salted European butter. Ideally, you want one continuous piece. If, like me, you have two half-pound sticks, allow them to soften slightly at room temperature until pliable.
- Carefully press the two softened butter sticks together, molding them into a single block. You may need to trim a bit of the top to ensure a cohesive form. Add any trimmed pieces to the end of the block to extend its length.
- Place the butter block directly onto the serving plate you intend to use. Attempting to move the finished lamb later is almost impossible.
- Using a small, sharp knife, begin to shape the butter into a lamb. Start by carving out the basic body shape.
- Shear off the top section of the butter to create a level base. This will allow the lamb to stand firmly on the plate.
- Carefully shape the head and neck. It is crucial to make the neck short to avoid the lamb resembling a dog. A shorter neck will maintain the lamb’s correct proportions.
- Now comes the most delicate part: creating the “fur.” Take the butter shavings from the initial shaping and work with them in small batches.
- Pay close attention to the butter’s temperature. It must be cold but still pliable. If the butter becomes too soft, it will smear through the strainer instead of creating individual strands.
- You will likely need to return the butter shavings to the freezer for a few minutes several times during this process. This helps to maintain the necessary consistency. On a warmer day, you might need to do this 5-6 times.
- To create the fur, press the cold butter shavings through the fine-mesh strainer. Use a small, flat spatula or the back of a spoon to force the butter through the mesh.
- If the butter is too warm, it will create a smooth, shiny appearance instead of the desired furry texture. Discard any butter that becomes too soft and start with a fresh, chilled batch.
- Using a thin, pointed knife, carefully remove the strands of butter “fur” from the bottom of the strainer.
- Gently apply the butter fur to the lamb’s body. Start around the neck area, ensuring a thick and even layer.
- On larger areas, you can use your finger to slide the fur off the knife and onto the lamb. However, when working around the more delicate areas, such as the neck, it is best to use another knife for precise placement.
- Continue applying the butter fur until the entire lamb is covered, except for the face and hooves.
- Finally, place the whole cloves to create the eyes, nose, and one rear hoof. This detail adds character to your lamb.
- Once completed, keep the Butter Lamb refrigerated until serving.
Expert Tips & Tricks
- European butter, with its higher fat content, is crucial for the right texture and flavor.
- Don’t rush the process. Patience is key to achieving the perfect fur texture. Frequent trips to the freezer are essential, especially on warmer days.
- Work in a cool environment. A chilled kitchen will help to keep the butter at the optimal temperature.
- If the butter starts to become too soft while shaping the lamb’s body, place the entire serving plate in the freezer for 10-15 minutes to firm it up before proceeding.
- Consider using a small ice pack wrapped in a towel to keep the butter shavings cold while you work on creating the fur.
- For added flair, consider using parsley or other fresh herbs to create a “grass” base around the lamb on the serving plate.
Serving & Storage Suggestions
Serve the Easter Butter Lamb chilled, directly from the refrigerator. It is best displayed as a centerpiece on your Easter table. The Butter Lamb can remain at room temperature for a short period (1-2 hours) for aesthetic purposes, but it should be refrigerated immediately afterward to prevent melting.
To store, keep the Butter Lamb tightly covered in the refrigerator. It will remain fresh for up to one week. Freezing is not recommended, as it can alter the texture of the butter.
Nutritional Information
Note: Nutritional information is estimated and may vary based on specific ingredients and portion sizes.
| Nutrient | Amount per Serving | % Daily Value |
|---|---|---|
| Calories | 325 kcal | 16% |
| Total Fat | 36 g | 55% |
| Saturated Fat | 23 g | 115% |
| Cholesterol | 98 mg | 32% |
| Sodium | 261 mg | 11% |
| Total Carbohydrate | 0 g | 0% |
| Dietary Fiber | 0 g | 0% |
| Sugars | 0 g | 0% |
| Protein | 0.4 g | 1% |
Variations & Substitutions
- Unsalted Butter: If you prefer, you can use unsalted butter. Add 1/2 teaspoon of salt per pound of butter.
- Dairy-Free Butter: While the texture won’t be exactly the same, you can attempt this recipe with a high-fat, plant-based butter alternative. Be extra mindful of the temperature, as some dairy-free butters melt more quickly.
- Decorations: Instead of cloves, you can use peppercorns or small candies for the eyes and nose.
FAQs (Frequently Asked Questions)
Q: Why is it important to use European butter?
A: European butter has a higher fat content, which results in a richer flavor and a firmer texture. This is essential for sculpting the lamb and creating the “fur.”
Q: What happens if the butter gets too soft?
A: If the butter becomes too soft, it will smear through the strainer instead of creating individual strands of fur. It may also be harder to sculpt. Immediately return the butter to the freezer to firm it up.
Q: Can I make this ahead of time?
A: Yes, you can make the Easter Butter Lamb up to a week in advance. Store it tightly covered in the refrigerator.
Q: How do I prevent the butter from melting on the table?
A: To prevent melting, serve the Butter Lamb chilled and avoid placing it in direct sunlight or near heat sources.
Q: Is there an easier way to make the fur?
A: Using a ricer instead of a strainer can be an alternative method. However, the strainer tends to produce a more delicate and realistic fur-like texture.
Final Thoughts
Crafting an Easter Butter Lamb is more than just following a recipe; it’s an act of love, a connection to heritage, and a celebration of the season. While the process might seem a bit intricate at first, the reward is a stunning centerpiece that will undoubtedly spark joy and conversation. Don’t be afraid to experiment and add your own personal touch. Gather your family, put on some music, and make it a collaborative effort. I encourage you to try this timeless tradition, and I would love to hear about your experience and any variations you create.