
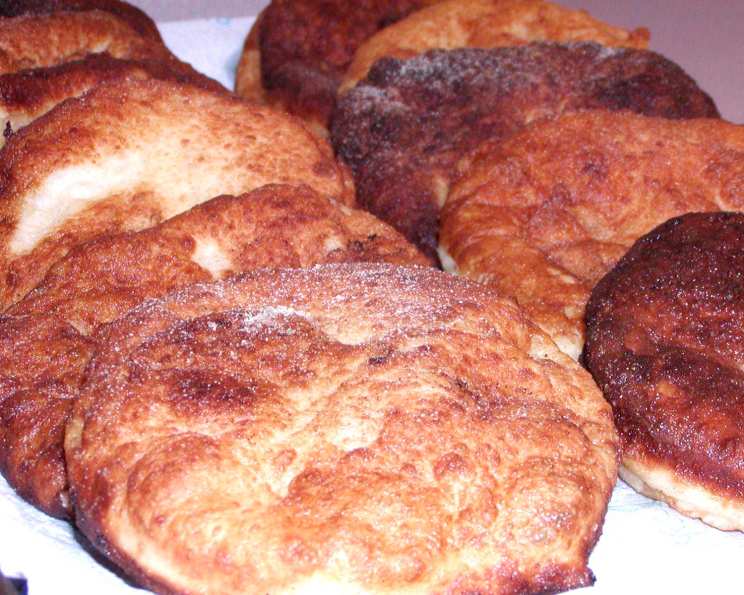
Polish Fry Bread: A Taste of Family Reunions
The aroma of these golden, puffy circles frying in hot oil always transports me back to childhood summers. Our family reunions were sprawling affairs held in my great aunt’s backyard, a symphony of laughter, buzzing insects, and the constant murmur of relatives catching up. But above all, it was the smell of these Polish fry breads, lovingly made by our family’s honorary member, the neighbor lady, that truly defined the day. They disappeared almost as quickly as she could fry them, each bite a comforting blend of soft dough, savory garlic salt, and pure, unadulterated joy. Every year, she would make what seemed like mountains of these treats, and they were always the first thing to vanish. This year, I finally got the recipe, and I am thrilled to share it with you.
Recipe Overview
- Prep Time: 1 hour 45 minutes
- Cook Time: 20-30 minutes
- Total Time: 2 hours 5 minutes – 2 hours 15 minutes
- Servings: 30
- Yield: About 30 fry breads
- Dietary Type: Vegetarian
Ingredients
- 1 large potato, enough to make 1 cup mashed
- 3-4 cups water, to cover the potato
- 1 1/4 ounces yeast (about 3 1/4 teaspoons active dry yeast or 35 grams fresh yeast)
- 1 cup barely warm milk
- 3 tablespoons sugar
- 4 cups flour, plus more for dusting
- 1/4 cup butter, softened
- 1 teaspoon salt
- 2 eggs
- Oil, for frying
- Garlic salt, to sprinkle over the tops
Equipment Needed
- Large pot
- Small bowl
- Potato masher or ricer
- Measuring cups and spoons
- Mixing bowl
- Damp towel
- Floured surface
- Rolling pin
- 3-inch cookie cutter or knife
- Large skillet or deep fryer
- Slotted spoon
- Paper towels
Instructions
-
Begin by preparing the potato. Scrub the potato clean under running water. Place it in a large pot and add 3-4 cups of water, ensuring the potato is fully submerged. Bring the water to a boil and cook until the potato is tender and easily pierced with a fork.
-
Once the potato is cooked, carefully remove it from the hot water and set aside to cool slightly. Reserve the potato water; you’ll need it later.
-
Once the potato is cool enough to handle, peel off the skin. You can discard the skin or save it for another use, such as making potato peel chips.
-
In a small bowl, combine the yeast, barely warm milk, and sugar. Stir gently and set aside for about 5-10 minutes, or until the mixture becomes bubbly and frothy. This indicates that the yeast is active and ready to use. If the yeast mixture doesn’t bubble, your yeast may be dead. Ensure your milk isn’t too hot (it should be just lukewarm) and try again with fresh yeast.
-
Now, mash the cooked and peeled potato thoroughly using a potato masher or ricer. Measure out exactly 1 cup of the mashed potato. Reserve the remaining mashed potato for another delicious recipe.
-
In a large mixing bowl, combine the 4 cups of flour with the softened butter. Use your fingers or a pastry cutter to work the butter into the flour until the mixture resembles coarse crumbs.
-
Add the salt and the 1 cup of mashed potato to the flour mixture. Taste the mixture and adjust the salt as needed to suit your preference.
-
Add the eggs and the bubbly yeast mixture to the bowl.
-
Gradually add the reserved potato water, a little at a time, while mixing the ingredients together. Use only as much potato water as needed to form a soft, slightly sticky dough. You may not need all the water.
-
Knead the dough briefly until it comes together into a cohesive mass. Place the dough in a lightly oiled bowl, turning to coat.
-
Cover the bowl with a damp towel and set it aside in a warm place to rise. This may take about 1 to 1 ½ hours, or until the dough has doubled in size. The rising time will depend on the temperature of your environment.
-
Once the dough has doubled, gently deflate it. On a lightly floured surface, roll out the dough to a thickness of about ½ inch. Be careful not to overwork the dough.
-
Use a 3-inch cookie cutter or a knife to cut out circles from the rolled-out dough.
-
Place the dough circles on a lightly floured surface, cover them loosely with a towel, and let them rise again for about 20-30 minutes.
-
While the circles are rising, heat the oil in a large skillet or deep fryer over medium-high heat. The oil should be very hot but not smoking. A good temperature is around 350-375°F (175-190°C).
-
Once the oil is hot and the dough circles have risen slightly, gently stretch each circle out to about 6 inches in diameter.
-
Carefully fry the stretched dough circles in the hot oil, a few at a time, until they are golden brown on both sides. Turn them as needed to ensure even cooking. This should take about 2-3 minutes per side.
-
Remove the fried breads from the oil using a slotted spoon and place them on paper towels to drain off any excess oil.
-
While the breads are still warm, dust the tops generously with garlic salt.
-
Serve immediately and enjoy!
Expert Tips & Tricks
- Don’t overheat the milk: Using milk that is too hot can kill the yeast. Aim for lukewarm or just barely warm to the touch.
- Potato water is key: The potato water adds a subtle flavor and helps create a softer dough. Don’t skip it!
- Don’t overcrowd the pan: Fry the breads in batches to maintain the oil temperature. Overcrowding can lower the temperature and result in greasy breads.
- Adjust the salt: Taste the dough before adding the eggs and adjust the salt to your liking. Remember that you will also be adding garlic salt on top, so don’t over-salt the dough itself.
- For extra flavor: Try adding a pinch of garlic powder or onion powder to the dough for a more complex flavor.
Serving & Storage Suggestions
Serve these Polish fry breads hot and fresh for the best flavor and texture. They are delicious on their own, sprinkled with garlic salt, or served alongside savory dishes like soups, stews, or pierogi. Leftovers can be stored in an airtight container at room temperature for up to 2 days, but they are best consumed immediately. To reheat, you can warm them in a low oven (around 300°F or 150°C) for a few minutes, or briefly pan-fry them to restore their crispness. They can also be frozen for longer storage. Wrap them individually in plastic wrap and place them in a freezer bag. To reheat from frozen, thaw them completely and then warm them in the oven or pan-fry them.
Nutritional Information
| Nutrient | Amount per Serving | % Daily Value |
|---|---|---|
| Calories | 102.4 kcal | N/A |
| Calories from Fat | N/A | 21% |
| Total Fat | 2.4 g | 3% |
| Saturated Fat | 1.3 g | 6% |
| Cholesterol | 17.6 mg | 5% |
| Sodium | 102.1 mg | 4% |
| Total Carbohydrate | 17 g | 5% |
| Dietary Fiber | 1 g | 4% |
| Sugars | 1.4 g | N/A |
| Protein | 3.1 g | 6% |
Note: Nutritional information is an estimate and may vary based on specific ingredients and cooking methods.
Variations & Substitutions
- Sweet Fry Bread: Instead of garlic salt, sprinkle the tops with powdered sugar or cinnamon sugar for a sweet treat.
- Savory Herbs: Add chopped fresh herbs like dill, parsley, or chives to the dough for a more herbaceous flavor.
- Cheese Fry Bread: Sprinkle shredded cheese (such as mozzarella or cheddar) on top of the fry bread while it is still hot.
- Gluten-Free Option: Substitute a gluten-free all-purpose flour blend for the regular flour. You may need to adjust the amount of liquid slightly to achieve the right dough consistency.
- Vegan Fry Bread: Replace the butter with a plant-based butter alternative and the eggs with flax eggs (1 tablespoon ground flaxseed mixed with 3 tablespoons water per egg). Ensure the milk is also plant-based.
FAQs (Frequently Asked Questions)
Q: Can I use instant yeast instead of active dry yeast?
A: Yes, you can use instant yeast. Add it directly to the flour mixture without proofing it in the milk first.
Q: Why is my dough not rising?
A: Several factors can prevent dough from rising, including using expired yeast, milk that is too hot or too cold, or a room that is too cold. Make sure your yeast is fresh, your milk is lukewarm, and your dough is in a warm place.
Q: Can I make the dough ahead of time?
A: Yes, you can make the dough ahead of time and store it in the refrigerator for up to 24 hours. Punch it down before rolling it out and frying.
Q: How do I know when the oil is hot enough?
A: Use a thermometer to check the oil temperature. It should be around 350-375°F (175-190°C). If you don’t have a thermometer, you can test the oil by dropping a small piece of dough into it. If the dough sizzles and turns golden brown in a few seconds, the oil is ready.
Q: My fry breads are greasy. What am I doing wrong?
A: Greasy fry breads are often caused by frying them at too low of a temperature. Make sure your oil is hot enough and don’t overcrowd the pan. Also, be sure to drain the fried breads on paper towels to remove excess oil.
Final Thoughts
Now that you have the secret to these delightful Polish fry breads, I encourage you to give this recipe a try. It’s a fantastic way to bring a little bit of family tradition and comfort food into your own kitchen. Don’t be afraid to experiment with different toppings or variations to make it your own. And most importantly, share these delicious treats with your loved ones and create some new memories of your own. These are best served hot, fresh, and shared with those you love. Happy cooking!