
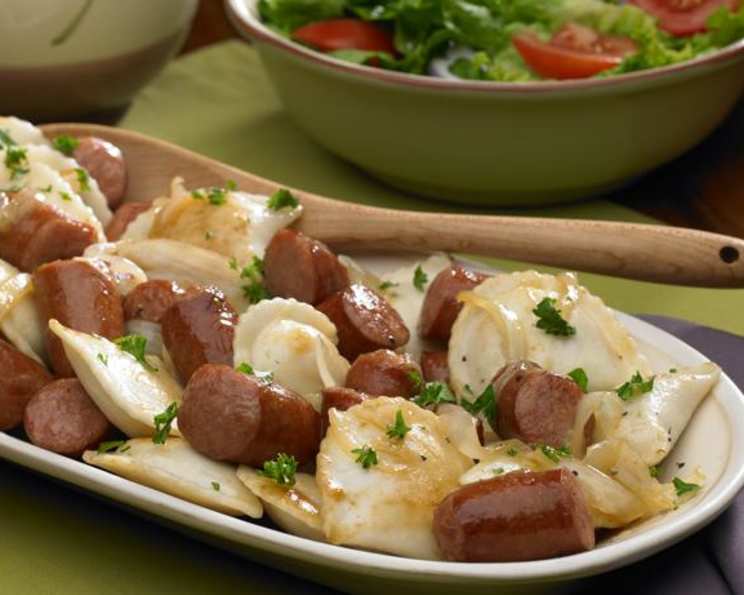
Kielbasa and Pierogies: A Taste of Polish Comfort
The aroma alone instantly transports me back to my grandmother’s kitchen. I can almost see her now, sleeves rolled up, presiding over a bubbling pot on the stove. The savory scent of kielbasa mingled with the comforting aroma of pierogies sizzling in butter was a constant in my childhood. This simple, hearty dish, bursting with flavor and love, was a family favorite, a taste of our heritage that warmed us from the inside out. Now, I’m excited to share this taste of Polish tradition with you.
Recipe Overview
- Prep Time: 5 minutes
- Cook Time: 20 minutes
- Total Time: 25 minutes
- Servings: 6
- Dietary Type: Varies (Can be Gluten-Free with GF Pierogies)
Ingredients
- 1 (14 ounce) package Johnsonville Polish Kielbasa
- 2 (16 ounce) packages frozen potato pierogies
- 1 large onion, thinly sliced
- 2 tablespoons butter
- Chopped fresh parsley (optional)
Equipment Needed
- Cutting Board
- Dutch Oven or Large Pot
- Colander
- Large Skillet
Instructions
- First, prepare the kielbasa. On a cutting board, carefully cut the sausage links into 1-inch pieces. Set aside.
- Next, cook the pierogies. In a Dutch oven or large pot, cook the frozen potato pierogies according to the package directions. The general method is to boil them until they float, but always check the specific instructions on your package.
- Once cooked, carefully drain the pierogies using a colander. Keep them warm while you prepare the kielbasa and onions.
- In a large skillet, melt the butter over medium heat.
- Add the thinly sliced onion to the melted butter and sauté until tender and translucent, about 5 minutes. Stir frequently to prevent burning. The onions should be softened and slightly golden.
- Add the kielbasa pieces to the skillet with the onions. Continue to cook and stir until the sausage is heated through and nicely browned. This should take another 5-7 minutes. Ensure the kielbasa is cooked to an internal temperature of 160°F (71°C).
- Now, combine everything together. Stir in the prepared pierogies into the skillet with the kielbasa and onion mixture. Gently toss to coat the pierogies with the buttery onion and kielbasa goodness.
- Finally, sprinkle with chopped fresh parsley, if desired, for a pop of color and fresh flavor.
- Serve immediately and enjoy this delicious Polish comfort food!
Expert Tips & Tricks
- Achieving Perfect Pierogies: To prevent your pierogies from sticking together while boiling, add a tablespoon of oil to the cooking water.
- Enhancing the Flavor: For an extra layer of flavor, consider adding a clove of minced garlic to the onions during the last minute of sautéing.
- Browning the Kielbasa: To get a nice, crispy exterior on the kielbasa, increase the heat slightly towards the end of the cooking time, watching carefully to prevent burning.
- Make-Ahead Tip: The onions can be sautéed ahead of time and stored in the refrigerator for up to 24 hours. This saves time when you’re ready to assemble the dish.
- Deglazing the Pan: After cooking the kielbasa and onions, deglaze the pan with a splash of chicken broth or white wine for an even richer sauce. Scrape up any browned bits from the bottom of the pan for maximum flavor.
Serving & Storage Suggestions
Serve this hearty dish hot, straight from the skillet. It pairs perfectly with a dollop of sour cream or plain yogurt on top. A side of sauerkraut or a simple green salad also complements the richness of the kielbasa and pierogies.
For leftovers, store in an airtight container in the refrigerator for up to 3 days. To reheat, you can microwave it, but for best results, reheat in a skillet over medium heat until heated through. You may need to add a little butter or oil to prevent sticking.
Freezing is also an option. Allow the dish to cool completely before transferring to a freezer-safe container. It can be frozen for up to 2 months. Thaw overnight in the refrigerator before reheating.
Nutritional Information
| Nutrient | Amount per Serving | % Daily Value |
|---|---|---|
| Calories | 439 kcal | N/A |
| Calories from Fat | 306 kcal | N/A |
| Total Fat | 34 g | 79% |
| Saturated Fat | 2.4 g | 12% |
| Cholesterol | 10.2 mg | 3% |
| Sodium | 34.8 mg | 1% |
| Total Carbohydrate | 2.3 g | 0% |
| Dietary Fiber | 0.4 g | 1% |
| Sugars | 1.1 g | 4% |
| Protein | 0.3 g | 0% |
Note: Nutritional information is an estimate and may vary based on specific ingredients and preparation methods.
Variations & Substitutions
- Gluten-Free: Use gluten-free pierogies to make this dish gluten-free. Many brands offer delicious gluten-free options.
- Vegetarian: Substitute the kielbasa with vegetarian sausage or smoked tofu for a vegetarian-friendly version.
- Different Pierogi Fillings: Experiment with different pierogi fillings such as cheese, sauerkraut, or spinach and feta.
- Spicy Kick: Add a pinch of red pepper flakes to the onions while sautéing for a spicy kick.
- Seasonal Variation: In the fall, add some diced apples to the onions for a sweet and savory twist.
FAQs (Frequently Asked Questions)
Q: Can I use fresh pierogies instead of frozen?
A: Yes, you can use fresh pierogies. Just adjust the cooking time accordingly, as they will likely cook faster than frozen pierogies.
Q: How do I prevent the pierogies from sticking to the pan when sautéing?
A: Ensure the pan is well-greased with butter and avoid overcrowding the pan. Work in batches if necessary to allow the pierogies to brown properly.
Q: Can I add other vegetables to this dish?
A: Absolutely! Bell peppers, mushrooms, or cabbage would be great additions to this dish. Add them to the skillet along with the onions.
Q: Is it possible to make this dish ahead of time?
A: You can prepare the kielbasa and onion mixture ahead of time and store it in the refrigerator. When ready to serve, simply cook the pierogies and combine everything together.
Q: What’s the best way to reheat leftover kielbasa and pierogies?
A: The best way is to reheat them in a skillet with a little butter over medium heat. This will help them retain their texture and flavor. You can also microwave them, but they may become slightly softer.
Final Thoughts
This Kielbasa and Pierogies recipe is more than just a meal; it’s a taste of tradition and comfort. It’s a reminder of family gatherings and the simple joys of home-cooked food. I encourage you to try this recipe and create your own memories around this classic Polish dish. Don’t hesitate to experiment with variations and make it your own. Enjoy the process, savor the flavors, and share it with those you love. Smacznego!