
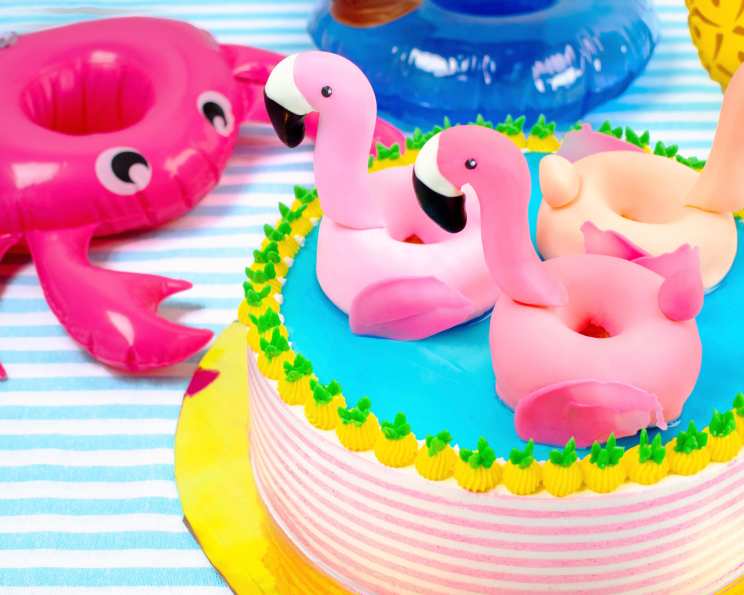
Pool Party Cake: Dive into Deliciousness
Summer birthdays always meant a trip to the local pool – chlorine-tinged hair, sun-kissed skin, and the echoing squeals of kids cannonballing into the deep end. One year, my mom outdid herself and brought the pool party to the cake, crafting an edible masterpiece that looked like a miniature swimming pool, complete with fondant floaties. The collective gasp of awe from my friends is a memory I cherish, and to this day, a playful, themed cake just feels like summer.
Recipe Overview
- Prep Time: 2 hours
- Cook Time: 30 minutes (for baking cakes, if not using pre-made)
- Total Time: 2 hours 30 minutes
- Servings: 12-16
- Yield: 1 cake
- Dietary Type: Not specified
Ingredients
- Two 9-inch Vanilla Cakes (Magnolia Bakery’s Vanilla Birthday Cake and Frosting recipe recommended, but any sturdy vanilla cake will work)
- Roxstarbakes Pineapple Curd (for filling)
- Roxstarbakes Swiss Meringue Buttercream (for frosting)
- Yellow food coloring
- Green food coloring
- Two colors of your choice, ideally white or blue for the cake top (for the pool)
- Uncooked Spaghetti
- Fondant in three shades of pink
- Fondant in other colors as desired for details (white, black, etc.)
- Candy Melts (for flamingo beak, eyes, and wings)
- White candy melts
- Black candy melts
- Corn Syrup
- Blue food coloring
- Donuts (plain, unfrosted)
- Optional: Sprinkles or other decorative elements
Equipment Needed
- Two 9-inch round cake pans
- Mixing bowls
- Electric mixer (stand or hand mixer)
- Spatulas
- Frosting comb
- Piping bags
- Wilton 32 piping tip
- Wilton 352s piping tip
- Microwave-safe bowls
- Baking sheets (for melting candy melts)
- Rolling pin
- Pizza cutter or sharp knife
- Cooling rack
Instructions
-
Prepare the Cakes: If you aren’t using pre-made cakes, begin by baking two 9-inch vanilla cakes according to your chosen recipe (Magnolia Bakery’s is recommended). Let the cakes cool completely on a wire rack before proceeding.
-
Prepare the Frostings and Curd: Ensure your Roxstarbakes Swiss Meringue Buttercream and Pineapple Curd are ready to use. Divide the buttercream into portions and tint with yellow, green, and your two chosen colors (white/blue and another of your preference).
-
Level and Fill the Cakes: Level the tops of the cooled cakes with a serrated knife to create a flat surface. Place one cake layer on a serving plate or cake board.
-
Filling and Stacking: Spread a layer of Pineapple Curd evenly over the first cake layer. Then, spread a layer of Buttercream on top of the curd.
Pro Tip: Alternating between curd and buttercream helps stabilize the next cake layer and prevents it from sliding. -
Stack the Second Layer: Carefully place the second cake layer on top of the filled first layer.
-
Crumb Coat: Apply a thin layer of buttercream over the entire cake to seal in any crumbs. Chill the cake in the refrigerator for at least 30 minutes to allow the crumb coat to set.
-
Frost the Cake: Apply a thick layer of buttercream frosting to the sides of the cake.
-
Create Stripes: Achieve decorative stripes using a frosting comb. First, apply your first color of buttercream. Then, go around the cake 3 times with the frosting comb to create the stripe pattern. Add your second color of buttercream and scrape off the excess.
-
Pipe the Border: Using a piping bag fitted with a Wilton 32 tip, pipe even dots around the border of the cake.
-
Create Mini Pineapples: Using yellow buttercream and a piping bag, pipe small pineapple shapes onto a baking sheet lined with parchment paper.
-
Add Pineapple Greens: Using a piping bag fitted with a Wilton 352s tip and green buttercream, pipe pineapple leaves onto the top of each mini pineapple.
-
The “Pool”: Mix Corn Syrup with Blue food coloring until you achieve your desired shade of blue. Carefully spread this mixture across the top of the cake to create the look of a swimming pool.
-
Prepare Flamingo Elements:
- Melt Candy Melts: Melt the white and black candy melts in separate microwave-safe bowls according to package instructions.
- Cover Donuts: Prep three plain, unfrosted donuts by covering them in different shades of pink fondant. Roll out the fondant and use a pizza cutter or sharp knife to cut out circles large enough to cover the donuts. Attach the fondant to the donuts using a small amount of water or edible glue.
- Mold Flamingo Heads and Tails: Mold flamingo heads and tails using pink fondant.
- Insert Spaghetti: Insert a piece of uncooked spaghetti into the bottom of each flamingo head and tail.
Pro Tip: Using spaghetti instead of sticks is safer because spaghetti is food-safe, preventing accidental ingestion. - Create Beaks and Eyes: Dip the noses of the flamingo heads into the melted white candy melts, then into the melted black candy melts to create the beak. Use a toothpick to apply small dots of black candy melts for the eyes.
- Create Wings: Shape pink fondant into flamingo wings.
-
Assemble the Flamingo Floaties: Place the fondant-covered donuts on the cake where you want the flamingo floaties to be positioned. Insert the flamingo heads and tails into the donuts using the spaghetti as support.
-
Add the Wings: Attach the fondant wings to the sides of the donuts.
-
Final Touches: Place the mini pineapple decorations around the cake. Add any additional decorative elements you desire, such as sprinkles or edible glitter.
Expert Tips & Tricks
- Cake Stabilization: For a taller, more stable cake, consider using dowels or bubble tea straws to support the layers. Insert them vertically into the cake before frosting.
- Buttercream Consistency: The consistency of your buttercream is crucial. If it’s too soft, chill it for a while. If it’s too stiff, add a tablespoon of milk or cream at a time until you reach the desired consistency.
- Fondant Tips: Knead the fondant well before using it to make it more pliable. If it’s too sticky, lightly dust your work surface with powdered sugar.
- Melting Candy Melts: Melt candy melts slowly and in short intervals to prevent burning. Add a teaspoon of shortening if they are too thick.
Serving & Storage Suggestions
Serve the Pool Party Cake chilled or at room temperature. Store leftover cake in an airtight container in the refrigerator for up to 3 days. For longer storage, freeze individual slices wrapped tightly in plastic wrap and then in a freezer bag for up to 2 months. Thaw in the refrigerator before serving. The cake is best enjoyed fresh as the fondant and candy melts may become sticky in humid conditions.
Nutritional Information
Note: Nutritional information is an estimate and will vary based on specific ingredients used.
| Nutrient | Amount per Serving | % Daily Value |
|---|---|---|
| Calories | 450 kcal | 23% |
| Total Fat | 20g | 31% |
| Saturated Fat | 12g | 60% |
| Cholesterol | 80mg | 27% |
| Sodium | 200mg | 9% |
| Total Carbohydrate | 65g | 22% |
| Dietary Fiber | 1g | 4% |
| Sugars | 45g | |
| Protein | 5g | 10% |
Variations & Substitutions
- Gluten-Free: Use a gluten-free vanilla cake mix or recipe. Ensure all other ingredients, especially candy melts, are also gluten-free.
- Dairy-Free: Substitute the Swiss Meringue Buttercream with a dairy-free buttercream made with vegan butter. Use dairy-free candy melts.
- Flavor Variations: Experiment with different cake flavors, such as lemon or coconut, to complement the pineapple curd.
- Seasonal Adaptation: For a winter pool party, use white chocolate candy melts for the “pool” and add snowflake sprinkles.
FAQs (Frequently Asked Questions)
Q: Can I make the cake layers ahead of time?
A: Yes, you can bake the cake layers up to 2 days in advance. Wrap them tightly in plastic wrap and store them at room temperature or in the refrigerator.
Q: Can I substitute the pineapple curd with another filling?
A: Absolutely! Lemon curd, raspberry jam, or even a simple vanilla buttercream would work well as substitutes.
Q: How do I prevent the fondant from cracking?
A: Knead the fondant well before using it and keep it covered with plastic wrap when not in use. If it starts to crack, add a tiny bit of shortening or vegetable glycerin.
Q: What if I don’t have a frosting comb?
A: You can create a similar striped effect using a spatula or the back of a spoon. Be creative!
Q: How long will the cake last at room temperature?
A: The cake is best stored in the refrigerator, but it can be kept at room temperature for a few hours, especially if the weather is cool.
Final Thoughts
Creating this Pool Party Cake is a delightful way to celebrate summer and bring a touch of whimsy to any occasion. Don’t be afraid to get creative with the decorations and personalize it to your liking! Whether it’s for a birthday, a summer get-together, or just because, this cake is guaranteed to make a splash. I encourage you to dive in and try this recipe – and don’t forget to share your creations with me! Happy baking!