
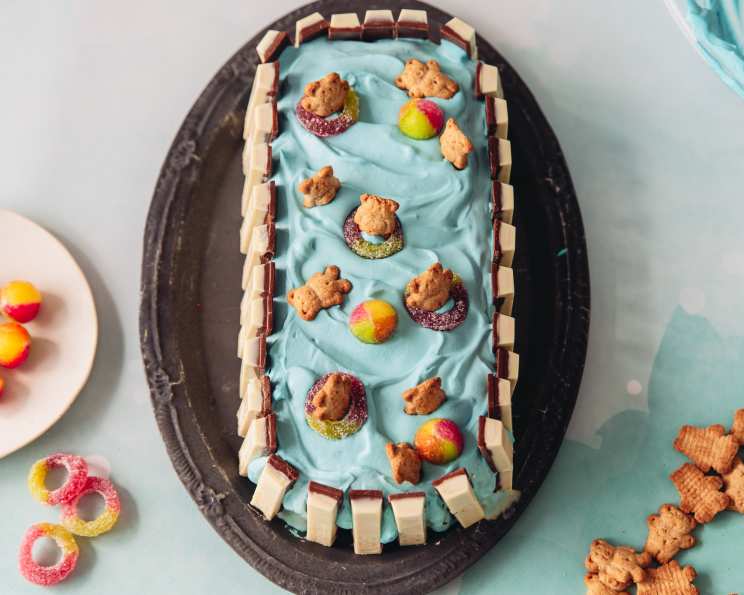
Pool Party Ice Cream Cake
I can still remember the sheer delight on my little sister’s face when my mom unveiled a homemade ice cream cake for her birthday. The cake was a masterpiece of layered flavors and vibrant colors, a true showstopper. While my attempt at recreating that exact cake may have fallen a bit short of my mom’s perfection, it sparked a lifelong love for creating edible works of art, especially those involving ice cream and cake! This Pool Party Ice Cream Cake brings back those cherished memories with a playful, whimsical twist, perfect for summer gatherings and creating new traditions.
Recipe Overview
- Prep Time: 45 minutes
- Freeze Time: 5 hours (minimum)
- Total Time: 5 hours 45 minutes
- Servings: 8-10
- Yield: 1 cake
- Dietary Type: Not specified, but can be modified for gluten-free with appropriate substitutions.
Ingredients
Cake
- 1 (15 1/4 ounce) box white cake mix
- Eggs (according to cake mix directions)
- Vegetable oil (according to cake mix directions)
- Water (according to cake mix directions)
- Blue food coloring
Ice Cream Mix
- 2 pints vanilla ice cream
- 10 chocolate sandwich style cookies
- 1/2 cup rainbow candy sprinkles
Frosting
- 1 cup heavy cream
- 1 tablespoon sugar
- Blue food coloring
Decoration
- 8-9 white chocolate finger wafers (like Kit Kat, but without chocolate)
- Chocolate and honey bear graham crackers
- Candy balls
- Gummy rings (red & white)
Equipment Needed
- Half-size sheet pan (18 x 13 inches)
- Parchment paper
- Wire rack
- Large mixing bowl
- Wooden spoon or electric mixer
- Rectangular ice cream cake pan (10 3/4 x 5 1/2-inch) or a silicone loaf pan (10.5 x 6 x 2.5 inch)
- Whisk
- Serving plate
- Small spatula or butter knife
Instructions
-
Preheat your oven to 350 degrees F (175 degrees C). Line a half-size sheet pan (18 x 13 inches) with parchment paper. This will prevent the cake from sticking and make it easy to remove after baking.
-
Tip the white cake mix into a large bowl. Add the eggs, vegetable oil, and water in the quantities specified on the cake mix box. Stir everything together until the batter is smooth and well combined.
-
Now for the fun part! Mix in enough blue food coloring to achieve a vibrant blue color in the cake batter. Remember, the color will lighten slightly during baking, so don’t be afraid to go a bit bolder than you think.
-
Pour the blue cake batter into the prepared sheet pan and spread it out into an even layer. This ensures the cake bakes evenly and has a uniform thickness.
-
Bake for 15-20 minutes, or until a skewer inserted into the center of the cake comes out clean. This is the best way to check for doneness. Start checking at 15 minutes and add time as needed.
-
Once baked, remove the cake from the oven and set it aside on a wire rack to cool completely. It’s crucial that the cake is completely cool before assembling the ice cream cake, or else the ice cream will melt.
-
Let the vanilla ice cream soften for a few minutes at room temperature. This will make it easier to work with. Scoop the softened ice cream into a large bowl.
-
Using a wooden spoon or an electric mixer on low speed, beat the softened vanilla ice cream until it reaches a buttercream-like texture. Be careful not to overbeat it, as it can become icy.
-
Crush the chocolate sandwich style cookies (like Oreos) into rough chunks. You can do this by placing them in a zip-top bag and gently crushing them with a rolling pin or the flat side of a meat mallet.
-
Add the crushed cookies and rainbow candy sprinkles to the bowl of softened ice cream. Stir everything together until well combined. This creates a delicious and colorful ice cream mixture.
-
Cut three rectangles of cake using a rectangular (10 3/4 x 5 1/2-inch) ice cream cake pan as a guide/template. If you don’t have this pan, you can use a silicone loaf pan (10.5 x 6 x 2.5 inch) or even freehand cut the cake, aiming for similar sized rectangles.
-
Line the ice cream cake pan with parchment paper, leaving some overhang on the sides. This will make it easier to remove the frozen cake later.
-
Place the first layer of cake into the bottom of the ice cream cake pan.
-
Spread half of the ice cream mixture over the first layer of cake in an even layer.
-
Top with the second layer of cake, followed by an even layer of the remaining ice cream mixture.
-
Finally, top with the third layer of cake. Cover the assembled ice cream cake with a layer of parchment paper and gently press down.
-
Freeze for at least 5 hours, or ideally overnight, until the cake is solid. This is important to ensure the cake holds its shape when you decorate it.
-
Once the cake has frozen sufficiently, prepare the frosting. Pour the heavy cream and sugar into a large bowl.
-
Add enough blue food coloring to the heavy cream and sugar to achieve your desired shade of vibrant blue.
-
Use a whisk (either hand whisk or electric) to beat the heavy cream until thickened to soft peaks. Be careful not to overwhip, or it will turn into butter.
-
Remove the frozen cake from the cake pan by lifting it out using the parchment paper overhang. Turn it out onto a serving plate and remove the parchment paper.
-
Cover the top and sides of the cake with the blue whipped cream, making swooshing wave patterns on the top using a small spatula or butter knife. Get creative with your wave designs!
-
Decorate with the white chocolate finger wafers around the edge of the cake, resembling a pool fence. Place a few gummy rings on top with graham cracker bears inside them, like they’re floating on inner tubes. Add a few candy balls to resemble beach balls and add a few more graham cracker bears to the top of the cake, as if they’re swimming.
-
Serve immediately and enjoy your delicious Pool Party Ice Cream Cake!
Expert Tips & Tricks
- For a richer flavor: Substitute the vanilla ice cream with a cookies and cream flavor.
- Make-ahead frosting: The whipped cream frosting can be made a few hours ahead of time and stored in the refrigerator. Just rewhip it briefly before using.
- Prevent ice crystals: To minimize ice crystal formation during freezing, wrap the cake tightly in plastic wrap before freezing.
- Clean cuts: Use a warm knife to slice the frozen cake for cleaner cuts. Dip the knife in hot water and wipe it dry between slices.
Serving & Storage Suggestions
Serve the Pool Party Ice Cream Cake immediately after decorating to prevent the whipped cream from melting. Leftovers can be kept frozen, covered, for up to a week. Keep in mind that the graham cracker bears and whipped cream on top may soften slightly upon thawing. It’s best to cut only the amount you plan to serve at one time and refreeze the rest.
Nutritional Information
Note: Nutritional information is an estimate and may vary based on specific ingredients used.
| Nutrient | Amount per Serving | % Daily Value |
|---|---|---|
| Calories | 450 kcal | 23% |
| Total Fat | 20g | 31% |
| Saturated Fat | 12g | 60% |
| Cholesterol | 50mg | 17% |
| Sodium | 300mg | 13% |
| Total Carbs | 65g | 22% |
| Dietary Fiber | 1g | 4% |
| Sugars | 40g | – |
| Protein | 5g | 10% |
Variations & Substitutions
- Gluten-free: Use a gluten-free white cake mix and gluten-free chocolate sandwich cookies.
- Dairy-free: Substitute the vanilla ice cream with a dairy-free alternative and use a dairy-free whipped topping.
- Different cake flavor: Experiment with other cake flavors like chocolate, strawberry, or lemon.
- Different ice cream flavors: Try other ice cream flavors like chocolate, strawberry, or mint chocolate chip.
FAQs (Frequently Asked Questions)
Q: Can I use a different type of pan?
A: Yes, you can use a similarly sized loaf pan or even a round cake pan. Just adjust the baking time accordingly.
Q: Can I make the cake ahead of time?
A: Absolutely! The cake layers can be baked and frozen ahead of time. Just wrap them well to prevent freezer burn.
Q: What if my ice cream is too hard to spread?
A: Let it soften at room temperature for a few more minutes until it’s spreadable but not melted.
Q: Can I use store-bought whipped cream?
A: Yes, store-bought whipped cream can be used in place of making your own.
Q: How do I prevent the graham cracker bears from getting soggy?
A: Add the graham cracker bears just before serving to keep them from softening.
Final Thoughts
This Pool Party Ice Cream Cake is more than just a dessert; it’s a celebration of summer, fun, and delicious flavors. It’s a perfect treat to share with friends and family at your next pool party or summer gathering. Don’t be afraid to get creative with the decorations and make it your own! I encourage you to try this recipe and share your creations with me. I can’t wait to see your unique pool party ice cream cakes! Enjoy!