
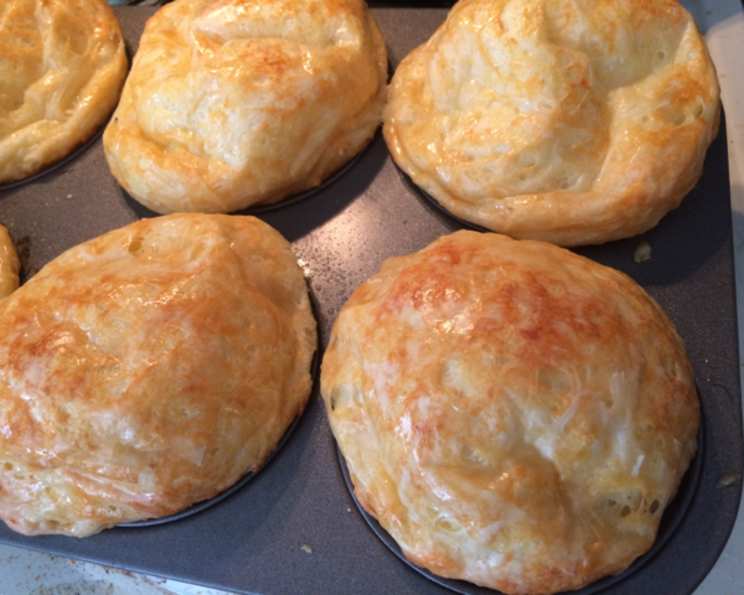
Mastering the Art of Popovers: A BLT Steak Inspired Recipe
I still remember the hushed reverence with which the popovers arrived at our table that evening. The server, almost ceremoniously, presented the basket, its contents radiating warmth. Steam escaped as he lifted the linen cloth, revealing golden-brown, impossibly tall puffs of perfection. The aroma of butter and cheese was intoxicating. That first bite – the crisp exterior yielding to a pillowy, airy interior – was pure culinary bliss. It was a bread experience unlike any other. I knew then I had to recreate that magic at home.
Recipe Overview
- Prep Time: 10 minutes
- Cook Time: 35 minutes
- Total Time: 45 minutes
- Servings: Varies, approximately 12-16 popovers
- Yield: 12-16 popovers (depending on cupcake pan size)
- Dietary Type: Not Gluten-Free
Ingredients
- 4 eggs, beaten
- 2 cups milk
- 1 teaspoon kosher salt
- 2 cups flour
- 1 cup gruyere, grated
- Non-stick vegetable spray, for greasing
Equipment Needed
- Cupcake pan(s)
- Whisk
- Microwave or saucepan
- Measuring cups and spoons
- Sifter (optional, but recommended)
Instructions
-
Begin by placing your cupcake pans in the oven. Preheat the oven, with the pans inside, to 350°F (175°C). Heating the pans is crucial for achieving that signature popover rise.
-
Warm the milk. You can do this either in the microwave for about 1 minute or gently over low heat in a saucepan. The milk should be warm, but not scalding. Set it aside. This step aids in the gluten development process, contributing to the popover’s structure.
-
In a large bowl, whisk the eggs until they are frothy. Slowly whisk in the warmed milk, being careful not to cook the eggs. Combine gently but thoroughly. Set the mixture aside.
-
Prepare the dry ingredients. Sift the flour with the kosher salt. Sifting ensures a lighter batter and helps prevent lumps. This step is optional but highly recommended.
-
Gradually add the dry ingredients to the wet ingredients. Slowly add the flour and salt mixture to the egg and milk mixture, gently combining until mostly smooth. Avoid overmixing, as this can develop too much gluten and result in tougher popovers. A few small lumps are acceptable.
-
Remove the heated cupcake pans from the oven. Immediately spray the inside of each cup generously with non-stick vegetable spray. This is essential for preventing the popovers from sticking and allowing them to rise freely.
-
Fill each cupcake cup approximately 3/4 full with the batter. The batter should still be slightly warm or at room temperature, not cool, for optimal results.
-
Top each cup with about 1 tablespoon of grated gruyere cheese. Distribute the cheese evenly over the popovers. The gruyere adds a delightful savory flavor and helps create a crispy, golden-brown crust.
-
Bake at 350°F (175°C) for 35 minutes, rotating the pans 1/2 turn halfway through baking. This ensures even browning and rising. Resist the temptation to open the oven door during baking, as this can cause the popovers to deflate.
-
Once baked, remove the cupcake pans from the oven. Immediately remove the popovers from the pan and serve immediately. Popovers are best enjoyed hot and fresh.
Expert Tips & Tricks
- Temperature is key: Ensure your oven is accurately preheated and the cupcake pans are hot before adding the batter.
- Don’t overmix: Overmixing the batter develops gluten, leading to dense, less airy popovers.
- Resist peeking: Avoid opening the oven door during baking, as temperature fluctuations can cause the popovers to collapse.
- Warm milk is crucial: Heating the milk helps activate the gluten and contributes to a better rise.
- For extra crispness: After baking, you can poke a small hole in the side of each popover to release steam and prevent them from becoming soggy. Then, return them to the oven for another 5 minutes to crisp up further.
- Adding herbs: Try adding fresh thyme, rosemary, or chives to the batter for added flavor dimension. Finely chop the herbs and gently fold them into the batter before filling the cupcake tins.
Serving & Storage Suggestions
Popovers are best served immediately while still warm and crispy. They make a wonderful accompaniment to soups, salads, stews, or roasted meats. For a truly decadent experience, serve them with a pat of butter, a drizzle of olive oil, or a dollop of crème fraîche.
If you have leftovers, store them in an airtight container at room temperature for up to 24 hours. To reheat, preheat the oven to 350°F (175°C) and bake for about 5-7 minutes, or until warmed through. While reheating will restore some crispness, they will never be quite as good as fresh out of the oven.
Popovers are not ideal for freezing, as their texture can change significantly. However, if you must freeze them, wrap them individually in plastic wrap and then place them in a freezer-safe bag. Thaw completely before reheating.
Nutritional Information
| Nutrient | Amount per Serving (estimated) | % Daily Value (estimated) |
|---|---|---|
| Calories | 150 kcal | 8% |
| Total Fat | 8g | 12% |
| Saturated Fat | 5g | 25% |
| Cholesterol | 70mg | 23% |
| Sodium | 250mg | 11% |
| Total Carbohydrate | 15g | 5% |
| Dietary Fiber | 1g | 4% |
| Sugars | 2g | 2% |
| Protein | 6g | 12% |
Note: Nutritional information is an estimate and may vary based on specific ingredients and portion sizes.
Variations & Substitutions
- Gluten-Free Popovers: Substitute the all-purpose flour with a gluten-free all-purpose flour blend. You may need to add a binder like xanthan gum to help with the structure.
- Dairy-Free Popovers: Replace the milk with a dairy-free alternative like almond milk or soy milk. Be sure to use a dairy-free cheese substitute as well, or omit the cheese altogether.
- Herb and Garlic Popovers: Add 1-2 cloves of minced garlic and 1-2 tablespoons of chopped fresh herbs (such as rosemary, thyme, or chives) to the batter for a savory twist.
- Sweet Popovers: Omit the gruyere cheese and add 1-2 tablespoons of sugar to the batter. Serve with fresh fruit and whipped cream for a delicious dessert.
- Spiced Popovers: Add a pinch of nutmeg, cinnamon, or cardamom to the batter for a warm, comforting flavor.
FAQs (Frequently Asked Questions)
Q: Why didn’t my popovers pop?
A: Several factors can contribute to flat popovers, including not preheating the pans, opening the oven door during baking, or using cold ingredients. Make sure the pans are hot, the ingredients are at room temperature, and resist the urge to peek!
Q: Can I make the batter ahead of time?
A: It’s best to bake the popovers immediately after mixing the batter. If you must make it ahead, cover and refrigerate for no more than 30 minutes. The longer it sits, the less the popovers will rise.
Q: What if I don’t have a cupcake pan?
A: While a cupcake pan is ideal, you can use a muffin tin as well. The popovers might not be as tall, but they will still be delicious. Popover pans offer the best vertical rise.
Q: Can I use a different type of cheese?
A: Absolutely! Gruyere is a classic choice, but you can experiment with other cheeses like cheddar, parmesan, or Swiss. Consider a blend of cheeses for even more flavor.
Q: How do I prevent the popovers from sticking to the pan?
A: Generously grease each cupcake cup with non-stick vegetable spray. You can also use melted butter or shortening, but non-stick spray is the most effective. Ensure the pans are preheated to ensure the base is slightly cooked as the batter hits the pan.
Final Thoughts
Popovers, those airy, golden puffs of delight, might seem intimidating to make at home, but with a few simple steps and a little attention to detail, you can recreate the magic of BLT Steak in your own kitchen. Don’t be afraid to experiment with different cheeses and herbs to create your own signature variation. So, preheat your oven, gather your ingredients, and prepare to be amazed at the transformation of simple ingredients into a truly extraordinary bread experience. I encourage you to try it, share your creations, and, most importantly, enjoy the delightful taste of homemade popovers. They are the perfect addition to any meal.