
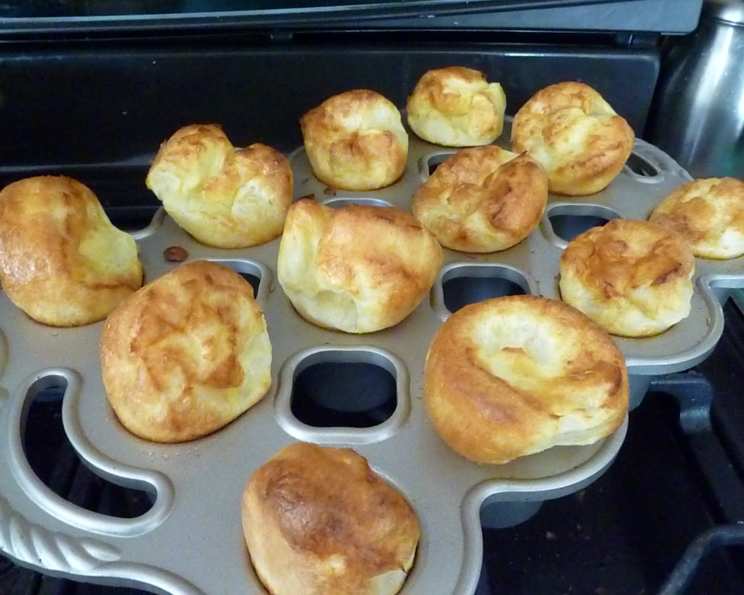
The Alchemist’s Popover: Mastering the Art of Ratios
My grandmother, bless her heart, was a “pinch of this, dash of that” kind of cook. While her food was undeniably delicious, replicating her recipes was an exercise in futility. Then I discovered the magic of baking by weight, and everything changed. I recall one particularly disastrous Thanksgiving when the rolls refused to rise. But then, armed with my trusty kitchen scale and the simple popover ratio – egg, milk, flour – I whipped up a batch of these golden puffs, and all was forgiven. Their dramatic rise and airy texture saved the day, proving that sometimes, precision is the secret ingredient to a memorable meal.
Recipe Overview
- Prep Time: 5 minutes
- Cook Time: 20 minutes
- Total Time: 25 minutes
- Servings: 6
- Yields: 12 Petite Popovers
- Dietary Type: **Not Vegetarian, Not Vegan, Gluten
Ingredients
- 1 ounce egg (My large usually 1.875oz)
- 2 ounces milk (so 3.75 oz if using 1.875 oz egg)
- 1 ounce flour (and 1.875oz if using 1.875 oz egg)
- Butter
- Salt
Equipment Needed
- Kitchen Scale
- Mixing Bowl
- Whisk
- Nordic Ware Petite Popover Pan (or regular popover pan, or skillet)
- Oven
Instructions
- Begin by preheating your oven to 450°F (232°C). Place the popover pan inside the oven while it preheats. This is crucial for achieving maximum puff.
- Using a kitchen scale, place your mixing bowl on the scale and zero it out.
- Crack the egg into the bowl, noting its weight in ounces. Zero the scale again. My large eggs are usually around 1.875 oz, but yours might be different. This is the beauty of this recipe—you adapt the other ingredients to your egg’s weight.
- Add the milk to the bowl, using twice the weight of the egg that you measured. For instance, if your egg weighed 1.875 oz, you’ll add 3.75 oz of milk. Again, zero the scale.
- Add the flour to the bowl, using the same weight as the egg. So, in my example, I would add 1.875 oz of flour.
- Add a dash of salt to the bowl.
- Whisk the mixture together thoroughly until it is well combined. Don’t worry about over-mixing; a smooth batter is what you’re after.
- Let the batter rest while the oven finishes preheating. This resting period allows the flour to fully hydrate, which results in a better texture in the final popovers.
- Remove the hot popover pan from the oven with caution.
- Place a small pat of butter into the bottom of each cup in the hot pan. The butter will melt quickly and ensure the popovers don’t stick.
- Carefully pour the batter into the prepared popover pan, filling each cup no more than halfway full. With my Nordic Ware petite popover pan and a large egg (1.875 oz), I get 12 popovers. A larger pan will yield fewer, larger popovers.
- Place the pan in the preheated oven and bake for 10 minutes.
- After 10 minutes, check the popovers. If they are browning too quickly, you can lower the oven temperature to 375°F (190°C).
- Continue baking until the popovers are nicely browned on top, being careful not to let them get too dark. This usually takes another 10-15 minutes, depending on your oven.
- Remove the popovers from the oven and let them cool slightly in the pan before removing them to a wire rack.
- This batter can also be used to make savory pancakes on the stovetop.
Expert Tips & Tricks
- Hot Pan is Key: Starting with a screaming hot pan is paramount for achieving that signature popover lift.
- Don’t Open the Oven: Resist the urge to peek while they’re baking! The sudden temperature change can cause them to deflate.
- Batter Consistency: A smooth, lump-free batter is essential. If you have lumps, try passing the batter through a fine-mesh sieve.
- Fat is Your Friend: Generously buttering the pan ensures the popovers release easily and develop a crispy exterior.
- Temperature Adjustment: All ovens are different. If your popovers are browning too quickly, reduce the temperature by 25°F (14°C).
- Consider using browned butter for an even richer, nutty flavor.
Serving & Storage Suggestions
Popovers are best served immediately while they are still warm and puffy. Serve them with a pat of butter, a sprinkle of salt and pepper, or a drizzle of honey.
Leftover popovers can be stored in an airtight container at room temperature for a day or two. However, they will lose their crispness over time. To revive them, reheat in a 350°F (175°C) oven for a few minutes. You can also freeze them. Wrap them individually in plastic wrap, then place them in a freezer bag. They will last for up to 2 months. Reheat from frozen in a 350°F (175°C) oven until warmed through.
Nutritional Information
| Nutrient | Amount per Serving | % Daily Value |
|---|---|---|
| Calories | 75 kcal | 4% |
| Total Fat | 4g | 5% |
| Saturated Fat | 2g | 10% |
| Cholesterol | 35mg | 12% |
| Sodium | 50mg | 2% |
| Total Carbohydrate | 6g | 2% |
| Dietary Fiber | 0g | 0% |
| Sugars | 1g | 2% |
| Protein | 2g | 4% |
Variations & Substitutions
- Savory Popovers: Add grated cheese, herbs (such as thyme or rosemary), or spices (such as garlic powder or onion powder) to the batter for a savory twist.
- Sweet Popovers: Add a teaspoon of vanilla extract or a tablespoon of sugar to the batter for a sweeter version. Dust with powdered sugar after baking.
- Gluten-Free Popovers: Substitute the all-purpose flour with a gluten-free all-purpose flour blend. Be sure to use a blend that contains xanthan gum for the best results.
- Dairy-Free Popovers: Use a plant-based milk alternative, such as almond milk, soy milk, or oat milk.
- Fill with everything from rare beef to fresh fruit.
FAQs (Frequently Asked Questions)
Q: Why are my popovers not popping?
A: The most common reasons are the oven temperature isn’t high enough, the pan wasn’t preheated, or the oven door was opened during baking.
Q: Can I make the batter ahead of time?
A: Yes, you can make the batter up to an hour in advance. However, it’s best to bake the popovers immediately after making the batter for the best results.
Q: What if I don’t have a popover pan?
A: You can use a muffin tin or even a skillet. The popovers won’t be as tall, but they will still be delicious.
Q: How do I prevent the popovers from collapsing when they cool?
A: Piercing the popovers with a small knife or skewer as soon as they come out of the oven can help release steam and prevent them from collapsing.
Q: Can I freeze popovers?
A: Yes, you can freeze popovers. Wrap them individually in plastic wrap, then place them in a freezer bag. They will last for up to 2 months. Reheat from frozen in a 350°F oven.
Final Thoughts
Popovers, at their core, are a testament to the magic of simple ingredients and precise execution. Don’t be intimidated by the seemingly delicate nature of this bake; embrace the ratio, trust your scale, and watch in amazement as these airy delights rise to greet you. I encourage you to experiment with different fillings, flavorings, and serving suggestions. This is a recipe that invites creativity and rewards curiosity. Share your popovers with friends and family, and revel in the joy of baking something truly special.