
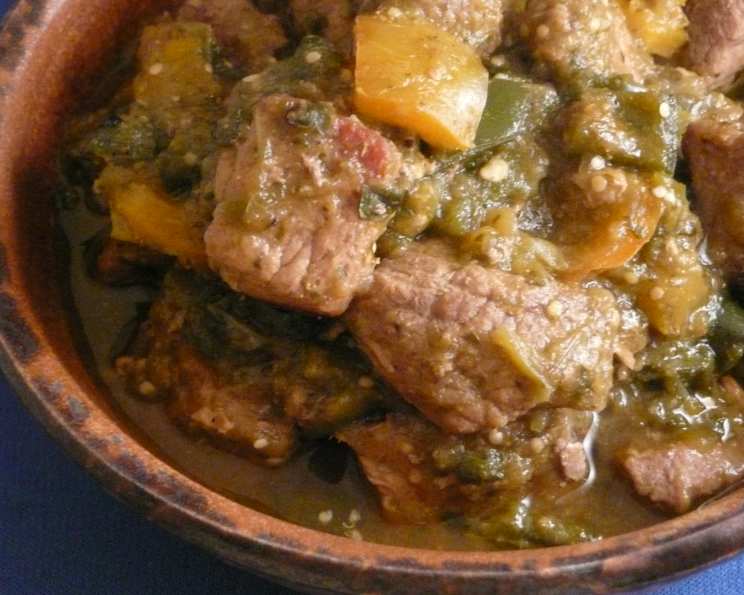
Pork Chili Verde: A Taste of Home
The aroma of roasting chiles always takes me back to my grandmother’s kitchen. I can almost see her now, carefully charring peppers over an open flame, her wrinkled hands moving with a grace born of years of experience. The air would fill with a smoky, earthy scent that promised warmth and comfort, and I knew that soon, a pot of her famous chili verde would be simmering on the stove, ready to chase away the chill of a fall evening. This pork chili verde recipe, while my own, is deeply inspired by those memories, a tribute to the flavors of my childhood and the woman who taught me the true meaning of home cooking.
Recipe Overview
- Prep Time: 45 minutes
- Cook Time: 3 hours
- Total Time: 3 hours 45 minutes
- Servings: 16-20
- Yield: Large pot of chili
- Dietary Type: Gluten-Free
Ingredients
- 6 lbs lean pork, trimmed and cut into 2-inch cubes
- ¼ cup vegetable oil or lard
- 2 large yellow onions, chopped
- 6 large garlic cloves, minced
- 1 tablespoon sea salt
- Fresh ground black pepper, to taste
- 1 tablespoon cumin
- 8 medium poblano chiles, seeded and chopped
- 4 large jalapenos, seeded and minced
- 2 large yellow bell peppers, seeded and chopped
- 4 cups chicken stock
- 3 lbs fresh tomatillos, husks removed
- 1 bunch cilantro leaf, chopped
Equipment Needed
- Large (6-8 quart) stock pot
- Blender
Instructions
- Begin by preparing the pork. Trim off any excess fat from the pork and cut it into approximately 2-inch squares.
- In a large (6 to 8 quart) stock pot, over high heat, sear the pork in the vegetable oil or lard until it is golden brown on all sides. Searing the pork develops a rich, deep flavor that is essential to the final result. Work in batches to avoid overcrowding the pot, which can lower the temperature and prevent proper browning.
- Remove the pork from the pot and set aside. Pour off any excess oil or fat drippings, leaving about 2 tablespoons in the pot.
- In the same pot, over medium heat, add the chopped onion, minced garlic, sea salt, and fresh ground black pepper. Sauté until the onions become transparent and softened. This usually takes about 5-7 minutes. Stir frequently to prevent burning.
- Add the cumin and the seared pork back to the pot. Pour in the chicken stock, ensuring the pork is mostly submerged. Bring the mixture to a boil, then reduce the heat to a simmer, cover, and cook for 30 minutes. Simmering allows the flavors to meld together and the pork to begin to tenderize.
- Add the chopped poblano chiles, minced jalapenos, and chopped yellow bell peppers to the pot. Stir well to combine.
- In a blender, puree the tomatillos and cilantro until smooth. This mixture will form the base of the chili verde sauce. Add the tomatillo and cilantro puree to the pot with the pork and vegetables.
- Cook the chili verde for an additional 30 to 45 minutes, or until the pork is very tender. Check the tenderness of the pork by piercing it with a fork. It should easily pull apart. Note: Cooking times may vary depending on the cut of pork and your stove. Mine usually requires a bit longer, so don’t be afraid to extend the cooking time if needed.
- Taste and adjust seasonings as needed, adding more salt, pepper, or cumin to your preference.
- Serve hot with white beans and rice. Garnish with grated sharp white cheddar cheese, if desired.
Expert Tips & Tricks
- Chile Roasting Shortcut: If you’re short on time, you can use canned diced green chiles in place of the fresh poblanos and jalapenos. While the flavor won’t be quite as complex, it’s a great way to streamline the process. You can also use the broiler in your oven to char the poblanos and jalapenos; just watch them closely to prevent burning.
- Pork Selection: Pork shoulder (also known as pork butt) is the ideal cut for chili verde because it has a good amount of marbling, which renders during cooking and keeps the meat moist and tender. If you can’t find pork shoulder, you can substitute pork loin, but be careful not to overcook it, as it can dry out easily.
- Spice Level Adjustment: Adjust the amount of jalapenos to control the heat level of the chili. If you prefer a milder chili, remove the seeds and membranes from the jalapenos before mincing. For a spicier chili, leave the seeds in or add an extra jalapeno.
- Thickening the Chili: If you prefer a thicker chili, you can remove about a cup of the liquid from the pot and blend it with a tablespoon of cornstarch. Then, stir the mixture back into the pot and cook for a few minutes until it thickens.
- Make-Ahead Marvel: Chili verde tastes even better the next day, as the flavors have had time to meld together. Make it a day ahead of time and store it in the refrigerator. Reheat gently on the stovetop before serving.
Serving & Storage Suggestions
Serve this vibrant pork chili verde hot, ladled over a bed of fluffy white rice and alongside a bowl of creamy white beans. A dollop of sour cream or a sprinkle of crumbled cotija cheese adds a cool, tangy counterpoint to the rich, savory flavors. This chili is also delicious served with warm tortillas for scooping.
Leftover chili verde can be stored in an airtight container in the refrigerator for up to 3-4 days. For longer storage, freeze in freezer-safe containers for up to 2-3 months. Thaw overnight in the refrigerator before reheating on the stovetop over medium heat until heated through.
Nutritional Information
| Nutrient | Amount per Serving | % Daily Value |
|---|---|---|
| Calories | 349.8 kcal | N/A |
| Calories from Fat | N/A | N/A |
| Total Fat | 14.8 g | 22% |
| Saturated Fat | 4.1 g | 20% |
| Cholesterol | 102.2 mg | 34% |
| Sodium | 614.6 mg | 25% |
| Total Carbohydrate | 13.4 g | 4% |
| Dietary Fiber | 2.6 g | 10% |
| Sugars | 6.4 g | N/A |
| Protein | 39.8 g | 79% |
Variations & Substitutions
- Chicken Chili Verde: Substitute the pork with an equal amount of boneless, skinless chicken thighs or breasts. Reduce the cooking time accordingly, as chicken cooks faster than pork.
- Vegetarian Chili Verde: Omit the pork and add 2 (15-ounce) cans of drained and rinsed great northern or cannellini beans. You can also add other vegetables like zucchini, corn, or potatoes.
- Spicy Chili Verde: Add 1-2 more jalapenos, or a few pinches of cayenne pepper, to increase the heat level.
- Smoked Chili Verde: Add 1-2 smoked ham hocks to the pot during the simmering process for a smoky flavor. Remove the ham hocks before serving and shred the meat from the hocks to add back to the chili.
FAQs (Frequently Asked Questions)
Q: Can I make this in a slow cooker?
A: Yes, you can adapt this recipe for a slow cooker. Sear the pork as directed, then transfer all ingredients to the slow cooker. Cook on low for 6-8 hours or on high for 3-4 hours, or until the pork is very tender.
Q: What is the best way to seed the chiles?
A: Wear gloves! Cut the chiles in half lengthwise and use a spoon to scrape out the seeds and membranes. Rinse under cold water to remove any remaining seeds.
Q: Can I use canned tomatillos?
A: While fresh tomatillos are preferred, you can substitute them with canned tomatillos. Drain them well before pureeing. You may need to adjust the seasoning, as canned tomatillos can be more acidic.
Q: What kind of beans go best with chili verde?
A: Great northern beans, cannellini beans, or pinto beans are all excellent choices. You can use canned beans for convenience, or cook dried beans from scratch.
Q: Can I freeze this chili verde?
A: Yes, chili verde freezes very well. Allow it to cool completely before transferring it to freezer-safe containers. Freeze for up to 2-3 months. Thaw overnight in the refrigerator before reheating.
Final Thoughts
I hope this recipe brings you as much joy as it has brought me and my family over the years. Don’t be afraid to experiment with the ingredients and adjust the flavors to your liking. Whether you’re a seasoned chef or a beginner cook, I encourage you to give this pork chili verde a try. Serve it with a cold Mexican beer and some warm tortillas for a truly authentic and satisfying meal. And please, let me know how it turns out – I love hearing your feedback!