
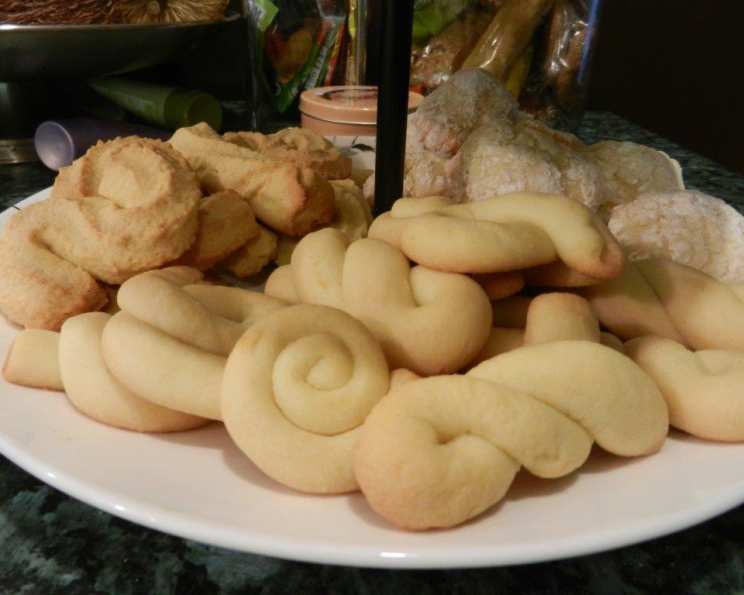
Rosquilhas Secas: A Taste of Portugal in Every Bite
The memory is as clear as the Portuguese sun: my grandmother’s kitchen, filled with the warm, comforting aroma of baking cookies. Not just any cookies, but rosquilhas secas, those subtly sweet, twice-baked rings that seemed to capture the very essence of her love. I’d sit at her feet, mesmerized as she deftly rolled and shaped the dough, her hands moving with the practiced grace of generations. The best part? Snapping one of those slightly crunchy, perfectly golden rings in half and savoring the simple, yet deeply satisfying flavor. These cookies weren’t just a treat; they were a tangible link to my heritage, a taste of home I carry with me wherever I go.
Recipe Overview
- Prep Time: 30 minutes
- Cook Time: 50 minutes
- Total Time: 2 hours 30 minutes (including chilling)
- Yields: 6-8 dozen
- Dietary Type: Not specified
Ingredients
- 7 cups all-purpose flour
- 2 cups sugar
- 8 large eggs, room temperature
- 1 lb butter, softened
- 2 teaspoons baking powder
- 2 lemons, rind of
Equipment Needed
- Mixing bowls
- Electric mixer
- Plastic wrap
- Measuring cups and spoons
- Baking sheets
- Cooling rack
Instructions
- In a large mixing bowl, beat the eggs and sugar together for a couple of minutes until light and fluffy. This step is crucial for incorporating air into the dough and creating a tender crumb.
- Add the lemon rind, softened butter, and baking powder to the egg mixture. Beat until the butter is fully combined and the mixture is smooth. Ensure your butter is truly softened to avoid lumps in the dough.
- Gradually add the flour to the wet ingredients, mixing well until a dough forms. Be careful not to overmix the dough, as this can develop the gluten and result in tougher cookies.
- Cover the dough tightly with plastic wrap and refrigerate overnight. This chilling period allows the gluten to relax, making the dough easier to handle and the cookies more tender. Don’t skip this step!
- The next day, preheat your oven to 350°F (175°C).
- Remove the dough from the refrigerator.
- Using a spoon, scoop walnut-sized pieces of dough.
- Roll each piece of dough into a 1/2-inch thick, 6-inch rope. The consistency of the dough should be easy to manage at this point. If it’s too sticky, add a little more flour.
- Press the ends of each rope firmly together, forming a ring.
- Gently stretch the rings slightly to open the center hole. This helps them bake evenly.
- Alternatively, for a different shape, you can make twists by folding the length of the rolled dough in half, then twisting a few times. This is a great way to add variety to your batch.
- Place the formed cookies on an ungreased baking sheet, leaving approximately 1 1/2 inches of space between each cookie.
- Reduce the oven temperature to 300°F (150°C).
- Bake the rings for 20 minutes, or until they begin to develop a light golden color. Keep a close eye on them, as oven temperatures can vary.
- Once all of the cookies have been baked, place them on a large baking sheet, piling them up if necessary.
- Reduce the oven temperature to 150°F (65°C).
- Return the cookies to the oven for approximately 30 minutes, or until they are crispy and golden brown. This second baking process is what gives rosquilhas secas their signature crunch. This low and slow bake ensures the moisture evaporates, resulting in a perfectly dry cookie.
Expert Tips & Tricks
- Room Temperature Matters: Using room temperature eggs and softened butter is essential for a smooth and well-emulsified dough. This ensures even baking and a tender texture.
- Don’t Overmix: Overmixing the dough will develop the gluten, resulting in tougher cookies. Mix just until the ingredients are combined.
- Chilling is Key: The overnight chilling period is crucial for both flavor development and dough handling. It also prevents the cookies from spreading too much during baking.
- Second Bake Precision: Monitor the cookies closely during the second bake. The goal is to dry them out without burning them. Adjust the time as needed based on your oven.
- Lemon Zest Power: Don’t skimp on the lemon zest! It adds a bright and refreshing flavor that complements the sweetness of the cookies.
- Even Baking: Rotate the baking sheets halfway through both baking stages to ensure even browning.
Serving & Storage Suggestions
These rosquilhas secas are best enjoyed with a cup of strong coffee or tea. They are also a wonderful accompaniment to Vinho do Porto (Port wine), a classic Portuguese pairing.
To store, allow the cookies to cool completely before placing them in an airtight container. They will keep at room temperature for up to 2 weeks. For longer storage, you can freeze them for up to 3 months. Thaw them completely before serving. The crisp texture may soften slightly after freezing, but they will still be delicious.
Nutritional Information
Please note that the following nutritional information is an estimate and may vary depending on the specific ingredients used.
| Nutrient | Amount per Serving | % Daily Value |
|---|---|---|
| Calories | 150 kcal | 8% |
| Total Fat | 7g | 11% |
| Saturated Fat | 4g | 20% |
| Cholesterol | 40mg | 13% |
| Sodium | 75mg | 3% |
| Total Carbohydrate | 20g | 7% |
| Dietary Fiber | 0.5g | 2% |
| Sugars | 7.5g | N/A |
| Protein | 1g | 2% |
Variations & Substitutions
- Gluten-Free: For a gluten-free version, substitute the all-purpose flour with a gluten-free all-purpose flour blend. You may need to adjust the liquid slightly to achieve the right dough consistency.
- Spice it Up: Add a pinch of ground cinnamon or nutmeg to the dough for a warm and comforting flavor.
- Citrus Twist: Experiment with different citrus zests, such as orange or lime, to create unique flavor profiles.
- Nutty Addition: Incorporate finely chopped almonds or walnuts into the dough for added texture and flavor.
- Vegan Option: While more difficult, substituting the butter with a vegan butter alternative and the eggs with a commercial egg replacer might be possible, but it will likely alter the texture and flavor significantly.
FAQs (Frequently Asked Questions)
Q: Why do I need to chill the dough overnight?
A: Chilling the dough allows the gluten to relax, resulting in more tender cookies. It also helps the dough hold its shape during baking and prevents excessive spreading.
Q: Can I use salted butter instead of unsalted?
A: Yes, you can use salted butter. However, you may want to reduce the amount of salt added to the dough to avoid overly salty cookies.
Q: My cookies are spreading too much during baking. What am I doing wrong?
A: This could be due to several factors: the dough wasn’t chilled long enough, the butter was too soft, or the oven temperature is too low. Ensure the dough is properly chilled, the butter is softened but not melted, and your oven is accurately calibrated.
Q: Can I freeze the baked cookies?
A: Yes, you can freeze the baked cookies in an airtight container for up to 3 months. Thaw them completely before serving.
Q: How do I know when the cookies are done during the second bake?
A: The cookies are done when they are crispy and golden brown. The exact baking time will depend on your oven, so keep a close eye on them and adjust the time as needed.
Final Thoughts
I wholeheartedly encourage you to try this recipe for rosquilhas secas. It’s more than just a cookie recipe; it’s a journey back to simpler times, a connection to family and tradition. Share these delightful treats with loved ones, and don’t hesitate to experiment with variations to make them your own. And if you do, please share your feedback – I’d love to hear how they turned out! These cookies are wonderful served with a glass of chilled aguardente after a hearty Portuguese meal. Bom apetite!