
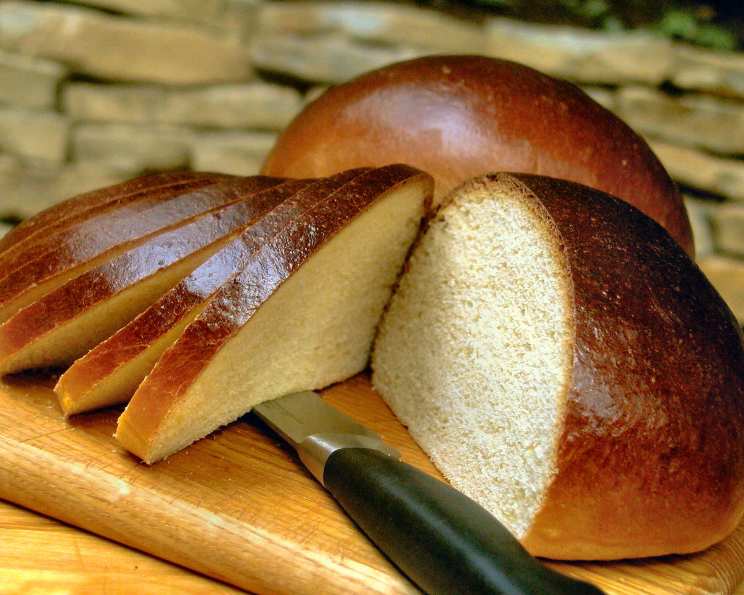
Portuguese Sweet Bread: A Taste of Home
The aroma alone transports me back to my grandmother’s kitchen. Sunlight streamed through the window, illuminating the flour dust dancing in the air as she kneaded and coaxed this very dough to life. The sweet, almost floral scent filled the house, a promise of the warm, golden loaves to come. Portuguese Sweet Bread wasn’t just a recipe; it was a symbol of family, love, and the simple joy of sharing something delicious, a tradition I’m thrilled to pass on to you.
Recipe Overview
- Prep Time: 2 hours 30 minutes (includes sponge and dough fermentation/proofing)
- Cook Time: 50-60 minutes
- Total Time: 6 hours 50 minutes
- Yields: 2 1-pound loaves
- Serves: 28
- Dietary Type: Not Vegetarian/Vegan
Ingredients
Sponge:
- ½ cup bread flour (unbleached, 2.25 ounces)
- 1 tablespoon granulated sugar (0.5 ounce)
- 2 ¼ teaspoons instant yeast (0.25 ounce)
- ½ cup water, at room temperature (4 ounces)
Dough:
- 6 tablespoons granulated sugar (3 ounces)
- 1 teaspoon salt (0.25 ounce)
- ¼ cup powdered milk (1.25 ounces)
- 2 tablespoons unsalted butter, at room temperature (1 ounce)
- 2 tablespoons vegetable shortening (1 ounce)
- 2 large eggs (3.3 ounces)
- 1 teaspoon lemon extract (0.17 ounce)
- 1 teaspoon orange extract (0.17 ounce)
- 1 teaspoon vanilla extract (0.17 ounce)
- 3 cups bread flour (unbleached, 13.5 ounces)
- 6 tablespoons (approximate) water, at room temperature (3 ounces)
Egg Wash:
- 1 egg, whisked with
- 1 teaspoon water, until frothy
Equipment Needed
- Small bowl
- 4-quart mixing bowl (or stand mixer bowl)
- Plastic wrap
- Large bowl
- Two 9-inch pie pans
- Spray oil
- Oven
- Oven rack
- Cooling rack
- Thermometer
Instructions
-
Prepare the Sponge: In a small bowl, stir together the bread flour, granulated sugar, and instant yeast. Add the water and stir until all ingredients are hydrated, forming a smooth batter. Cover the bowl with plastic wrap and ferment at room temperature for 60-90 minutes, or until the sponge becomes foamy and appears on the verge of collapse. This fermentation process is crucial for developing the bread’s characteristic flavor and texture.
-
Create the Dough: In a 4-quart mixing bowl (or the bowl of an electric mixer), combine the granulated sugar, salt, powdered milk, butter, and vegetable shortening. Using a sturdy spoon (or the paddle attachment of your mixer), cream together until smooth. Then, mix in the eggs and the lemon, orange, and vanilla extracts. The extracts add a subtle citrusy sweetness that complements the bread beautifully.
-
Combine Sponge and Flour: Begin kneading by hand (or switch to the dough hook attachment if using a mixer) and mix in the prepared sponge and the bread flour. Tip: If using a mixer, wait until most of the ingredients are combined before switching to the dough hook. This will help the dough grab onto the hook more easily.
-
Add Water Gradually: Add the water, as needed, to create a very soft dough. You may not need the full amount of water, as this can vary depending on factors like the moisture content and protein percentage of your flour. The finished dough should be very supple and soft, easy to knead, and not wet or sticky.
-
Knead the Dough: Achieving the right dough consistency is paramount. Knead for 10-12 minutes with a mixer, or close to 15 minutes by hand. Doughs with high amounts of fat and sugar usually take longer to knead because the gluten requires more time to develop. The finished dough should pass the windowpane test (see note below) and register 77°F to 81°F using a thermometer.
-
First Fermentation (Bulk Fermentation): Lightly oil a large bowl. Place the dough in the bowl, rolling it around to coat with oil. Cover with plastic wrap. Ferment at room temperature until the dough doubles in size, around 2 hours. This bulk fermentation stage allows the yeast to work its magic, creating air pockets and developing flavor.
-
Divide and Shape: Remove the dough from the bowl and divide it into 2 equal pieces. Form each piece into a boule (a round loaf).
-
Proofing: Lightly oil two 9-inch pie pans. Place a boule, seam side down, in each pan. Mist with spray oil and loosely cover with plastic wrap. Proof at room temperature for 2 to 3 hours, or until the dough fills the pans fully, doubling in size. This final proofing stage allows the dough to rise and become light and airy. If you want to bake only 1 of the loaves, you can retard the second in the refrigerator for 1 day, but it will take 4 to 5 hours to proof after it comes out of the refrigerator.
-
Prepare for Baking: Very gently brush the loaves with the egg wash. Preheat the oven to 350°F (175°C) with the oven rack on the middle shelf.
-
Bake: Bake the loaves for 50 to 60 minutes, or until they register 190°F (88°C) in the center using a thermometer. After 30 minutes, check the loaves and rotate 180 degrees, if necessary, for even baking. The dough will brown rather quickly due to the high sugar content. When done, the loaves will be a rich mahogany brown.
-
Cool: Remove the bread from the pie pans and place on a rack to cool. The bread will soften as it cools, resulting in a very soft, squishy loaf. Allow the bread to cool for at least 90 minutes before slicing or serving. Patience is key! Letting the bread cool properly allows the internal structure to set, preventing a gummy texture.
Windowpane Test: Cut off a small piece of dough and gently stretch, pulling and turning it to see if it will hold a paper-thin, translucent membrane. If it falls apart before it makes this windowpane, continue to knead for another minute or two and test again.
Expert Tips & Tricks
- Room Temperature Matters: Ensuring your ingredients, especially butter and eggs, are at room temperature will help them incorporate smoothly into the dough, leading to a more even texture.
- Don’t Overproof: Overproofed dough can collapse during baking, resulting in a dense loaf. Keep a close eye on the dough during the proofing stage and bake when it has nearly doubled, but still has some spring when gently pressed.
- Oven Thermometer is Your Friend: Ovens can vary in temperature, so using an oven thermometer ensures accurate baking. This is especially important with sweet breads, as the high sugar content can cause them to burn easily if the oven is too hot.
- Watch the Browning: If the bread starts to brown too quickly, tent it loosely with foil during the last 15-20 minutes of baking to prevent burning.
Serving & Storage Suggestions
Portuguese Sweet Bread is delicious served warm or at room temperature. It’s wonderful on its own, with a smear of butter or jam, or used for French toast.
- Storage: Store cooled bread in an airtight container at room temperature for up to 3 days.
- Freezing: For longer storage, wrap the bread tightly in plastic wrap and then foil, or place in a freezer bag. Freeze for up to 2 months. Thaw completely at room temperature before serving.
- Reheating: To reheat, wrap the bread in foil and warm in a 350°F (175°C) oven for 10-15 minutes, or until heated through. You can also toast slices individually.
Nutritional Information
| Nutrient | Amount per Serving | % Daily Value |
|---|---|---|
| Calories | 100 | N/A |
| Calories from Fat | 24g | 25% |
| Total Fat | 2.7 g | 4% |
| Saturated Fat | 1.2 g | 5% |
| Cholesterol | 23.2 mg | 7% |
| Sodium | 95.8 mg | 3% |
| Total Carbohydrate | 15.7 g | 5% |
| Dietary Fiber | 0.5 g | 2% |
| Sugars | 3.7 g | 14% |
| Protein | 2.7 g | 5% |
Note: Nutritional information is an estimate and may vary based on specific ingredients and portion sizes.
Variations & Substitutions
- Citrus Zest: Add the zest of one orange or lemon to the dough for an extra burst of citrus flavor.
- Spices: Incorporate a pinch of ground cardamom or nutmeg for a warm, aromatic twist.
- Raisins or Dried Cranberries: Fold in ½ cup of raisins or dried cranberries into the dough before shaping for added sweetness and texture.
- Vegan Adaptation: While more involved, this recipe can be made vegan by substituting the butter with a high-quality vegan butter alternative, the powdered milk with a non-dairy milk powder (such as soy or coconut), and the eggs with a commercial egg replacer. Finding a good egg replacer is key for structure! The results will vary.
FAQs (Frequently Asked Questions)
Q: Why is my bread browning so quickly?
A: Portuguese Sweet Bread has a high sugar content, which causes it to brown faster than other breads. Keep a close eye on it during baking and tent with foil if needed.
Q: Can I use active dry yeast instead of instant yeast?
A: Yes, but you’ll need to proof the active dry yeast first. Dissolve it in warm water with a pinch of sugar and let it sit for 5-10 minutes until foamy before adding it to the sponge.
Q: My dough is too sticky. What should I do?
A: Add flour one tablespoon at a time until the dough reaches the desired consistency. Be careful not to add too much, as this can make the bread dry.
Q: Can I make this dough in a bread machine?
A: Yes, you can use the dough cycle on your bread machine. Add the ingredients in the order recommended by your machine’s manufacturer. After the dough cycle is complete, shape and bake as directed.
Q: How do I know when the bread is done baking?
A: The best way to check for doneness is to use a thermometer. The bread should register 190°F (88°C) in the center. It should also be a rich mahogany brown color.
Final Thoughts
Baking Portuguese Sweet Bread is more than just following a recipe; it’s about connecting with tradition and creating something truly special. Don’t be intimidated by the process – each step is a small act of love that transforms simple ingredients into a comforting and delicious loaf. So, preheat your oven, gather your ingredients, and embark on this baking adventure. I encourage you to share your creations and experiences with others, and most importantly, enjoy the sweet rewards of your labor. Serve with a strong cup of coffee or a glass of port wine for the full Portuguese experience. Bom apetite!