
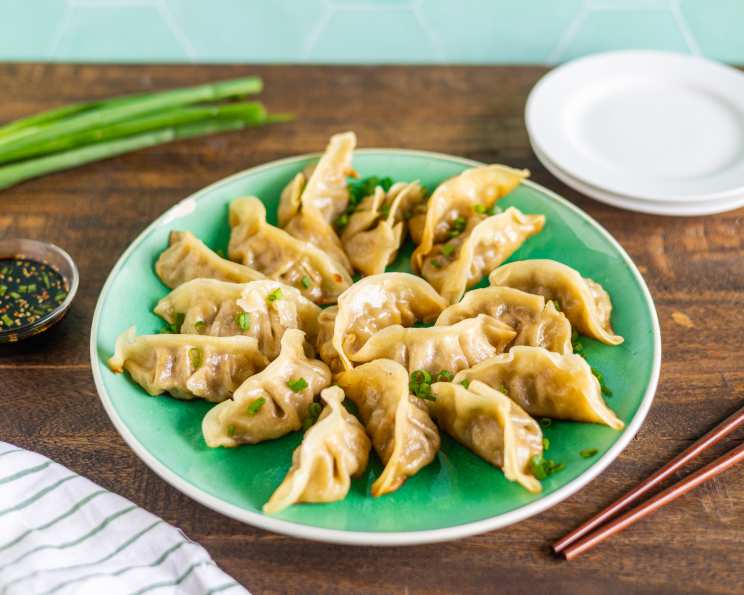
Mastering the Art of Pot Stickers: A Chef’s Guide
The sizzle of pot stickers in a hot pan, the tantalizing aroma of ginger and sesame oil filling the air – these sensory memories transport me straight back to my college days. My tiny apartment kitchen, usually reserved for instant ramen, was transformed into a dumpling-making factory thanks to my roommate’s grandmother’s recipe. We’d spend hours folding these little pockets of deliciousness, a comforting ritual that transcended the simple act of cooking. Each perfectly browned, crispy-bottomed pot sticker was a tiny victory, a testament to our shared effort and a promise of a satisfyingly savory meal. Now, decades later, I still feel that thrill every time I make them.
Recipe Overview
- Prep Time: 30 minutes
- Cook Time: 20 minutes
- Total Time: 50 minutes
- Servings: 25-30 pot stickers
- Yield: 25-30 pot stickers
- Dietary Type: Not specified (can be adapted; see variations)
Ingredients
- 1 lb ground pork
- 2 green onions, chopped
- 1 tablespoon soy sauce
- 2 teaspoons rice wine
- 1 teaspoon sesame oil
- 1 garlic clove, minced
- 1 egg, beaten
- 1 tablespoon cornstarch
- 1⁄4 teaspoon salt
- 1⁄4 teaspoon pepper
- Peanut oil
- 1 cup chicken broth, divided
- 25-30 wonton skins
Equipment Needed
- Large bowl
- Measuring spoons and cups
- Large skillet with a lid
- Small bowl (for water)
- Plate or baking sheet
Instructions
-
In a large bowl, combine the ground pork, chopped green onions, soy sauce, rice wine, sesame oil, minced garlic, beaten egg, cornstarch, salt, and pepper. Mix thoroughly until all ingredients are evenly distributed. This mixture forms the delicious filling for your pot stickers.
-
Lay out a wonton wrapper on a clean surface. Place a heaping teaspoon of the pork filling in the center of the wrapper. Be careful not to overfill, as this can make the pot stickers difficult to seal.
-
Moisten the edges of the wonton wrapper with a little water. This will act as a glue to help the wrapper seal properly. Fold the wrapper over the filling to form a half-moon shape. Press firmly along the edges to seal, ensuring no air pockets remain. You can create decorative pleats along the sealed edge if desired, but a simple, tight seal is perfectly fine.
-
Heat 3 tablespoons of peanut oil in a large skillet over medium-high heat. Once the oil is hot and shimmering, carefully place the pot stickers in the skillet, ensuring they are not overcrowded. Work in batches if necessary.
-
Sauté the pot stickers until the bottoms are golden brown. This typically takes about 3-5 minutes. Keep a close eye on them to prevent burning.
-
Once the bottoms are nicely browned, add 1/2 cup of chicken broth to the skillet. Immediately cover the pan with a lid. The chicken broth will create steam, which will cook the filling inside the pot stickers.
-
Simmer the pot stickers, covered, for 8 minutes. The chicken broth should mostly evaporate during this time, and the wonton wrappers will become translucent and tender.
-
Remove the cooked pot stickers from the pan and place them on a plate or baking sheet to keep warm.
-
Reserve the remaining broth in the skillet in a separate bowl. This flavorful broth can be used as a dipping sauce or added to soups and sauces.
-
Repeat steps 4-9 with the remaining pot stickers, using more peanut oil and chicken broth as needed. Be sure to adjust the cooking time and amount of chicken broth based on the size of your skillet and the number of pot stickers you are cooking at once.
-
Keep the cooked pot stickers warm on a covered plate until ready to serve. This prevents them from drying out and losing their appealing texture.
Expert Tips & Tricks
- Perfect Pleats: For a classic pot sticker look, create pleats along one edge of the wrapper before sealing. This not only looks beautiful but also helps to ensure a tight seal.
- Prevent Sticking: Ensure your skillet is hot enough before adding the pot stickers. This will help them to sear properly and prevent sticking. Using a non-stick skillet can also be helpful.
- Broth Alternative: If you don’t have chicken broth, you can use water or vegetable broth. The broth adds flavor, but the steaming process is the most important part.
- Make-Ahead Magic: Prepare the filling ahead of time and store it in the refrigerator for up to 24 hours. This allows the flavors to meld together and saves time on the day you plan to cook. You can also assemble the pot stickers in advance and freeze them on a baking sheet before transferring them to a freezer bag. Cook them directly from frozen, adding a few extra minutes to the cooking time.
Serving & Storage Suggestions
Serve your golden-brown pot stickers immediately while they are hot and crispy. Arrange them artfully on a platter and garnish with chopped green onions and a drizzle of sesame oil. Serve with your favorite dipping sauce, such as soy sauce, rice vinegar, chili oil, or the reserved chicken broth from the cooking process.
Leftover pot stickers can be stored in an airtight container in the refrigerator for up to 3 days. To reheat, pan-fry them in a little oil until crispy or steam them gently until heated through. You can also microwave them, but they may lose some of their crispness.
Nutritional Information
Please note that these values are estimates and can vary based on ingredient specifics and serving size.
| Nutrient | Amount per Serving | % Daily Value |
|---|---|---|
| Calories | 150 kcal | 8% |
| Total Fat | 8g | 10% |
| Saturated Fat | 3g | 15% |
| Cholesterol | 30mg | 10% |
| Sodium | 250mg | 11% |
| Total Carbohydrate | 10g | 4% |
| Dietary Fiber | 1g | 4% |
| Sugars | 1g | – |
| Protein | 8g | 16% |
Variations & Substitutions
- Vegetarian Pot Stickers: Substitute the ground pork with finely chopped mushrooms, tofu, or a combination of vegetables such as cabbage, carrots, and spinach.
- Chicken or Shrimp Pot Stickers: Use ground chicken or finely chopped shrimp instead of pork. Adjust seasoning as needed.
- Spicy Pot Stickers: Add a pinch of red pepper flakes or a teaspoon of chili garlic sauce to the filling for a spicy kick.
- Gluten-Free Option: Look for gluten-free wonton wrappers, which are becoming increasingly available in specialty grocery stores. You can also make your own using a gluten-free flour blend.
- Dipping Sauce Variations: Experiment with different dipping sauces to complement the flavor of the pot stickers. Try a combination of soy sauce, rice vinegar, sesame oil, and ginger, or a sweet and sour sauce.
FAQs (Frequently Asked Questions)
Q: Can I use different types of wrappers?
A: Yes, you can use gyoza wrappers instead of wonton wrappers. Gyoza wrappers are slightly thicker and chewier, giving the pot stickers a different texture.
Q: How do I prevent the pot stickers from sticking to the pan?
A: Make sure the pan is hot enough and has enough oil before adding the pot stickers. Using a non-stick pan also helps.
Q: Can I bake these instead of pan-frying and steaming?
A: Baking is not recommended as it won’t achieve the signature crispy bottom and tender steamed top. The pan-frying and steaming method is essential for the best texture.
Q: Can I freeze cooked pot stickers?
A: Yes, you can freeze cooked pot stickers. Let them cool completely, then arrange them in a single layer on a baking sheet and freeze until solid. Transfer them to a freezer bag for longer storage. Reheat them by pan-frying or steaming.
Q: What can I use instead of rice wine?
A: If you don’t have rice wine, you can substitute it with dry sherry or a small amount of apple cider vinegar.
Final Thoughts
Making pot stickers might seem a little daunting at first, but with a little practice, you’ll be folding and frying like a pro in no time. Don’t be afraid to experiment with different fillings and flavors to create your own signature pot sticker recipe. Gather your friends and family, put on some music, and turn it into a fun and collaborative cooking experience. The best part? Sharing the fruits of your labor with loved ones and enjoying those perfect, crispy-bottomed bites together. Let me know in the comments what variations you tried, and how they turned out!