
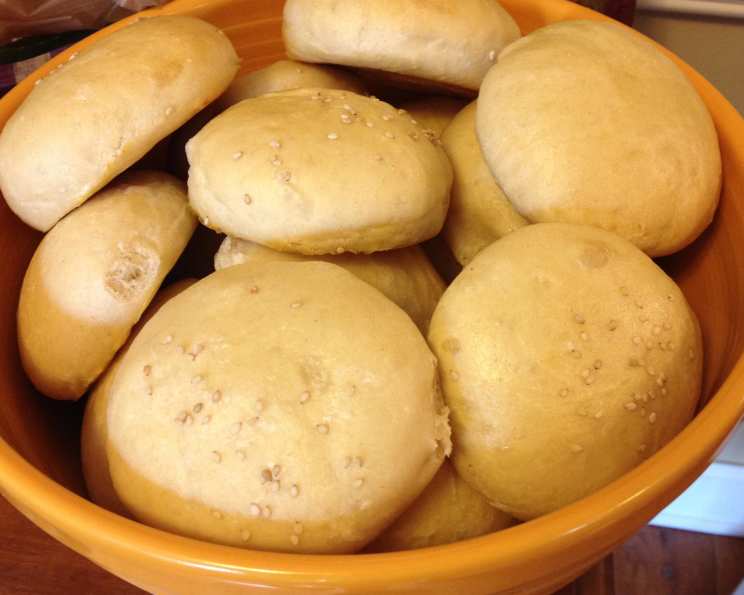
Potato Bread and Buns With Potato Starch
The scent of baking bread is a powerful time machine. One whiff, and I’m transported back to my grandmother’s kitchen, a warm, sun-drenched space filled with the comforting aroma of yeast and rising dough. While she was famous for her sourdough, her secret weapon for the softest, most pillowy burger buns was always a touch of potato. This recipe, inspired by her wisdom, uses potato starch to achieve that same incredible tenderness in both loaves and buns, making every bite a memory worth savoring.
Recipe Overview
- Prep Time: 25 minutes
- Cook Time: 14 minutes
- Total Time: 1 hour 9 minutes (including proofing)
- Servings: 5
- Yields: 10 buns
- Dietary Type: Vegetarian
Ingredients
- 1⁄4 cup (33 g) potato starch
- 3 1⁄2 cups (1 lb) bread flour
- 2 teaspoons (6 g) instant yeast
- 2 1⁄2 teaspoons (12 g) sugar
- 1 1⁄2 teaspoons (9 g table salt)
- 1 1⁄3 cups (300 g) water
- 1 1⁄2 teaspoons (10 g) butter
- 1 egg (optional, beaten with 1 tsp water) for egg wash
Equipment Needed
- Large mixing bowl
- Measuring cups and spoons
- Dough scraper (optional)
- Kitchen scale (optional, for dividing dough)
- Oiled straight-sided container
- Plastic wrap
- Baking sheet
- Parchment paper
- Cooling rack
Instructions
-
In a large mixing bowl, combine the potato starch, bread flour, instant yeast, sugar, and salt. Mix well to ensure the ingredients are evenly distributed.
-
Add the water and butter to the dry ingredients. Mix well until a shaggy dough forms.
-
Cover the bowl and let the dough rest for 10 minutes. This allows the flour to fully hydrate, leading to a softer, more extensible dough. This process is called autolyse.
-
Turn the dough out onto a lightly floured surface. Knead the dough for 5 to 8 minutes, until it becomes smooth and elastic. It should pass the windowpane test – meaning you can stretch a small piece of dough thin enough to see light through it without tearing. If the dough is too sticky, add flour 1 tablespoon at a time.
-
Shape the dough into a rectangular shape. Fold the dough in thirds, letter-style, from top to bottom and then from side to side. This helps to develop strength and structure in the dough.
-
Place the folded dough in an oiled, straight-sided container. Cover the container with plastic wrap to prevent the dough from drying out.
-
After 15 minutes, gently stretch and fold the dough again inside the container. This strengthens the gluten structure, improving the bread’s texture and rise. Return the dough to the container and cover.
-
Let the dough proof until it has approximately doubled in size. This process can take anywhere from 1 to 2 hours, depending on the temperature of your kitchen. A warmer environment will encourage faster proofing.
-
Once the dough has doubled, gently remove it from the bowl and place it on a lightly floured surface. Divide the dough into 10 equal pieces, each weighing approximately 85 grams. Using a kitchen scale ensures uniformity in size and even baking.
-
Round each piece of dough on the counter by pressing down as you circulate your hand in a counter-clockwise direction until the piece is a smooth ball. This creates surface tension, which helps the buns hold their shape during baking.
-
Press each dough ball flat with floured hands. Repeat as needed over the next 10 minutes to flatten more. Place the flattened dough rounds on a baking sheet lined with parchment paper, leaving some space between each bun.
-
Preheat your oven to 375°F (190°C).
-
Cover the baking sheet with oiled plastic wrap to prevent the buns from drying out during proofing. Let the buns proof for about 30 minutes, or until they have risen to about 1 1/2 times their original volume.
-
If desired, brush the tops of the buns with the egg wash (egg beaten with 1 tsp of water). This will give them a beautiful golden-brown color and a slightly glossy finish.
-
Bake the buns for 7 minutes. Then, rotate the pan and bake for another 7 minutes, or until the internal temperature reaches 190°F (88°C). Rotating the pan ensures even baking and prevents hot spots.
-
Remove the buns from the oven and transfer them to a cooling rack. Allow them to cool completely before slicing and enjoying.
Expert Tips & Tricks
- Potato starch is the key to the incredibly soft texture of these buns. Don’t substitute with potato flour, as it has a different consistency and won’t produce the same results.
- If you don’t have instant yeast, you can use active dry yeast. Simply proof it in warm water (105-115°F) for 5-10 minutes before adding it to the dry ingredients.
- For a richer flavor, substitute the water with potato water (the water leftover from boiling potatoes).
- To ensure even baking, use an oven thermometer to verify the accuracy of your oven temperature.
- If the buns are browning too quickly, loosely tent them with aluminum foil during the last few minutes of baking.
Serving & Storage Suggestions
These potato buns are perfect for burgers, hot dogs, BBQ sandwiches, or even as a side with soups and stews. Serve them warm or at room temperature.
To store leftover buns, place them in an airtight container or a resealable plastic bag. They will keep at room temperature for 2-3 days, in the refrigerator for up to a week, or in the freezer for up to 3 months.
To reheat frozen buns, thaw them at room temperature or in the microwave. You can then warm them in a low oven (300°F) for a few minutes to restore their soft texture.
Nutritional Information
| Nutrient | Amount per Serving | % Daily Value |
|---|---|---|
| Calories | 384.8 kcal | N/A |
| Calories from Fat | 27 g | 7% |
| Total Fat | 3.1 g | 4% |
| Saturated Fat | 1.2 g | 5% |
| Cholesterol | 40.2 mg | 13% |
| Sodium | 730.8 mg | 30% |
| Total Carbohydrate | 76.2 g | 25% |
| Dietary Fiber | 3.3 g | 13% |
| Sugars | 2.6 g | N/A |
| Protein | 11.5 g | 23% |
Note: Nutritional information is an estimate and may vary depending on specific ingredients and portion sizes.
Variations & Substitutions
- Sweet Potato Buns: Replace half of the water with sweet potato puree for a hint of sweetness and a vibrant color.
- Whole Wheat Buns: Substitute up to half of the bread flour with whole wheat flour for a nuttier flavor and added fiber. You may need to add a bit more water to compensate for the increased absorption of the whole wheat flour.
- Herb-Infused Buns: Add a tablespoon of dried herbs, such as rosemary, thyme, or oregano, to the dry ingredients for a savory twist.
- Sesame Seed Buns: Sprinkle sesame seeds on top of the buns before baking for added flavor and texture.
- Garlic & Herb Buns: Mix minced garlic and your favorite herbs into melted butter and brush over the warm buns after baking.
FAQs (Frequently Asked Questions)
Q: Why use potato starch in bread making?
A: Potato starch absorbs and retains moisture, resulting in a softer, more tender crumb and longer shelf life. It also contributes to a slightly sweet flavor.
Q: Can I use potato flour instead of potato starch?
A: No, potato flour and potato starch are not interchangeable. Potato flour is made from the whole potato and has a much stronger potato flavor and a denser texture. It will not produce the same results as potato starch.
Q: How do I know when the dough has proofed enough?
A: The dough should have approximately doubled in size and feel light and airy. Gently poke the dough with your finger. If the indentation slowly springs back, the dough is ready to bake. If the indentation springs back immediately, it needs more time to proof. If the indentation doesn’t spring back at all, it has over-proofed.
Q: Can I make the dough ahead of time?
A: Yes, you can make the dough ahead of time and refrigerate it after the first proof. This will slow down the fermentation process and allow the flavors to develop further. Let the dough come to room temperature before shaping and baking.
Q: My buns are browning too quickly. What should I do?
A: If the buns are browning too quickly, loosely tent them with aluminum foil during the last few minutes of baking. This will help to prevent them from burning while still allowing them to bake through.
Final Thoughts
Don’t be intimidated by the thought of baking bread – this potato bun recipe is surprisingly simple and rewarding. The use of potato starch creates a texture that’s simply irresistible, making every sandwich a special occasion. So, gather your ingredients, preheat your oven, and prepare to be amazed by the incredible aroma and flavor of homemade potato bread. And after you’ve baked your first batch, don’t forget to share your creations and experiences – baking is always better when shared with friends and family! Consider pairing these buns with homemade pulled pork or grilled vegetables for the ultimate culinary experience.