
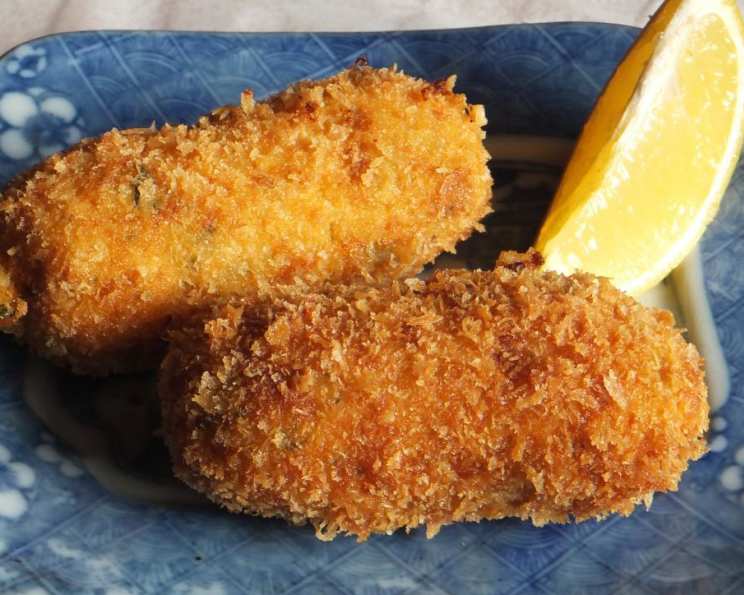
Prawn Croquettes: A Taste of Coastal Memories
The aroma of fried food instantly transports me back to my childhood holidays spent along the Spanish coast. I remember the salty air, the cries of gulls overhead, and, most vividly, the little tapas bars overflowing with locals. Nestled amongst plates of patatas bravas and glistening olives, there were always these golden-brown jewels: prawn croquettes. Each bite was an explosion of creamy, savory filling encased in a perfectly crisp, crunchy shell. They were simple, comforting, and utterly irresistible – a taste of summer I’ve never forgotten.
Recipe Overview
- Prep Time: 30 minutes
- Cook Time: 20 minutes
- Total Time: 13 hours 50 minutes (including chilling time)
- Yields: 36 units
- Serves: 6
- Dietary Type: Not Gluten-Free
Ingredients
- 3 1/2 ounces (100g) butter
- 4 ounces (115g) plain flour
- 1 1/4 pints (710ml) cold milk
- Salt and pepper to taste
- 14 ounces (400g) cooked peeled shrimp, diced
- 2 teaspoons tomato puree
- 5-6 tablespoons fine breadcrumbs
- 2 large eggs, beaten
- Olive oil, for deep-frying
Equipment Needed
- Medium saucepan
- Whisk
- Large, heavy-based pan
- Slotted spoon
- Kitchen paper
Instructions
-
Begin by preparing the base of the croquette filling. In a medium saucepan, melt the butter over medium heat.
-
Once melted, add the flour to the saucepan, stirring continuously with a whisk or wooden spoon. This creates a roux, the foundation of our creamy filling. Allow the flour to cook in the butter for a couple of minutes, stirring constantly. This step is crucial; it cooks out the raw flour taste and allows the roux to properly thicken the milk later.
-
Now, gradually add the cold milk to the roux, a little at a time, stirring continuously. This is important to prevent lumps from forming. Continue stirring until you have a thick, smooth sauce. Be patient; it takes a few minutes for the sauce to come together.
-
Add the diced shrimp to the sauce, along with a generous seasoning of salt and pepper. Stir well to combine.
-
Stir in the tomato puree. This adds a touch of acidity and sweetness that complements the richness of the shrimp and sauce.
-
Continue to cook the mixture for approximately 7 or 8 minutes, stirring frequently. The end result should be quite thick, almost like a very dense béchamel. This ensures the croquettes hold their shape when fried.
-
Remove the saucepan from the heat and transfer the mixture to a bowl or container. Let the mixture cool completely. This is a crucial step. It’s best to cover the container and refrigerate the mixture overnight, or for at least 12 hours. This allows the filling to firm up and makes it easier to shape the croquettes.
-
Once the mixture is thoroughly chilled and firm, it’s time to shape the croquettes. Take a scant tablespoon of the mixture and form it into a croqueta, a 1 1/2 – 2 inch cylinder. You can use your hands or two spoons to shape them. Don’t worry if they’re not perfect; the breading will help hold them together.
-
Prepare your breading station. In separate shallow dishes, place the fine breadcrumbs and the beaten eggs.
-
Roll the croqueta first in the breadcrumbs, ensuring it is completely coated. Then, coat it in the beaten egg, allowing any excess to drip off. Finally, roll it in the breadcrumbs again, making sure the croqueta is evenly coated on all sides. The double breading ensures a crisp and sturdy crust.
-
Repeat the breading process for all the remaining croquettes. Make sure the breadcrumbs are always dry to ensure an even coating. If the breadcrumbs become damp, replace them with fresh ones.
-
Now, it’s time to fry the croquettes. Heat the olive oil for deep-frying in a large, heavy-based pan. The oil should be deep enough to fully submerge the croquettes. Heat the oil until the temperature reaches 350ºF (175ºC). A simple way to test the oil temperature is to drop in a small cube of bread; it should turn golden brown in 20-30 seconds. If you have a deep-fry thermometer, use it to ensure the oil is at the correct temperature.
-
Carefully fry the croquettes in batches of no more than 3 or 4, to avoid overcrowding the pan and lowering the oil temperature.
-
Fry the croquettes for approximately 5 minutes, or until they are golden brown and crispy.
-
Remove the croquettes from the oil with a slatted spoon and drain them on kitchen paper to remove any excess oil.
-
Serve the prawn croquettes immediately. They are best enjoyed hot and fresh.
Expert Tips & Tricks
- For an extra smooth filling, you can use an immersion blender to blend the sauce after it has cooked, before adding the shrimp. Be careful not to over-blend.
- If the filling is too soft to shape, add a little more cooked mashed potato to firm it up.
- To prevent the croquettes from sticking to the pan, make sure the oil is hot enough before adding them.
- For a richer flavor, you can add a splash of sherry or brandy to the sauce.
- You can prepare the croquettes ahead of time and store them in the refrigerator for up to 24 hours before frying.
- For even browning, turn the croquettes gently while frying.
Serving & Storage Suggestions
Prawn croquettes are best served hot and fresh as an appetizer or tapas. They can be served with a variety of dipping sauces, such as aioli, garlic mayonnaise, or a simple lemon wedge. Leftover croquettes can be stored in an airtight container in the refrigerator for up to 2 days. Reheat them in a preheated oven at 350°F (175°C) for about 10-15 minutes, or until heated through and crispy. You can also reheat them in an air fryer for a similar result. Croquettes can be frozen, uncooked, after breading. Freeze them individually on a baking sheet before transferring to a freezer bag for up to 2 months. Fry from frozen, adding a few minutes to the cooking time.
Nutritional Information
| Nutrient | Amount per Serving | % Daily Value |
|---|---|---|
| Calories | 377.8 kcal | N/A |
| Calories from Fat | 182 g | 48% |
| Total Fat | 20.3 g | 31% |
| Saturated Fat | 11.6 g | 57% |
| Cholesterol | 251.2 mg | 83% |
| Sodium | 859 mg | 35% |
| Total Carbohydrate | 24.5 g | 8% |
| Dietary Fiber | 0.8 g | 3% |
| Sugars | 0.6 g | 2% |
| Protein | 23.4 g | 46% |
Variations & Substitutions
- Spicy Croquettes: Add a pinch of cayenne pepper or a dash of hot sauce to the filling for a kick.
- Ham & Cheese Croquettes: Replace some of the shrimp with diced ham and a handful of grated cheese.
- Vegetarian Croquettes: Substitute the shrimp with cooked mushrooms or spinach.
- Gluten-Free Croquettes: Use gluten-free breadcrumbs and a gluten-free flour blend for the roux.
- Different Seafood: Try using crab, lobster, or scallops instead of shrimp.
FAQs (Frequently Asked Questions)
Q: Can I make these ahead of time?
A: Absolutely! Preparing the shrimp mixture and shaping the croquettes the day before frying is a great time-saver. Just store them covered in the refrigerator.
Q: How do I prevent the croquettes from falling apart while frying?
A: Ensuring the shrimp mixture is very thick and thoroughly chilled is key. Also, a double coating of breadcrumbs helps create a sturdy crust.
Q: Can I freeze these croquettes?
A: Yes, you can freeze the croquettes after they have been shaped and breaded. Freeze them individually on a baking sheet before transferring to a freezer bag.
Q: What’s the best oil for deep-frying?
A: Olive oil is a good choice for its flavor and heat stability, but you can also use vegetable oil or canola oil.
Q: Can I bake these instead of frying them?
A: While frying is the traditional method for achieving a crispy crust, you can try baking them. Preheat your oven to 400°F (200°C), place the croquettes on a baking sheet, and bake for about 20-25 minutes, turning halfway through, until golden brown.
Final Thoughts
These prawn croquettes are more than just a recipe; they’re a gateway to a world of flavors and memories. Don’t be intimidated by the steps – each one contributes to the final result: a delightful harmony of textures and tastes. So, gather your ingredients, put on some music, and get ready to create a little piece of coastal magic in your own kitchen. And once you’ve mastered the basics, feel free to experiment with different fillings and flavor combinations to create your own signature croquettes! Share your creations and feedback – I can’t wait to hear what you come up with!