
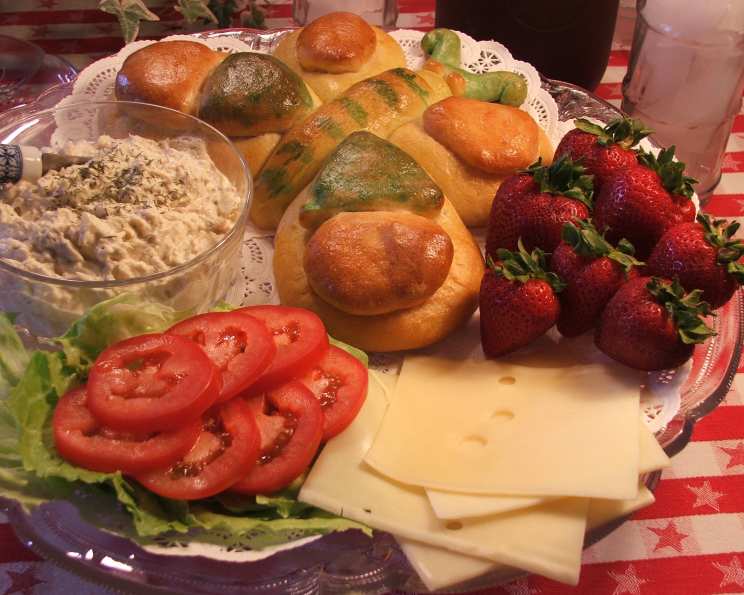
Pretty Butterfly Sandwich: A Whimsical Culinary Creation
I still remember the look on my daughter Lily’s face when I first presented her with a butterfly sandwich. Her eyes widened, a gasp escaped her lips, and a huge grin spread across her face. It wasn’t just a sandwich; it was a work of art, a testament to the power of food to bring joy. That day, a simple lunch became a cherished memory, and the Pretty Butterfly Sandwich became a tradition in our home. It’s a delightful dish that adds a touch of magic to any meal, perfect for birthdays, picnics, or simply a day when you want to make someone smile.
Recipe Overview
- Prep Time: 1 hour 5 minutes (includes rising time)
- Cook Time: 20 minutes
- Total Time: 1 hour 25 minutes
- Servings: 2
- Yield: 1 Butterfly Sandwich
- Dietary Type: Can be adapted to Vegetarian (depending on filling)
Ingredients
- 5 Rhodes frozen rolls, Texas-size, thawed but still cold
- 1 tablespoon melted butter
- 1 egg, beaten
- Filling of your choice (tuna salad, chicken salad, lunchmeats, cheeses, etc.)
Equipment Needed
- Baking Sheet
- Non-stick cooking spray
- Plastic Wrap
- Pastry Brush (optional)
Instructions
- Begin by cutting one of the frozen rolls in half. You’ll use one half for the butterfly’s body.
- Shape this half into a short, approximately 5-inch long rope. This will form the body of your butterfly.
- Place the rope onto a baking sheet that has been generously sprayed with non-stick cooking spray. This prevents the dough from sticking and ensures easy removal after baking. Save the remaining half of the roll for later decoration.
- For the large back wings, take two rolls and shape each into a large teardrop. Place these teardrop shapes beside the lower half of the butterfly’s body on the baking sheet.
- Now, cut another roll in half. Shape each half into a smaller teardrop. These will be the front wings.
- Place these smaller teardrops beside the upper half of the butterfly’s body.
- With the remaining one and a half rolls, it’s time to get creative with decorations for the wings. Form two flat teardrop shapes, two flat circles, two flat triangles, one thin small rope, and two small balls. These will be used to adorn the butterfly’s wings.
- Arrange these shapes on the wings to create a visually appealing design. Get creative and experiment with different patterns!
- Take the thin rope and bend it into a “V” shape. Place this above the butterfly’s head to form the antennae.
- Gently press the two small balls into the head to create the eyes.
- Brush the entire butterfly, including the body and wings, with the melted butter. This adds flavor and helps the bread brown beautifully.
- Cover the baking sheet with plastic wrap. This creates a warm, humid environment that encourages the dough to rise.
- Let the butterfly rise for approximately 45 minutes, or until it has roughly doubled in size. This allows the dough to become light and airy, resulting in a softer sandwich.
- Preheat your oven to 350°F (175°C).
- Once the butterfly has risen, remove the plastic wrap and gently brush it with the egg, beaten with 1 tablespoon of water. The egg wash will give the baked butterfly a beautiful golden-brown sheen.
- Bake in the preheated oven for about 20 minutes, or until the butterfly is golden brown. Keep a close eye on it to prevent burning.
- Remove from the oven and let it cool completely on the baking sheet. This will prevent the bread from becoming soggy.
- Once cooled, carefully slice the butterfly horizontally, as you would a sandwich.
- Fill with your favorite sandwich fillings! Tuna salad, chicken salad, lunchmeats, cheeses – the possibilities are endless. Be generous with the filling!
Expert Tips & Tricks
- If you find the dough too sticky to work with, lightly flour your hands and the work surface.
- For a more vibrant golden-brown color, add a pinch of sugar to the egg wash.
- Don’t overcrowd the baking sheet. If you’re making multiple butterfly sandwiches, bake them in batches.
- If the decorative shapes on the wings don’t quite turn out as expected, don’t worry! Imperfection is part of the charm. As the original recipe suggests, try making small ropes and shaping/rolling them into palmier shapes to decorate the wings next time for a different effect.
- For added flavor, sprinkle the wings with sesame seeds or poppy seeds before baking.
- If the tops are browning too quickly during baking, tent the butterfly loosely with foil.
Serving & Storage Suggestions
Serve your Pretty Butterfly Sandwich immediately after filling for the best flavor and texture. Arrange it on a plate with colorful fruits and vegetables to create a visually appealing and nutritious meal.
If you have leftovers, store them in an airtight container in the refrigerator. The sandwich is best consumed within 1-2 days. Reheating is not recommended, as it may make the bread tough. However, you can enjoy it cold.
The unbaked dough can be prepared ahead of time and stored in the refrigerator for up to 24 hours. Allow it to come to room temperature before baking.
Nutritional Information
(Estimates will vary depending on the fillings chosen.)
| Nutrient | Amount per Serving | % Daily Value |
|---|---|---|
| Calories | 450 kcal | 23% |
| Total Fat | 25g | 38% |
| Saturated Fat | 10g | 50% |
| Cholesterol | 150mg | 50% |
| Sodium | 600mg | 26% |
| Total Carbohydrate | 45g | 15% |
| Dietary Fiber | 2g | 8% |
| Sugars | 5g | – |
| Protein | 20g | 40% |
Variations & Substitutions
- Vegetarian: Use vegetarian fillings such as hummus, roasted vegetables, or a black bean spread.
- Vegan: Use vegan rolls, a plant-based butter alternative, and a plant-based milk (such as almond or soy) to brush the bread before baking. Fill with your favorite vegan sandwich fillings.
- Gluten-Free: While this recipe is based on wheat-based frozen rolls, experiment with gluten-free bread dough shaped in the same way to create a gluten-free butterfly sandwich. The baking time may need adjusting.
- Sweet Butterfly: For a dessert version, use a sweet bread dough and fill with Nutella, jam, or cream cheese frosting. Dust with powdered sugar after baking.
- Different Shapes: While this recipe focuses on a butterfly, the same technique can be used to create other fun shapes, such as caterpillars, flowers, or even simple geometric designs.
FAQs (Frequently Asked Questions)
Q: Can I use different types of frozen rolls?
A: Yes, while the recipe calls for Texas-size Rhodes rolls, you can use other brands or sizes. You may need to adjust the number of rolls used and the shaping techniques accordingly.
Q: Can I prepare the dough ahead of time?
A: Yes, you can prepare the dough, shape the butterfly, and then cover it with plastic wrap and store it in the refrigerator for up to 24 hours before baking. Allow it to come to room temperature and rise slightly before baking.
Q: What is the best way to prevent the dough from sticking to the baking sheet?
A: Generously spray the baking sheet with non-stick cooking spray. You can also line the baking sheet with parchment paper.
Q: How can I tell if the butterfly is done baking?
A: The butterfly is done when it is golden brown on top and the dough is cooked through. You can insert a toothpick into the center; if it comes out clean, the butterfly is done.
Q: What are some good filling ideas for the butterfly sandwich?
A: The possibilities are endless! Some popular fillings include tuna salad, chicken salad, ham and cheese, turkey and Swiss, and vegetarian options like hummus and roasted vegetables.
Final Thoughts
The Pretty Butterfly Sandwich is more than just a recipe; it’s an opportunity to create a delightful and memorable meal for yourself and your loved ones. Don’t be afraid to get creative with the decorations and fillings, and most importantly, have fun! I encourage you to try this recipe and share your creations with others. Pair it with a refreshing glass of lemonade or a side of fresh fruit for a complete and satisfying meal. Whether you’re celebrating a special occasion or simply want to add a touch of whimsy to your day, the Pretty Butterfly Sandwich is sure to bring a smile to everyone’s face. Enjoy!