
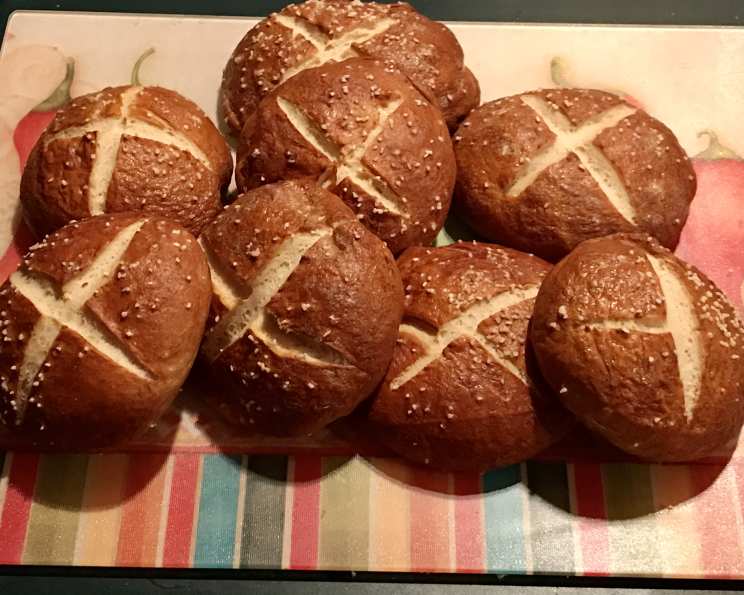
The Ultimate Pretzel Sandwich Bun Recipe
The aroma of freshly baked pretzels always transports me back to my childhood trips to Germany. The salty, chewy crust and soft, slightly sweet interior were irresistible. I’d devour them plain, dipped in mustard, or occasionally, if I was lucky, tucked around a juicy bratwurst. Recreating that experience at home – but in sandwich bun form – has been a delicious adventure, and these pretzel buns are the perfect vessel for everything from classic deli meats to gourmet burgers.
Recipe Overview
- Prep Time: 30 minutes
- Rise Time: 1 hour 15 minutes
- Cook Time: 20-24 minutes
- Total Time: Approximately 2 hours
- Servings: 10 buns
- Dietary Type: Vegetarian
Ingredients
Dough:
- 1 3/4 cups warm water
- 2 tablespoons unsalted butter, softened
- 3/4 teaspoon salt
- 4 1/2 cups all-purpose flour, plus more for dusting
- 1/4 cup nonfat dry milk powder
- 2 teaspoons instant yeast
Topping:
- Coarse sea salt
Water Bath:
- 2 quarts water
- 1 tablespoon salt
- 1/4 cup baking soda
Equipment Needed
- Large mixing bowl or stand mixer
- Baking sheet
- Large pot
- Slotted spoon
- Sharp knife or scissors
- Cooling rack
- Measuring cups and spoons
Instructions
- Combine the dough ingredients: In a large mixing bowl or the bowl of a stand mixer fitted with a dough hook, combine the warm water, softened butter, salt, all-purpose flour, nonfat dry milk powder, and instant yeast.
- Knead the dough: Knead the ingredients until a smooth, slightly sticky dough forms. This can be done by hand for about 8-10 minutes or with a mixer on medium-low speed for 5-7 minutes. The dough should be elastic and pull away from the sides of the bowl, although it will remain slightly tacky.
- First rise: Place the dough in a lightly greased bowl, turning to coat. Cover the bowl with plastic wrap or a clean kitchen towel and let it rise in a warm place for about 1 hour, or until doubled in size.
- Shape the buns: Gently deflate the risen dough and transfer it to a lightly greased work surface. Divide the dough into 10 equal pieces. Shape each piece into a smooth ball.
- Second rise: Place the dough balls on a lightly greased baking sheet, cover them loosely with plastic wrap or a clean kitchen towel, and let them rest for 15 minutes. This brief rest allows the gluten to relax, making them easier to handle in the next step.
- Preheat the oven: While the dough balls are resting, preheat your oven to 400°F (200°C).
- Prepare the water bath: In a large pot, bring the water, salt, and baking soda to a rolling boil. Ensure the pot is large enough to accommodate the dough balls without overcrowding.
- Boil the buns: Carefully drop 5 dough balls at a time into the boiling water bath. Cook for 30 seconds, then flip them over and cook for another 30 seconds. This brief boiling step is crucial for the pretzel’s signature chewy texture and dark color.
- Return to baking sheet: Using a slotted spoon, carefully remove the boiled buns from the water and return them to the prepared baking sheet. Space them evenly to allow for proper air circulation during baking.
- Score and salt: Using scissors or a sharp knife, cut 1/2-inch-deep crosses into the center of each bun. This not only looks attractive but also helps the buns bake evenly. Immediately sprinkle the scored buns with coarse sea salt. Don’t skimp on the salt, as it’s a key component of the pretzel flavor.
- Bake the buns: Bake the buns in the preheated oven for 20 to 24 minutes, or until they are a deep, dark brown color. The color is your best indicator of doneness.
- Cool: Remove the baked buns from the oven and transfer them to a wire rack to cool completely before slicing and filling.
Expert Tips & Tricks
- Dough Consistency: The dough should be slightly sticky. If it’s too dry, add water one tablespoon at a time. If it’s too wet, add flour one tablespoon at a time.
- Warm Rise: For the first rise, a slightly warm environment helps the yeast activate more quickly. Try placing the bowl in a slightly warmed oven (turned off!) or near a sunny window.
- Baking Soda Bath: Don’t skip the baking soda in the water bath! This is what gives pretzels their distinctive flavor and chewy crust. Be cautious when adding the baking soda to the boiling water, as it can bubble up vigorously.
- Color Control: If the buns are browning too quickly, tent them loosely with foil during the last few minutes of baking.
- Shiny Finish: For an extra shiny finish, brush the boiled buns with an egg wash (1 egg beaten with 1 tablespoon of water) before sprinkling with salt.
- Flavor Boost: Consider adding a tablespoon of dark molasses or brown sugar to the dough for a richer, more complex flavor.
Serving & Storage Suggestions
These pretzel buns are incredibly versatile and can be used for a wide variety of sandwiches. They’re fantastic with classic deli meats like ham, turkey, or roast beef, but they also shine with more creative fillings like pulled pork, chicken salad, or even vegetarian options like grilled vegetables and hummus.
- Serving: Serve the buns fresh, sliced horizontally and filled with your favorite sandwich ingredients. They are best enjoyed warm or at room temperature.
- Storage: Store leftover buns in an airtight container at room temperature for up to 2 days, or in the refrigerator for up to 5 days.
- Freezing: For longer storage, freeze the baked buns in a freezer-safe bag or container for up to 2 months. Thaw completely before using.
- Reheating: To reheat, wrap the buns in foil and warm them in a 350°F (175°C) oven for about 10-15 minutes, or until heated through. You can also microwave them for a shorter time, but be careful not to overcook them, as they can become tough.
Nutritional Information
Note: Nutritional information is an estimate and may vary based on specific ingredients and portion sizes.
| Nutrient | Amount per Serving | % Daily Value |
|---|---|---|
| Calories | 239 kcal | 12% |
| Total Fat | 3g | 4% |
| Saturated Fat | 2g | 8% |
| Cholesterol | 7mg | 2% |
| Sodium | 2430mg | 101% |
| Total Carbohydrate | 45g | 15% |
| Dietary Fiber | 2g | 7% |
| Sugars | 2g | 4% |
| Protein | 7g | 14% |
Variations & Substitutions
- Gluten-Free: Substitute the all-purpose flour with a gluten-free all-purpose blend designed for bread making. You may need to adjust the liquid slightly.
- Whole Wheat: Replace up to half of the all-purpose flour with whole wheat flour for a nuttier flavor and added fiber.
- Vegan: Ensure the butter is a plant-based alternative. The recipe is already dairy-free thanks to the nonfat dry milk powder, which is easily omitted with no other changes needed.
- Spices: Add a teaspoon of caraway seeds, fennel seeds, or everything bagel seasoning to the dough for added flavor.
- Sweet Pretzel Buns: Reduce the salt in the dough to 1/4 teaspoon and add 2 tablespoons of sugar. Omit the coarse sea salt topping and sprinkle with cinnamon sugar after baking.
FAQs (Frequently Asked Questions)
Q: Why do I need to boil the dough before baking?
A: The boiling process is essential for creating the characteristic chewy crust and pretzel flavor. The baking soda in the water bath causes a chemical reaction that alters the dough’s surface.
Q: Can I use active dry yeast instead of instant yeast?
A: Yes, but you’ll need to proof the active dry yeast first. Dissolve it in the warm water with a teaspoon of sugar and let it sit for 5-10 minutes until foamy before adding the other ingredients.
Q: My buns are too salty. What can I do?
A: Reduce the amount of salt you sprinkle on top. Also, consider using a less coarse sea salt, as finer salt tends to distribute more evenly.
Q: The buns are browning too quickly. How can I prevent this?
A: Tent the buns loosely with aluminum foil during the last few minutes of baking.
Q: Can I make the dough ahead of time?
A: Yes! After the first rise, punch down the dough, wrap it tightly in plastic wrap, and refrigerate it for up to 24 hours. Let it come to room temperature before shaping and proceeding with the recipe.
Final Thoughts
I hope you’ll give these pretzel sandwich buns a try! They’re a fun and rewarding baking project, and the resulting buns are simply irresistible. Whether you fill them with a classic sandwich or something a little more adventurous, I’m confident you’ll love the unique flavor and texture. Feel free to experiment with different fillings and seasonings to create your own signature pretzel bun sandwich. And most importantly, have fun and enjoy the process!