
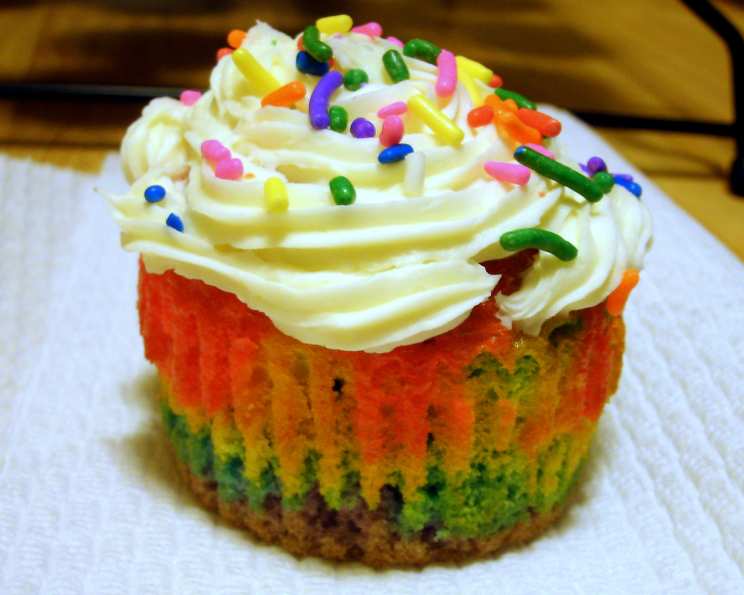
Psychedelic 60’s Tie-Dye Cupcakes
The first time I saw tie-dye cupcakes, it was at a summer solstice festival, amidst swirling skirts and the scent of patchouli. A girl with flowers in her hair offered me one, and as I bit into the vibrant swirl of colors, it felt like a burst of pure joy. The taste was simple vanilla, but the visual spectacle took me back to the carefree spirit of the ’60s, even though I wasn’t even born yet. Since then, I’ve been obsessed with recreating that little bit of edible magic, and this recipe is my tribute to that moment.
Recipe Overview
- Prep Time: 20 minutes
- Cook Time: 17 minutes
- Total Time: 37 minutes
- Servings: 24 cupcakes
- Yield: 24 cupcakes
- Dietary Type: Vegetarian
Ingredients
- 1 (18 ounce) box white cake mix
- Red food coloring
- Blue food coloring
- Green food coloring
- Yellow food coloring
- 1 (16 ounce) can vanilla frosting
- Rainbow candy sprinkles
Equipment Needed
- Mixing bowls (at least 6 small bowls)
- Measuring cups and spoons
- Muffin tin
- Muffin liners
- Spatulas
- Whisk or electric mixer
Instructions
-
Begin by preheating your oven according to the cake mix directions. Typically, this will be around 350°F (175°C), but double-check the box for specific instructions relating to your brand.
-
Next, prepare the white cake mix according to the package directions. This usually involves combining the mix with ingredients like eggs, oil, and water. Use a whisk or electric mixer to ensure all ingredients are well-incorporated and the batter is smooth.
-
Divide the prepared batter evenly into 6 small bowls. This is crucial for creating the vibrant tie-dye effect.
-
Now comes the fun part – dyeing the batter! Add the following amounts of food coloring to each bowl, mixing well until the color is uniform. It’s best to use gel food coloring, as it is more concentrated and won’t change the consistency of your batter as much as liquid food coloring.
- Purple: 9 drops red food coloring + 6 drops blue food coloring.
- Blue: 12 drops blue food coloring.
- Green: 12 drops green food coloring.
- Yellow: 12 drops yellow food coloring.
- Orange: 12 drops yellow food coloring + 4 drops red food coloring.
- Red: 18 drops red food coloring.
-
Line a 24-cup muffin tin with muffin liners. This prevents the cupcakes from sticking and makes them easier to remove.
-
Evenly distribute the batter between the prepared muffin cups, layering the colors carefully. I recommend using about ½ tablespoon of each color per cup. Start with one color, then add another on top, and so on. The order in which you layer the colors isn’t critical; feel free to experiment and create your own unique patterns. Don’t overfill the cups; they should be about two-thirds full to allow for rising during baking.
-
Bake according to the cake mix directions. The baking time will vary depending on your oven, but it’s generally around 15-20 minutes. You can test for doneness by inserting a toothpick into the center of a cupcake; if it comes out clean or with only a few moist crumbs, the cupcakes are ready.
-
Remove the cupcakes from the oven and let them cool in the muffin tin for a few minutes before transferring them to a wire rack to cool completely. Cooling them completely is essential before frosting, as warm cupcakes will melt the frosting.
-
Once the cupcakes are completely cool, frost them with vanilla frosting. You can use a knife or spatula to spread the frosting evenly, or you can use a piping bag for a more decorative effect.
-
Top the frosted cupcakes with rainbow candy sprinkles. This adds a final touch of color and fun!
Expert Tips & Tricks
- Swirl for Maximum Tie-Dye: After layering the batter in the muffin cups, gently swirl the colors together using a toothpick or skewer for a more pronounced tie-dye effect. Be careful not to over-swirl, as this can muddy the colors.
- Batter Consistency: If your batter seems too thick, add a tablespoon of milk or water at a time until it reaches the desired consistency. Conversely, if it’s too thin, add a tablespoon of flour.
- Color Intensity: For more vibrant colors, use gel food coloring instead of liquid. Gel coloring is more concentrated and won’t thin out the batter as much.
- Make Ahead: You can bake the cupcakes a day in advance. Store them in an airtight container at room temperature. Frost them just before serving.
- Level Baking: To ensure even baking, rotate the muffin tin halfway through the baking time.
- Prevent Sticking: Make sure to use good quality muffin liners to prevent the cupcakes from sticking.
- Frosting Tip: For easy frosting, microwave the vanilla frosting for about 10 seconds to make it more spreadable.
Serving & Storage Suggestions
Serve these colorful cupcakes at room temperature. They’re perfect for birthday parties, picnics, or any occasion that calls for a touch of whimsy. To store, place leftover cupcakes in an airtight container at room temperature for up to 3 days, or in the refrigerator for up to a week. If you want to store them for longer, you can freeze them for up to 2 months. Thaw frozen cupcakes at room temperature before serving.
Nutritional Information
| Nutrient | Amount per Serving | % Daily Value |
|---|---|---|
| Calories | 170 kcal | N/A |
| Total Fat | 5.4g | 8% |
| Saturated Fat | 0.9g | 4% |
| Cholesterol | 0mg | 0% |
| Sodium | 177.1mg | 7% |
| Total Carbohydrate | 29.6g | 9% |
| Dietary Fiber | 0.2g | 0% |
| Sugars | 23.6g | N/A |
| Protein | 1g | 1% |
Note: Nutritional information is an estimate and may vary based on specific ingredients and portion sizes.
Variations & Substitutions
- Gluten-Free: Use a gluten-free cake mix to make these cupcakes gluten-free.
- Vegan: Substitute the cake mix with a vegan cake recipe. Use vegan frosting and ensure your sprinkles are also vegan.
- Different Flavors: Experiment with different cake mix flavors, such as chocolate, lemon, or strawberry.
- Frosting Flavors: Instead of vanilla frosting, try using chocolate, cream cheese, or even a fruity frosting to complement the cake flavor.
- Natural Food Coloring: Use natural food coloring derived from fruits and vegetables for a healthier option.
- Tie-Dye Cookies: Use this same method with sugar cookie dough for psychedelic cookies!
FAQs (Frequently Asked Questions)
Q: Can I use a different size muffin tin?
A: Yes, but you’ll need to adjust the baking time accordingly. Smaller muffin tins will require a shorter baking time, while larger ones will need longer. Keep an eye on the cupcakes and test for doneness with a toothpick.
Q: Can I make these cupcakes without food coloring?
A: Yes, but they won’t be tie-dye! You can still make vanilla cupcakes with vanilla frosting and sprinkles. Consider adding other mix-ins, like chocolate chips or nuts.
Q: Can I freeze these cupcakes?
A: Yes, you can freeze unfrosted cupcakes for up to 2 months. Wrap them tightly in plastic wrap and then place them in a freezer-safe bag or container. Thaw at room temperature before frosting.
Q: The colors are bleeding together. What am I doing wrong?
A: Be careful not to over-swirl the batter when layering the colors. Also, make sure the batter isn’t too thin. If it is, add a tablespoon of flour to thicken it slightly.
Q: My cupcakes are dry. How can I prevent this?
A: Don’t overbake the cupcakes. Bake them until a toothpick inserted into the center comes out clean or with only a few moist crumbs. Also, make sure to store them in an airtight container to prevent them from drying out.
Final Thoughts
These Psychedelic 60’s Tie-Dye Cupcakes are more than just a dessert; they’re a vibrant celebration of color and fun. Don’t be intimidated by the multiple steps – the process is surprisingly simple, and the results are truly spectacular. Whether you’re baking for a special occasion or just want to add a little joy to your day, these cupcakes are sure to bring a smile to everyone’s face. Give them a try, experiment with different colors and flavors, and let your inner hippie shine! And please, share your creations and feedback – I can’t wait to see what you come up with! Perhaps pair them with a refreshing glass of homemade lemonade for a truly groovy treat.