
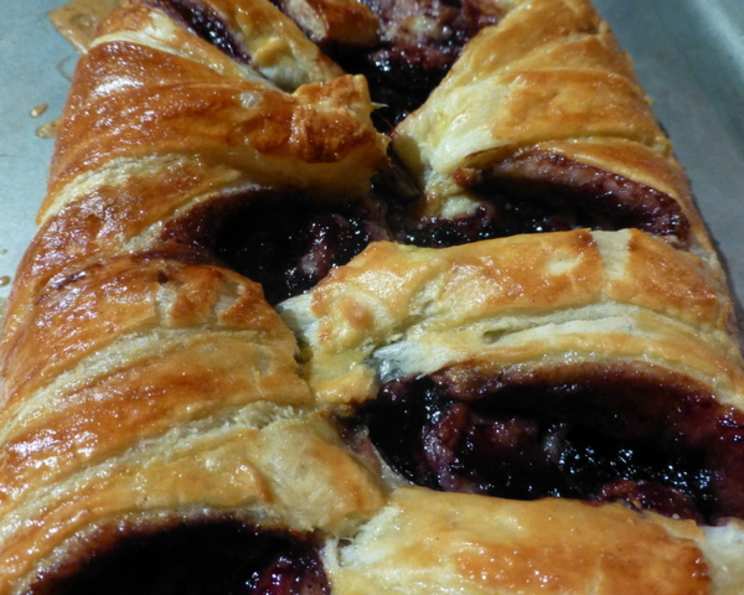
Puff Pastry Cheese and Preserve Danish: A Slice of Simple Elegance
The memory is still so vivid: the crisp autumn air, the scent of woodsmoke curling from the chimney of my grandmother’s kitchen, and the glint of golden-brown pastry cooling on a wire rack. These weren’t just any pastries; they were her signature cheese and preserve danishes, flaky jewels filled with creamy sweetness and tart bursts of fruit. Each bite was a comforting hug, a reminder of simple joys and the warmth of family gathered together. It’s a memory I’ve tried to recreate in my own kitchen countless times, and this recipe brings me closest to that feeling of pure, unadulterated happiness.
Recipe Overview
- Prep Time: 15 minutes
- Cook Time: 25-30 minutes
- Total Time: 40-45 minutes
- Servings: 6
- Yield: 1 danish
- Dietary Type: Vegetarian
Ingredients
- 1 cup mascarpone cheese
- 1 egg yolk
- 1 egg, beaten with 1 tablespoon water (for egg wash)
- 1/4 cup sugar
- 2 tablespoons all-purpose flour, plus extra for rolling out dough
- 1/2 teaspoon vanilla extract
- 1 sheet frozen puff pastry, thawed
- 6 ounces fruit preserves (cherry or strawberry), or your preferred flavor
Equipment Needed
- Small bowl
- Rolling pin
- Sheet tray
- Parchment paper
- Sharp kitchen shears or knife
- Cooling rack
- Pastry brush
Instructions
-
Preheat your oven to 375 degrees F (190 degrees C). Ensure your oven rack is positioned in the center for even baking.
-
In a small bowl, prepare the cheese filling. Combine the mascarpone, egg yolk, sugar, flour, and vanilla extract. Stir until the ingredients are just combined. Overmixing can lead to a less creamy filling, so be gentle. Set the bowl aside.
-
Lightly dust a clean work surface with all-purpose flour. Unfold the thawed puff pastry sheet and place it on the floured surface. Use a rolling pin to gently flatten and smooth the pastry. Aim for a slightly thinner rectangle, but avoid over-rolling, which can prevent the pastry from puffing up properly.
-
Line a sheet tray with parchment paper. Carefully transfer the rolled-out puff pastry onto the prepared tray.
-
Now, it’s time to build the danish. Using a spatula or the back of a spoon, schmear the mascarpone mixture down the middle of the puff pastry lengthwise. Create a 3-inch wide strip of cheese filling, leaving a border of pastry on either side.
-
Spoon the fruit preserves on top of the mascarpone. Distribute the preserves evenly over the cheese filling. Don’t be afraid to be generous, but avoid overloading the filling to prevent leakage during baking.
-
This step is key to achieving that beautiful braided look. Using sharp kitchen shears or a knife, cut the long sides of the pastry into 1-inch wide strips. Cut towards the cheese filling, but stop about 1-inch before reaching the filling. This will create a fringe-like appearance on both sides of the filling.
-
Now for the braiding! Alternating sides, fold one piece of the fringe over the cheese and jelly mixture. Repeat this process, alternating sides, until you’ve folded all the strips over the filling. The final result should resemble a braided pastry, with the fruit preserve peeking through the folds.
-
In a separate small bowl, beat the egg with 1 tablespoon of water to create an egg wash. Use a pastry brush to generously brush the entire surface of the dough with the beaten egg mixture. This will give the danish a beautiful golden-brown color and a slightly glossy finish.
-
Bake in the preheated oven for 25 to 30 minutes, or until the pastry is golden brown and puffed up. Keep a close eye on the danish during the last few minutes of baking to prevent burning. If the top starts to brown too quickly, you can loosely tent it with foil.
-
Once baked, carefully remove the danish from the oven and transfer it to a cooling rack. Allow it to cool for at least 15-20 minutes before serving. This allows the filling to set slightly and the pastry to cool enough to handle.
-
To serve, cut the danish into strips.
Expert Tips & Tricks
- Temperature is key: Ensure your puff pastry is cold but pliable before working with it. If it gets too warm, it will be difficult to handle and won’t puff up properly.
- Don’t overmix the filling: Overmixing the mascarpone filling can result in a runny consistency. Mix just until the ingredients are combined.
- Get creative with fillings: Feel free to experiment with different types of cheese (like ricotta or cream cheese) and preserves. Nutella or almond paste also make fantastic fillings.
- Make it ahead: You can assemble the danish ahead of time and store it in the refrigerator, unbaked, for up to 24 hours. Just be sure to brush it with the egg wash right before baking.
- Prevent soggy bottoms: Bake the danish on the lower rack of the oven for the last few minutes to ensure the bottom is crisp.
Serving & Storage Suggestions
Serve the Puff Pastry Cheese and Preserve Danish warm or at room temperature. It’s a delightful treat for breakfast, brunch, or dessert. Dust with powdered sugar for an extra touch of elegance.
Leftovers can be stored in an airtight container at room temperature for up to 2 days or in the refrigerator for up to 4 days. To reheat, warm the danish in a preheated oven at 350°F (175°C) for a few minutes until heated through. You can also reheat individual slices in the microwave, but the pastry will lose some of its crispness. Freezing is not recommended as it affects the texture of both the pastry and the filling.
Nutritional Information
| Nutrient | Amount per Serving | % Daily Value |
|---|---|---|
| Calories | 440 kcal | N/A |
| Calories from Fat | 184 g | 42% |
| Total Fat | 20.5 g | 31% |
| Saturated Fat | 5.3 g | 26% |
| Cholesterol | 70.4 mg | 23% |
| Sodium | 149.1 mg | 6% |
| Total Carbohydrate | 58.1 g | 19% |
| Dietary Fiber | 1.2 g | 4% |
| Sugars | 27 g | N/A |
| Protein | 5.8 g | 11% |
Note: Nutritional information is an estimate and may vary based on specific ingredients and portion sizes.
Variations & Substitutions
- Gluten-Free: Use a gluten-free puff pastry sheet.
- Dairy-Free: Substitute the mascarpone cheese with a dairy-free cream cheese alternative.
- Vegan: In addition to the dairy-free substitution, use agave nectar or maple syrup instead of sugar in the filling, and use a plant-based milk (like almond or soy milk) for the egg wash. You can also use melted coconut oil for the egg wash.
- Seasonal Variations: Use seasonal fruit preserves such as apple butter in the fall or cranberry sauce during the holidays.
FAQs (Frequently Asked Questions)
Q: Can I use a different type of cheese instead of mascarpone?
A: Yes, you can substitute mascarpone with cream cheese or ricotta cheese. Just be sure to adjust the sugar level to taste, as cream cheese and ricotta may have a different sweetness level than mascarpone.
Q: Can I make this danish ahead of time?
A: Yes, you can assemble the danish ahead of time and store it in the refrigerator, unbaked, for up to 24 hours. Brush it with the egg wash right before baking.
Q: My puff pastry is cracking. What should I do?
A: Puff pastry can crack if it’s too cold. Let it sit at room temperature for a few minutes to soften slightly before working with it.
Q: Can I use fresh fruit instead of preserves?
A: Yes, you can use fresh fruit, but be sure to toss it with a little sugar and cornstarch to thicken the juices and prevent the danish from becoming soggy.
Q: My filling is leaking out during baking. What did I do wrong?
A: You may have overfilled the danish or not sealed the edges properly. Be sure to leave a border around the filling and press the edges together to seal.
Final Thoughts
I hope this recipe for Puff Pastry Cheese and Preserve Danish brings as much joy to your kitchen as it has to mine. It’s a surprisingly simple yet incredibly elegant treat that’s perfect for any occasion. Don’t be afraid to experiment with different fillings and variations to make it your own. And most importantly, share it with the people you love. Let me know how it turns out, and happy baking! Perhaps pair it with a delicate Earl Grey tea or a crisp glass of sparkling wine for an extra touch of indulgence.