
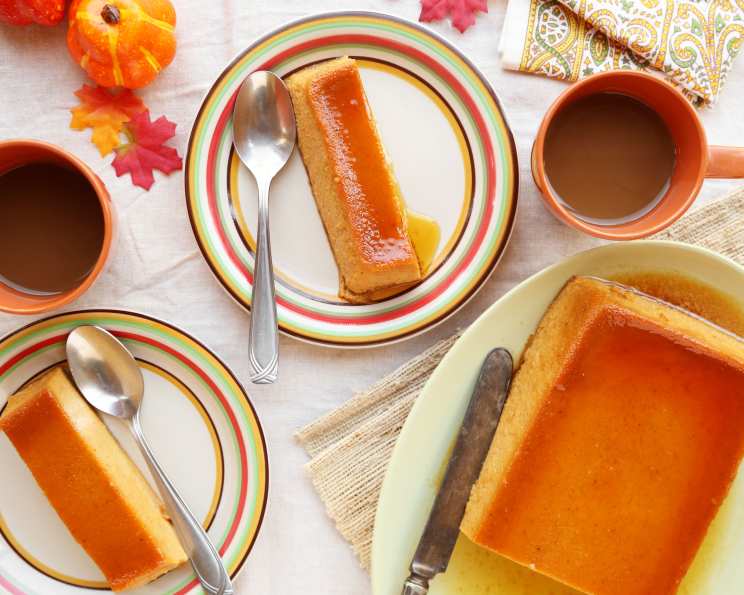
Pumpkin Flan: A Fall Dessert Delight
There’s something magical about the first whiff of pumpkin spice that signals the start of autumn. For me, it instantly transports me back to my grandmother’s kitchen, where the air was always thick with the aroma of cinnamon, nutmeg, and, of course, pumpkin. While she was renowned for her pumpkin pie, I remember one Thanksgiving when she decided to try something new – a pumpkin flan. The creamy, spiced custard with its shimmering caramel top was an instant hit, and it’s a dessert that continues to evoke warmth and cherished memories.
Recipe Overview
- Prep Time: 20 minutes
- Cook Time: 50 minutes
- Total Time: 3 hours 50 minutes (includes chilling time)
- Servings: 8-10
- Yield: 1 flan
- Dietary Type: Not specified (contains dairy and eggs)
Ingredients
- 1 cup white sugar
- 1 (14 ounce) can pumpkin pie filling
- 1 (12 ounce) can evaporated milk
- 1 (8 ounce) can sweetened condensed milk
- 6 eggs
- 1 teaspoon vanilla extract
- 1 teaspoon allspice
Equipment Needed
- Medium saucepan
- Blender
- Flan mold or cake pan
- Larger baking pan
- Oven
Instructions
-
Begin by preheating your oven to 350 degrees Fahrenheit (175 degrees Celsius). This step is crucial for even cooking.
-
Now, let’s prepare the caramel. In a medium saucepan over medium heat, melt the 1 cup of white sugar. It’s important to stir constantly until the sugar melts and turns into a golden caramel. Be very careful not to burn the sugar, as this will result in a bitter taste. Watch it closely and remove it from the heat just before it reaches your desired color, as it will continue to darken from the residual heat.
-
Once the sugar is caramelized, immediately and carefully pour it into your flan mold or cake pan. Quickly tilt and rotate the mold to evenly coat the bottom with the caramelized sugar. Be careful, as the caramel will be very hot! Set the mold aside to cool and harden. The hardened caramel will create a beautiful topping when the flan is inverted.
-
Next, prepare the flan mixture. In a blender, combine the pumpkin pie filling, evaporated milk, sweetened condensed milk, eggs, vanilla extract, and allspice. Blend until the mixture is perfectly smooth, ensuring there are no lumps. This will guarantee a silky and luscious final product.
-
Gently pour the blended pumpkin mixture into the flan mold, over the hardened caramel.
-
Prepare a water bath. Place the flan mold inside a larger baking pan. Carefully pour hot water into the larger pan until it reaches about 1 inch up the sides of the flan mold. This water bath is essential for even cooking and preventing the flan from cracking. Handle the pans very carefully to avoid spilling the hot water!
-
Carefully transfer the entire setup – the pan with the water bath and the flan mold inside – to the preheated oven. Ensure you have a firm grip and move slowly to avoid any accidents.
-
Bake for approximately 50 minutes. To check for doneness, insert a knife into the center of the flan. If the knife comes out clean, the flan is ready. If not, continue baking for a few more minutes and check again. Ovens can vary, so the baking time might need slight adjustments.
-
Once baked, carefully remove the flan from the oven and the water bath. Allow it to cool to room temperature on a wire rack.
-
After it has cooled, cover the flan with plastic wrap and refrigerate for at least 3 hours, or preferably overnight. This chilling time is crucial for the flan to set properly and develop its characteristic creamy texture.
-
To unmold the flan, run a thin knife around the edges of the mold to loosen it. Place a serving plate over the mold and carefully invert it. The caramel will now be on top, creating a beautiful and delicious sauce.
Expert Tips & Tricks
- Don’t Overbake: Overbaking will result in a rubbery texture. Keep a close eye on the flan and check for doneness regularly.
- Caramel Care: Burnt caramel is bitter and can ruin the whole flan. Use medium heat and stir constantly. If you see it darkening too quickly, remove it from the heat.
- Smooth Texture: Ensure your flan mixture is completely smooth by blending it well. You can also strain it through a fine-mesh sieve for an extra silky texture.
- Water Bath Importance: The water bath provides gentle, even heat, preventing the flan from curdling or cracking. Don’t skip this step!
- Make-Ahead Magic: Flan is a great make-ahead dessert. It can be prepared a day or two in advance and stored in the refrigerator. This makes it perfect for holiday gatherings or dinner parties.
Serving & Storage Suggestions
Serve the pumpkin flan chilled, directly after unmolding. The caramel will beautifully drizzle down the sides. You can garnish it with a dusting of cinnamon, a dollop of whipped cream, or a sprinkle of chopped pecans for added flavor and texture.
Leftovers should be stored in an airtight container in the refrigerator. The flan will keep well for up to 3-4 days. While you can technically freeze flan, the texture may change slightly upon thawing, so it’s best enjoyed fresh or within a few days.
Nutritional Information
| Nutrient | Amount per Serving | % Daily Value |
|---|---|---|
| Calories | 352.1 kcal | N/A |
| Calories from Fat | 83 g | 24% |
| Total Fat | 9.3 g | 14% |
| Saturated Fat | 4.7 g | 23% |
| Cholesterol | 161.5 mg | 53% |
| Sodium | 238 mg | 9% |
| Total Carbohydrate | 58.3 g | 19% |
| Dietary Fiber | 4.2 g | 16% |
| Sugars | 40.6 g | 162% |
| Protein | 10.4 g | 20% |
Note: These values are estimates and may vary based on specific ingredients and serving sizes.
Variations & Substitutions
- Spice it Up: Adjust the amount of allspice to your liking, or add other warm spices like nutmeg, ginger, or cloves.
- Dairy-Free Option: While the recipe uses evaporated and sweetened condensed milk, experimenting with dairy-free alternatives might be possible. Be mindful that the texture might change.
- Caramel Alternatives: You can infuse the caramel with different flavors by adding a pinch of salt, a splash of bourbon, or a few drops of coffee extract.
- Add a Crust: For a richer dessert, consider adding a graham cracker crust to the bottom of the flan mold before pouring in the custard.
FAQs (Frequently Asked Questions)
Q: Why is a water bath necessary for baking flan?
A: The water bath provides gentle, even heat, preventing the flan from curdling or cracking. It helps the custard set slowly and evenly, resulting in a smooth and creamy texture.
Q: Can I use a different type of milk instead of evaporated and condensed milk?
A: The combination of evaporated and condensed milk contributes significantly to the flan’s texture and sweetness. While you can experiment with alternatives, be aware that the final result may differ.
Q: How can I prevent the caramel from burning?
A: Use medium heat and stir the sugar constantly while it’s melting. Watch it closely and remove it from the heat just before it reaches your desired color, as it will continue to darken from the residual heat.
Q: How do I know when the flan is done baking?
A: Insert a knife into the center of the flan. If the knife comes out clean, the flan is ready. If not, continue baking for a few more minutes and check again.
Q: Can I make this flan ahead of time?
A: Yes, flan is a great make-ahead dessert. It can be prepared a day or two in advance and stored in the refrigerator, covered with plastic wrap.
Final Thoughts
This Pumpkin Flan is more than just a dessert; it’s a celebration of autumn’s flavors and a perfect way to end a festive meal. Its creamy texture, warm spices, and luscious caramel topping are sure to impress your family and friends. Don’t be intimidated by the steps – with a little patience and attention to detail, you’ll create a truly memorable dessert. So, gather your ingredients, preheat your oven, and get ready to experience the magic of homemade pumpkin flan. I can’t wait to hear what you think and how it brings warmth to your own kitchen!