
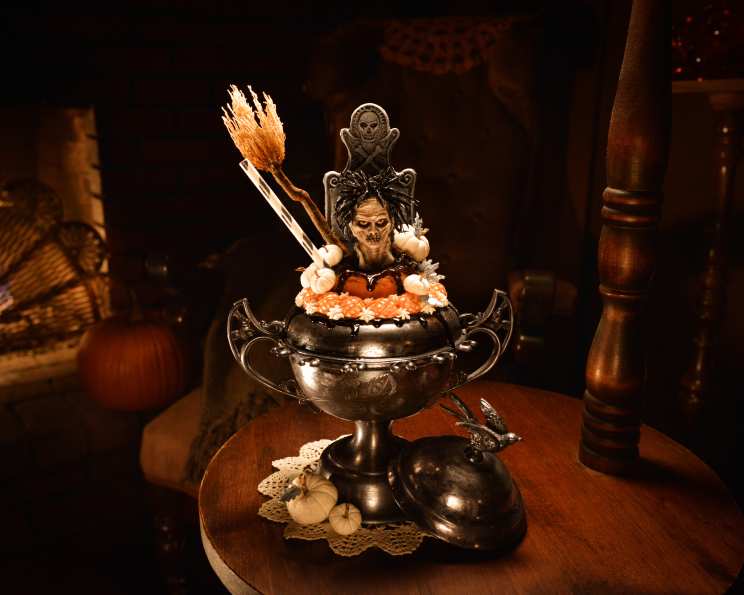
Pumpkin Spice Billy Butcher-Sundae: A Halloween Horror Treat
There’s a certain chill in the October air that always brings back memories of Halloweens past. As a child, I wasn’t always the bravest when it came to haunted houses and scary movies, but I was always the first in line for the Halloween treats. I vividly remember one year, a neighbor, known for her outlandish decorations and even more outlandish desserts, presented me with something akin to this Pumpkin Spice Billy Butcher-Sundae. The whimsical, slightly spooky presentation, combined with the familiar and comforting flavors of pumpkin spice, instantly turned my trepidation into delight. It was the perfect combination of scary and sweet, and it sparked a lifelong love for creative, themed desserts.
Recipe Overview
- Prep Time: 15 hours 20 minutes
- Cook Time: 20 minutes
- Total Time: 15 hours 40 minutes
- Servings: 8
- Dietary Type: Not specified
Ingredients
-
Pumpkin Spice Ice Cream
- 2 cups fresh pumpkin puree
- 3 teaspoons vanilla
- 4 cups heavy cream
- 1 3/4 cups dark brown sugar
- 10 egg yolks
- 1 teaspoon cinnamon
- 1 teaspoon ground ginger
- 1 teaspoon salt
- 4 tablespoons Bourbon
-
Zombie Cookie
- 1 cup butter, room temperature
- 1 cup sugar
- 1 egg
- 1 teaspoon vanilla extract
- 3 cups flour
- 1/2 teaspoon salt
-
Modeling Chocolate
- 16 ounces chocolate, or candy melts
- 1/4 cup light corn syrup
-
Royal Icing
- 3 large egg whites
- 3 1/2 cups confectioners’ sugar
- 3 drops orange food coloring
-
Garnish
- Shredded wheat (For broom garnishment)
- Almond slivers (For leaves)
- Whipped cream
- Hot fudge sauce
- Straws
- Decorative Urn
Equipment Needed
- Ice Cream Maker
- Stand Mixer
- Dremel Tool (Optional: for polishing cookies and almonds)
- Parchment Paper
- Double Boiler (or microwave-safe bowl)
- Sealable Containers
Instructions
-
Prepare the Pumpkin Base (Night Before): In a bowl, thoroughly combine the pumpkin puree and vanilla. Cover and refrigerate overnight. This allows the flavors to meld and deepen.
-
Create the Custard Base (Morning Of): The next morning, in a saucepan, heat 3 cups of heavy cream and the dark brown sugar over medium heat, stirring occasionally until the sugar is dissolved and the mixture is warm but not boiling.
-
Temper the Egg Yolks: In a separate bowl, whisk together the remaining 1 cup of heavy cream, egg yolks, cinnamon, ginger, and salt. This mixture will create the rich, custardy base of the ice cream.
-
Combine and Thicken: Slowly pour about 1 cup of the hot cream mixture into the yolk mixture, whisking constantly. This process, called tempering, gently raises the temperature of the eggs, preventing them from scrambling. Once thoroughly combined, slowly pour the yolk mixture back into the cream mixture in the saucepan, stirring constantly. Continue to heat the mixture over low heat, stirring constantly, for about 5 minutes, or until it begins to thicken slightly and coats the back of a spoon. Do not boil.
-
Chill the Ice Cream Base: Cover the saucepan and refrigerate the custard base until it is completely cold. This step is crucial for achieving a smooth and creamy ice cream texture.
-
Finalize the Ice Cream Base: Remove the pumpkin mixture from the refrigerator and pour it into the chilled cream mixture. Add the Bourbon and whisk thoroughly until the mixture is creamy and smooth.
-
Churn and Freeze: Pour the combined mixture into your ice cream maker and churn according to the manufacturer’s instructions until thick. Transfer the churned ice cream to a freezable container and freeze until completely set before scooping, at least 3 hours.
-
Preheat the Oven: Preheat your oven to 365 degrees F (185 degrees C).
-
Cream Butter and Sugar: In a stand mixer, cream together the butter and sugar until light and fluffy. This creates air pockets in the dough, resulting in a tender cookie.
-
Add Wet Ingredients: Add the vanilla extract and egg to the creamed butter and sugar mixture, and mix until well combined.
-
Combine Dry and Wet Ingredients: In a separate bowl, whisk together the flour and salt. Gradually add the dry ingredients to the wet ingredients, mixing gently until a dough ball forms. Be careful not to overmix, as this can result in a tough cookie.
-
Shape and Bake Cookies: On a sheet of parchment paper, mold your dough into the desired zombie shapes. Remember that smaller pieces will bake faster than larger ones. Bake for 8-12 minutes, depending on the size of your cookie. The cookies are done when the edges are lightly golden brown.
-
Cool and Decorate: Once the cookies have baked, transfer them to a cooling rack and let them cool completely. Once cool, decorate them with royal icing or other desired decorations. Allow the decorated cookies to dry completely before placing them in your sundae.
-
Prepare the Modeling Chocolate: Warm the corn syrup separately in the microwave. Melt the white chocolate candy melts using a double boiler or in the microwave in short intervals, stirring in between to prevent burning. Once the chocolate is completely melted and smooth, remove it from the heat and mix in the warm corn syrup, mixing just until a soft-serve texture forms.
-
Set and Manipulate the Modeling Chocolate: Wrap the modeling chocolate tightly in plastic wrap and allow it to set for 6-8 hours or overnight. When ready to use, break off a piece and manipulate it in your hands until it is soft and flexible again. If it’s too soft, you can always fold in a little bit of powdered sugar to help it set up a bit more. Once you have a flexible dough, you can roll it out and shape it to make the white chocolate pumpkins.
-
Create Royal Icing: In a stand mixer, beat the egg whites until frothy. Gradually incorporate the confectioners’ sugar until the icing is smooth and forms stiff peaks.
-
Tint Royal Icing: Separate the royal icing into two sealable containers. Leave one bowl white (un-tinted), and use orange food coloring to tint the other (about three drops).
-
Assemble the Sundae: Finally, assemble your ice cream sundae to resemble the recipe photos. Use the decorative urn as a base, layering the hot fudge, ice cream, zombie cookies, and modeling chocolate pumpkins. Adorn with whipped cream, shredded wheat “brooms,” and almond sliver “leaves.” Add straws for a final touch.
Expert Tips & Tricks
- For a more intense pumpkin flavor, roast your pumpkin puree in the oven before using it in the ice cream.
- If you don’t have an ice cream maker, you can try the “no-churn” method, which involves whisking the ice cream base every 30 minutes while it freezes.
- To prevent the cookies from spreading too much during baking, chill the dough for at least 30 minutes before shaping them.
- If your modeling chocolate is too sticky, knead in a little bit of powdered sugar. If it’s too dry, add a tiny bit of shortening.
- Use a Dremel tool to smooth the edges of the zombie cookies, for a more polished look.
Serving & Storage Suggestions
Serve the Pumpkin Spice Billy Butcher-Sundae immediately after assembling for the best texture and presentation. The sundae is best enjoyed fresh, as the ice cream will melt and the cookies will soften over time. Leftover ice cream can be stored in an airtight container in the freezer for up to 2 weeks. Decorated zombie cookies can be stored at room temperature in an airtight container for up to 3 days.
Nutritional Information
Please note that these values are estimates and may vary based on specific ingredients and serving sizes.
| Nutrient | Amount per Serving | % Daily Value |
|---|---|---|
| Calories | 1695.3 kcal | N/A |
| Calories from Fat | 926 g | 55% |
| Total Fat | 102.9 g | 158% |
| Saturated Fat | 62.4 g | 312% |
| Cholesterol | 454.8 mg | 151% |
| Sodium | 759 mg | 31% |
| Total Carbohydrate | 192.2 g | 64% |
| Dietary Fiber | 11 g | 44% |
| Sugars | 127.5 g | 510% |
| Protein | 20.4 g | 40% |
Variations & Substitutions
- For a vegan version, substitute the heavy cream with coconut cream and use a vegan egg replacement in the cookie dough.
- If you don’t like Bourbon, you can omit it or substitute it with rum extract or vanilla extract.
- Get creative with the zombie cookie designs! Use different cookie cutters or hand-shape the dough into various spooky creatures.
- Instead of white chocolate modeling chocolate, you can use milk chocolate or dark chocolate for a richer flavor.
- For a gluten-free option, use a gluten-free flour blend in the cookie recipe.
FAQs (Frequently Asked Questions)
Q: How can I make the ice cream smoother?
A: Chilling the ice cream base completely before churning is crucial for a smooth texture. Also, avoid over-churning the ice cream, as this can lead to a grainy texture.
Q: Can I make the zombie cookies ahead of time?
A: Absolutely! The zombie cookies can be made several days in advance and stored in an airtight container at room temperature.
Q: What if my modeling chocolate is too hard?
A: Gently warm the modeling chocolate in the microwave in short intervals, kneading it in between until it becomes pliable. Be careful not to overheat it, as it can become oily.
Q: Can I use store-bought ice cream instead of making my own?
A: Yes, you can use store-bought pumpkin spice ice cream if you’re short on time. However, homemade ice cream will always have a superior flavor and texture.
Q: How do I prevent my royal icing from cracking?
A: Add a small amount of glycerin or corn syrup to the royal icing to help prevent it from cracking.
Final Thoughts
This Pumpkin Spice Billy Butcher-Sundae is more than just a dessert; it’s an experience. From the creamy, spiced ice cream to the whimsical zombie cookies and the spooky garnishes, every element is designed to delight and slightly fright. So, gather your ingredients, unleash your inner artist, and create a Halloween masterpiece that will be the talk of the town. Don’t be afraid to experiment with different flavors and decorations to make it your own. And most importantly, have fun! Share your creations and your memories with friends, and don’t forget to tag me in your photos! Happy haunting, and happy baking!