
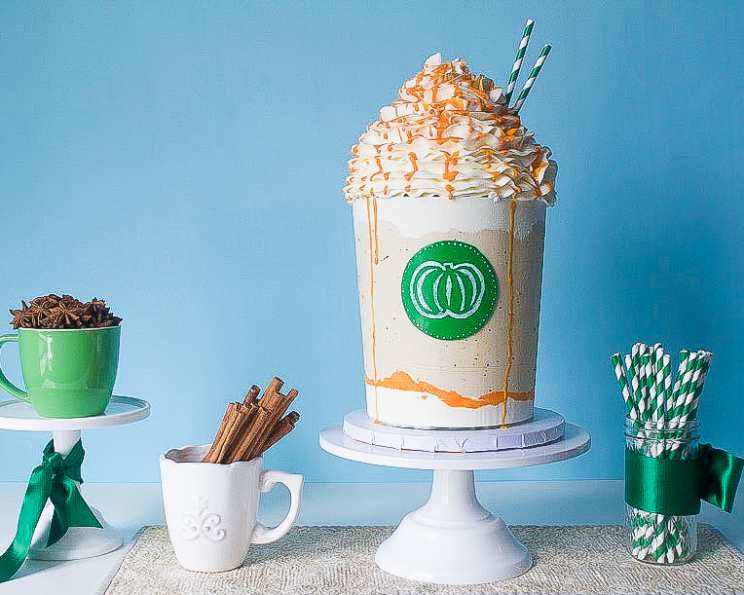
Pumpkin Spice Latte Cake: A Slice of Autumn Magic
Fall has always been my favorite season, and not just because of the vibrant colors. It’s the smells – the earthy aroma of fallen leaves, the crisp scent of woodsmoke, and, of course, the intoxicating fragrance of pumpkin spice. One particular memory stands out: baking pumpkin pies with my grandmother, the kitchen filled with warmth, laughter, and the comforting scent of cinnamon, nutmeg, and ginger. It wasn’t just about the pie; it was about tradition, family, and the simple joy of creating something delicious together. That feeling is what I try to capture in every autumn bake, and this Pumpkin Spice Latte Cake is no exception – a multi-layered masterpiece that brings the cozy coffee shop experience right into your own kitchen.
Recipe Overview
- Prep Time: 6 hours 40 minutes
- Servings: 20
- Yields: 1 cake
Ingredients
- 5 cups cake flour, sifted
- ½ cup whole powdered milk (optional)
- 2 ½ teaspoons baking soda
- 2 teaspoons baking powder
- 4 teaspoons ground cinnamon
- 1 teaspoon ground nutmeg
- 1 teaspoon ground ginger
- ½ teaspoon ground allspice
- ½ teaspoon ground cloves
- 1 ½ teaspoons fine salt
- 1 ½ cups unsalted butter
- 6 large eggs, at room temperature
- 1 ⅓ cups white sugar
- 1 ⅓ cups light brown sugar, packed
- 2 ½ cups canned pumpkin
- ½ cup cold brew coffee or ½ cup water
- 1 tablespoon vanilla
- 4-5 teaspoons orange gel food coloring
- ¼ cup cocoa powder, sifted
- 2 batches Cold Brew Coffee Buttercream (for frosting)
- 1 batch Milkmoon Meringue Buttercream (for vanilla frosting)
- ¼ cup white chocolate or ¼ cup white candy wafers
- ¼ cup heavy cream
- green fondant
- white edible paint (for decorating the cake)
Equipment Needed
- Two 5” round 3” deep cake pans
- Two 6” round 3” deep cake pans
- Two 7” round 3” deep cake pans
- Stand mixer
- Medium mixing bowl
- Small bowl
- Whisk
- Spatula
- Cake tester or toothpick
- Cooling rack
- Foil
- Paring or butter knife
- 8” or 9” round cardboard cake circle or board
- Acrylic circle or waxed cardboard round
- Disposable piping bags
- Straight edge (tall plastic quilting ruler recommended)
- Small icing spatula
- Sharp paring knife
- Microwaveable bowl
- Squeeze bottle (optional)
- Closed-star or regular star piping tip
- Three-inch circle cutter (optional)
- Paintbrush
- X-acto knife (optional)
- Paper
Instructions
-
Bake Your Cakes: Preheat your oven to 350°F (175°C). Prepare your cake pans. You’ll need two 5” round 3” deep pans, two 6” round 3” deep pans, and two 7” round 3” deep pans. Grease the bottoms of each pan and line with a baking paper circle to prevent sticking.
-
Combine Dry Ingredients: In a medium mixing bowl, combine the cake flour, powdered milk (if using), baking soda, baking powder, cinnamon, nutmeg, ginger, allspice, cloves, and salt. Whisk thoroughly to ensure everything is evenly distributed. Set aside. Note: If you prefer, you can replace the individual spices with an equal amount of commercial pumpkin spice blend, or your own homemade mix.
-
Prepare Pumpkin Mixture: In a small bowl, whisk together the canned pumpkin, vanilla, and cold brew coffee (or water) until well combined. Set aside.
-
Cream Butter and Sugars: Place the room-temperature butter, eggs, white sugar, and brown sugar in the bowl of your stand mixer fitted with the paddle attachment. Cream on medium speed until the mixture is lightened in color, fluffy, and totally smooth – about 3-5 minutes. Scrape down the bowl with a spatula to ensure that nothing is sticking to the sides. Tip: If the mixture appears to have broken (fat and liquid separating), continue creaming until it comes back together.
-
Incorporate Pumpkin Mixture: Add the pumpkin mixture to the creamed butter and sugar and continue to beat until just combined.
-
Incorporate Dry Ingredients: With the mixer on low speed, gradually incorporate the dry ingredients in two additions, beating just until combined after each addition. Scrape down the bowl and mix for only a few more seconds to ensure the batter is homogeneous. Avoid overmixing!
-
Create Your Marble Batter: Separate the batter to create the different colors.
-
Orange Batter: Take 4 cups of batter and place in a medium bowl. Mix in 3 teaspoons of orange gel food coloring until the batter reaches a solid, vibrant orange color. Pour enough of this batter into each of your two 3” deep, 5” round pans to reach halfway up the side.
-
Chocolate Batter: Take 3 cups more of batter and combine with the ¼ cup cocoa powder, mixing until totally incorporated and a rich brown color.
-
Assemble Marbled Batter: Place alternating scoops of the brown, tan (original), and remaining orange batter into your remaining four larger cake pans (the 6″ and 7″ pans), doing your best to ensure the batter comes up to about halfway up the side in all four. It’s okay if they aren’t all exactly even. The marbling effect comes from layering the colors somewhat randomly.
-
Bake the Cakes: Bake your cakes for 35-45 minutes, or until a cake tester or toothpick inserted into the center comes out clean. Allow the cakes to cool to room temperature on a cooling rack, then cover them with foil and refrigerate for about an hour, until cold.
-
De-pan the Cakes: Remove the cooled cakes from the fridge. Slide a paring or butter knife around the outside of each pan to loosen the cake. Invert the pan and gently shake out the cake.
-
Make Your Buttercream: Follow the recipes for two batches of Cold Brew Coffee Buttercream and one batch of Milkmoon Meringue Buttercream.
-
Prep Your Base: Level the tops of your 6” and 7” cakes using a serrated knife. Torte (split horizontally) each cake into two layers, for a total of eight layers. Keep the smaller 5” orange cakes aside; these will form the pumpkin surprise topping.
-
Stack and Fill: Stack your cake layers on an 8” or 9” round cardboard cake circle or board. (It’s best if the board or circle is completely flat.) Start with the 7” layers, then add the 6” layers, filling each layer with Cold Brew Coffee Buttercream. Refrigerate for at least 1 hour, or until the cake is completely firm.
-
Trim and Shape: Trim the caramelization from the sides of the cake, doing your best to emphasize a slight angle from the 6” round top to the 7” round base. You are essentially creating an upside-down cup shape.
-
Frost the Cake: Add a very thin crumb coat of coffee buttercream to the top of the cake. Press a 6” round acrylic circle or waxed cardboard round onto the top. Cutting the tip off of a disposable piping bag (leaving a ½ inch circle at the end), pipe your remaining coffee buttercream onto the sides of the cake, leaving space at the top and bottom for the “whipped cream” you will be adding later. Keep the edges of your coffee buttercream wavy and organic for a more realistic look!
-
Smooth the Coffee Buttercream: Use a straight edge to smooth the coffee buttercream. A tall plastic quilting ruler works well. Use the acrylic or cardboard round at the top to guide your straight edge, creating a perfectly smooth finish. Refrigerate until firm.
-
Add White Buttercream “Whip”: Pipe plain white buttercream at the top and bottom of the cake’s sides, leaving small gaps here and there between the white buttercream and coffee buttercream in the top area. Make another pass with your straight edge, getting your “whip” nice and smooth, and flush with the coffee buttercream. Refrigerate until firm.
-
Pumpkin-Colored Accents: Mix a few squirts of orange gel into about ½ cup white buttercream to create a bright pumpkin color. Remove your firmed cake from the fridge and push this orange buttercream into the spaces you left at the top between the white and the coffee buttercream using a small icing spatula. Refrigerate until firm, then use the icing spatula to scrape down any messy buttercream to reveal clean lines underneath.
-
Flip the Cake!: Yes, you read that right! Place your nice cake board or cake plate so it’s ready on the counter. Pick up your cake, place a hand on either side, and flip it so that the 7” end is at the top and the 6” end is at the bottom. Your cake needs to be super thoroughly chilled before you attempt this step, so make sure it has spent a cumulative 2-3 hours in the fridge! Center the cup-shaped cake on your board. Remember that you have a second board at the very bottom of the cake.
-
Remove the Base Board: Carefully pinch the 8 or 9” round you were using as the base of the cake before you flipped it and gently pull it up, moving around the cake as you pop it up off of the buttercream on the sides. Remove it entirely to reveal your bare cake top.
-
Create the Pumpkin Surprise Topping: Using a sharp paring knife, carve down the two 5” orange cakes into domes, one with a knob on the top for the pumpkin’s “stem.” Using a dab or two of the orange buttercream from earlier, join your cake domes on the flat sides to create a delicious mini-pumpkin!
-
Assemble the Pumpkin on Top: Smooth a small amount of white buttercream to the top of the flipped cake, and center your mini-pumpkin on the top. Using another disposable piping bag with a ½” hole at the tip, pipe white buttercream over the pumpkin and then smooth with a small icing spatula to create a nice mound that entirely obscures the pumpkin within.
-
Pipe the Swirl: Use the largest closed-star or regular star piping tip you can find to pipe a swirl of white buttercream over the pumpkin surprise to create the “whipped cream” topping. Refrigerate for at least 20 minutes to firm up the outside of the buttercream.
-
Make the Orange Drizzle: In the meantime, make a small amount of drizzle by placing your white chocolate or candy wafers and heavy cream in a microwaveable bowl and microwave for 15 seconds at a time, stirring frequently, until the chocolate has dissolved. Mix in a squirt of orange gel coloring to achieve a bright pumpkin color, or you can stir in a little leftover orange buttercream if you have any.
-
Drizzle the Ganache: Place the ganache in a squeeze bottle if you have one, or just use a spoon to drizzle it all over the “whipped cream” buttercream swirl.
-
Finishing Touches: This step is optional but highly recommended! Cut out a three-inch circle of green fondant and apply it to the side of the cake. Using a paintbrush dipped in white edible paint, you can either freehand a pumpkin shape (or your initials, or anything else you want to add!) or you can create a stencil.
-
Create Stencil (Optional): Use an x-acto knife to cut out your pumpkin design from plain paper, and then stick it onto the fondant round, paint over it, and peel it away to leave a fun pumpkin design.
-
Add Straw: Finish the latte look by cutting a super cute paper straw in half and inserting both pieces into the swirl.
-
Cutting the Cake: When you cut your slices of cake, you will slowly reveal the pumpkin shape hidden under the swirl on top! Make sure you take a pause once you’re halfway through cutting up the cake so everyone can admire the detail you put into the super fun design!
Expert Tips & Tricks
- Room Temperature Ingredients: Using room temperature butter and eggs is crucial for achieving a smooth and emulsified cake batter. This ensures even baking and a tender crumb.
- Don’t Overmix: Overmixing cake batter develops the gluten in the flour, resulting in a tough cake. Mix until just combined.
- Chill Time is Key: Chilling the cake thoroughly before flipping and frosting is essential for stability. This prevents the cake from crumbling or sliding.
- Leveling Cake Layers: A serrated knife works best for leveling cake layers. Use a gentle sawing motion to avoid tearing the cake.
- Customizing the Spices: Adjust the amount of pumpkin spice to your personal preference. You can also add other spices like cardamom or star anise for a unique flavor profile.
Serving & Storage Suggestions
Serve this Pumpkin Spice Latte Cake chilled. It makes a stunning centerpiece for fall gatherings and pairs perfectly with a cup of hot coffee or tea.
Storage: Store leftover cake in an airtight container in the refrigerator for up to 3 days. For longer storage, you can freeze individual slices for up to 2 months. Thaw in the refrigerator before serving.
Nutritional Information
Please note that these values are estimates and can vary depending on specific ingredients and portion sizes.
| Nutrient | Amount per Serving | % Daily Value |
|---|---|---|
| Calories | 414 kcal | – |
| Calories from Fat | 158 g | 38% |
| Total Fat | 17.6 g | 27% |
| Saturated Fat | 10.5 g | 52% |
| Cholesterol | 96.9 mg | 32% |
| Sodium | 473.6 mg | 19% |
| Total Carbohydrate | 59.8 g | 19% |
| Dietary Fiber | 2.2 g | 8% |
| Sugars | 30.1 g | – |
| Protein | 5.6 g | 11% |
Variations & Substitutions
- Gluten-Free: Substitute the cake flour with a high-quality gluten-free blend. Be sure to add xanthan gum to help bind the batter.
- Dairy-Free: Use a plant-based butter alternative and non-dairy milk for the buttercream and cake batter.
- Spice It Up: Add a pinch of cayenne pepper to the cake batter for a subtle kick.
- Coffee Extract: For an intensified coffee flavor, add a teaspoon of coffee extract to the cake batter.
FAQs (Frequently Asked Questions)
Q: Can I make the cakes ahead of time?
A: Absolutely! In fact, it’s recommended. Bake the cakes up to 2 days in advance, wrap them tightly in plastic wrap, and store them in the refrigerator.
Q: Can I use store-bought buttercream?
A: While homemade buttercream is best for flavor and texture, you can substitute with high-quality store-bought buttercream to save time.
Q: My batter looks curdled. What should I do?
A: This can happen when the butter is too cold. Continue mixing until it comes together. If it’s still curdled, try warming the bowl slightly over a double boiler.
Q: How do I prevent the cake from sticking to the pans?
A: Greasing the pans well and lining the bottoms with parchment paper circles will help prevent sticking.
Q: Is the cake too sweet?
A: The sweetness level is balanced by the coffee buttercream. If you prefer a less sweet cake, reduce the amount of sugar in the batter slightly.
Final Thoughts
This Pumpkin Spice Latte Cake is more than just a dessert; it’s a celebration of the season. The warm spices, the rich coffee flavor, and the hidden pumpkin surprise create a truly unforgettable experience. I encourage you to try this recipe and share it with your loved ones. Don’t be intimidated by the multiple steps – each one contributes to the overall magic of this cake. And most importantly, have fun with it! Let your creativity shine through in the decorating, and enjoy the process of creating something truly special. I would love to hear about your experience and see your creations!