
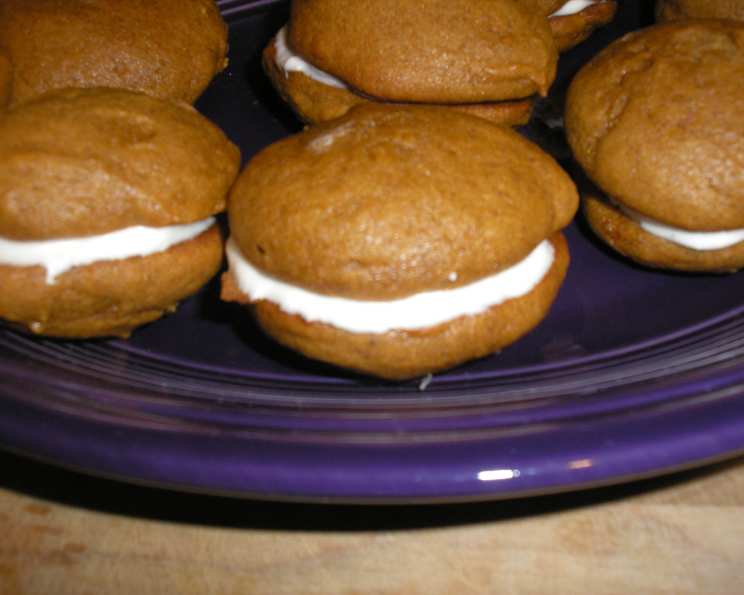
Pumpkin Whoopie Pies With Cream-Cheese Filling
I remember the first time I tasted a whoopie pie. It was at a local county fair, and amidst the chaos of livestock judging and prize-winning vegetables, a simple stand was selling these unassuming, cake-like sandwiches. The soft, spiced pumpkin cakes, held together by a sweet, tangy cream cheese filling, were a revelation. One bite, and I was transported to a cozy autumn afternoon, the kind where leaves crunch underfoot and the air smells of woodsmoke and cinnamon. From that day on, I was hooked, and I’ve been chasing that perfect whoopie pie ever since.
Recipe Overview
- Prep Time: 30 minutes
- Cook Time: 15 minutes
- Total Time: 45 minutes
- Servings: 25
- Yields: 50 pies
- Dietary Type: Vegetarian
Ingredients
For the Cookies:
- 3 cups all-purpose flour
- 1 teaspoon salt
- 1 teaspoon baking powder
- 1 teaspoon baking soda
- 2 tablespoons ground cinnamon
- 1 tablespoon ground ginger
- 1 tablespoon ground cloves
- 2 cups dark brown sugar, firmly packed
- 1 cup olive oil
- 3 cups pumpkin puree, chilled
- 2 large eggs
- 1 teaspoon pure vanilla extract
For the Filling:
- 3 cups confectioners’ sugar
- 1/2 cup unsalted butter, softened
- 8 ounces cream cheese, softened
- 1 teaspoon pure vanilla extract
Equipment Needed
- Two baking sheets
- Parchment paper or nonstick baking mat
- Large bowl
- Whisk
- Electric mixer with paddle attachment
- Medium bowl
- Disposable pastry bag
Instructions
-
Make the cookies: Preheat oven to 350 degrees F (175 degrees C). Line two baking sheets with parchment paper or a nonstick baking mat; set aside. Using parchment paper ensures the cookies don’t stick, making for easy removal and clean-up.
-
In a large bowl, whisk together the flour, salt, baking powder, baking soda, cinnamon, ginger, and cloves; set aside. This step ensures that the dry ingredients are evenly distributed, which is crucial for a consistent rise and flavor in the cookies.
-
In another large bowl, whisk together the brown sugar and olive oil until well combined. The brown sugar adds a deep, molasses-like sweetness, while the olive oil contributes to the cookies’ moistness. Make sure there are no lumps for a smooth batter.
-
Add the pumpkin puree to the brown sugar mixture and whisk until combined. Chilled pumpkin puree is recommended, as it will help keep the batter cool and prevent the cookies from spreading too much during baking.
-
Add the eggs and vanilla extract and whisk until well combined. Eggs provide structure and richness, while vanilla extract enhances the overall flavor profile.
-
Sprinkle the flour mixture over the pumpkin mixture and whisk until fully incorporated. Be careful not to overmix the batter, as this can lead to tough cookies. Mix just until the dry ingredients are moistened.
-
Using a tablespoon, scoop dough and level it, then place it on a cookie sheet. Repeat and place about 1 inch apart. The size of the dough mounds will determine the final size of your whoopie pies. Ensure uniform size for consistent baking.
-
Transfer to oven and bake until cookies are just starting to crack on top and a toothpick inserted into the center of each cookie comes out clean, about 15 minutes. Monitor the cookies closely during baking. The cracking on top is a good indicator that they are nearly done. An inserted toothpick should come out clean or with just a few moist crumbs attached.
-
Let cool completely on pan. Allowing the cookies to cool completely on the baking sheet prevents them from sticking and makes them easier to handle when assembling the whoopie pies.
-
Make the filling: Sift confectioners’ sugar into a medium bowl; set aside. Sifting prevents lumps and ensures a smooth, creamy filling.
-
In the bowl of an electric mixer fitted with the paddle attachment, beat butter until smooth. Using softened butter is crucial for a smooth and creamy filling.
-
Add the cream cheese and beat until well combined. Make sure the cream cheese is also softened to avoid lumps in the filling.
-
Add the confectioners’ sugar and vanilla, beat just until smooth. Be careful not to overbeat the filling, as this can make it too thin.
-
(Filling can be made up to a day in advance. Cover and refrigerate; let stand at room temperature to soften before using.) If making the filling ahead of time, ensure it’s brought to room temperature before using for easier piping and spreading.
-
Assemble the whoopie pies: Line a baking sheet with parchment paper and set aside. This is where the magic happens!
-
Transfer filling to a disposable pastry bag and snip the end. Using a pastry bag allows for easy and precise filling distribution.
-
When cookies have cooled completely, pipe a large dollop of filling on the flat side of half of the cookies. Sandwich with remaining cookies, pressing down slightly so that the filling spreads to the edge of the cookies.
-
Transfer to prepared baking sheet and cover with plastic wrap. Refrigerate cookies at least 30 minutes before serving and up to 3 days. Chilling the whoopie pies allows the filling to firm up and the flavors to meld together.
Expert Tips & Tricks
- For a deeper flavor, try browning the butter for the filling before creaming it with the cream cheese. This adds a nutty complexity that complements the pumpkin spice.
- If you find your cookie dough is too sticky to handle, chill it in the refrigerator for 30 minutes before scooping.
- Use a cookie scoop for uniform whoopie pie sizes.
- Don’t overbake! Slightly underbaked cookies are moister and more tender.
- Add a pinch of nutmeg to the cream cheese filling for an extra layer of autumnal spice.
Serving & Storage Suggestions
Serve the Pumpkin Whoopie Pies chilled for the best flavor and texture. Arrange them on a platter for an attractive presentation. You can dust them lightly with confectioners’ sugar for an elegant touch.
Leftover whoopie pies should be stored in an airtight container in the refrigerator for up to 3 days. For longer storage, you can freeze them for up to 2 months. Thaw them in the refrigerator before serving. They do not need reheating.
Nutritional Information
| Nutrient | Amount per Serving | % Daily Value |
|---|---|---|
| Calories | 165.5 kcal | N/A |
| Calories from Fat | 72 g | 44% |
| Total Fat | 8 g | 12% |
| Saturated Fat | 2.7 g | 13% |
| Cholesterol | 17.3 mg | 5% |
| Sodium | 99.9 mg | 4% |
| Total Carbohydrate | 22.6 g | 7% |
| Dietary Fiber | 0.5 g | 1% |
| Sugars | 15.9 g | 63% |
| Protein | 1.4 g | 2% |
Variations & Substitutions
- Gluten-Free: Substitute the all-purpose flour with a gluten-free blend. Be sure to use a 1-to-1 replacement blend that includes xanthan gum for best results.
- Vegan: Replace the eggs with flax eggs (1 tablespoon ground flaxseed mixed with 3 tablespoons water per egg). Use a vegan butter substitute and vegan cream cheese for the filling.
- Spice It Up: Add a pinch of cayenne pepper to the cookie dough for a subtle kick.
- Chocolate Chips: Fold in chocolate chips into the cookie dough for added sweetness and texture.
- Maple Syrup: Substitute some of the brown sugar with maple syrup for a more complex flavor profile.
FAQs (Frequently Asked Questions)
Q: Can I use canned pumpkin pie filling instead of pumpkin puree?
A: No, canned pumpkin pie filling contains added spices and sugar, which will alter the flavor and texture of the cookies. Stick to pure pumpkin puree for the best results.
Q: Why are my whoopie pies flat?
A: Flat whoopie pies can be caused by overmixing the batter, using room-temperature pumpkin puree, or having an oven that is not at the correct temperature. Ensure to chill the pumpkin puree before use.
Q: Can I make the dough ahead of time?
A: Yes, you can make the cookie dough ahead of time and store it in the refrigerator for up to 2 days. Allow the dough to come to room temperature slightly before scooping and baking.
Q: How do I keep the filling from oozing out when I bite into the whoopie pie?
A: Chilling the assembled whoopie pies for at least 30 minutes before serving will help the filling to firm up and prevent it from oozing out.
Q: Can I freeze the whoopie pies?
A: Yes, you can freeze the whoopie pies for up to 2 months. Wrap them individually in plastic wrap and then place them in an airtight container. Thaw in the refrigerator before serving.
Final Thoughts
These Pumpkin Whoopie Pies with Cream-Cheese Filling are a guaranteed crowd-pleaser, bringing a touch of autumnal magic to any occasion. Whether you’re baking for a cozy family gathering, a festive holiday celebration, or simply a sweet treat for yourself, these delightful little sandwiches are sure to bring a smile to everyone’s face. Don’t be afraid to experiment with variations and make them your own! And please, let me know how they turn out – I’m always eager to hear about your culinary adventures. Perhaps a warm cup of spiced apple cider would be the perfect accompaniment? Happy baking!