
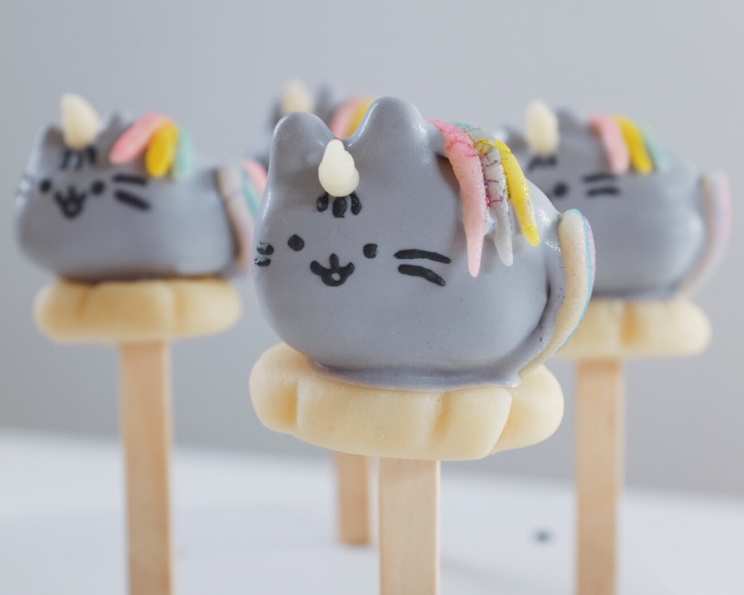
Pusheenicorn Cake Pops: A Whimsical Treat
My first encounter with Pusheen was, predictably, online. A friend sent me a GIF of the adorable cartoon cat indulging in a massive slice of pizza, and I was instantly smitten. Its simple charm and relatable love of food resonated deeply. Fast forward a few years, and I was searching for a fun, creative project to make with my niece. The idea of transforming Pusheen into a unicorn cake pop, a “Pusheenicorn,” felt absolutely perfect—a delicious and utterly delightful adventure in baking and decorating.
Recipe Overview
- Prep Time: 45 minutes
- Cook Time: 20 minutes
- Total Time: 1 hour 5 minutes
- Servings: 12 cake pops
- Yield: 12 Pusheenicorn Cake Pops
- Dietary Type: Not specified – can be adapted
Ingredients
- 1 (16 ounce) box white cake mix
- Food coloring (red, orange, yellow, green, blue, purple, black)
- 1 cup vanilla frosting
- 2 cups white chocolate candies (also known as candy melts)
- Vegetable oil
- Marzipan
- Royal icing
Equipment Needed
- Muffin tin
- Cupcake liners
- Mixing bowls
- Double boiler (or microwave-safe bowl)
- Popsicle sticks
- Small bowls for food coloring
- Piping bag (for royal icing)
Instructions
-
Preheat your oven according to the instructions on the white cake mix box. Different brands may have slightly different temperature recommendations, so be sure to follow them closely for the best results.
-
Prepare the cake mix according to the package directions. Once the batter is ready, divide it evenly into six separate mixing bowls. Aim for approximately 3/4 cup of batter in each bowl.
-
Using the food coloring, tint each bowl of batter to a pastel shade. Create red, orange, yellow, green, blue, and purple pastel colors. You’ll want to avoid making a black batter at this stage. Add the food coloring a little at a time, mixing well after each addition, until you achieve your desired pastel hue.
-
Line your muffin tin with cupcake liners. Pour the colored batter into the prepared muffin tin, filling each liner about two-thirds full.
-
Bake the cupcakes according to the package instructions on the cake mix. Baking times can vary depending on your oven, so keep a close eye on them. A toothpick inserted into the center should come out clean when they’re done.
-
Allow the cupcakes to cool completely. This is a crucial step! Warm cupcakes will make the cake pop mixture too wet and difficult to work with.
-
Once the cupcakes are completely cooled, crumble them into their respective bowls. Break them down into fine crumbs.
-
Add vanilla frosting to each bowl of crumbled cupcake. Start with 1 tablespoon of frosting per bowl, and then add more, 1 teaspoon at a time, until the mixture holds its shape when pressed together but doesn’t feel overly wet or sticky. You want a consistency similar to play dough.
-
Take a teaspoon of each colored cake mixture and gently squish them together to form an oval shape. Arrange the colors in a ROY G. BIV (red, orange, yellow, green, blue, indigo, violet) gradient, blending them slightly where they meet to create a smooth transition. Shape the top edge of the oval to form small “ears” for the Pusheen.
-
Place the shaped cake pops on a plate or baking sheet lined with parchment paper and chill them in the freezer for 15-20 minutes. This will help them firm up and make them easier to dip.
-
While the cake pops are chilling, prepare the marzipan decorations. Shape the marzipan into a horn, mane, tail, and cloud. These will be the defining features of your Pusheenicorn! Set these aside. Use a popsicle stick to carefully press a hole through the marzipan cloud. This hole will allow you to slide the cloud onto the cake pop stick after dipping.
-
Melt the white chocolate candies (candy melts) in a double boiler over low heat, or in a microwave-safe bowl in short intervals, stirring frequently to prevent burning.
-
Once the candy melts are fully melted and smooth, gradually add the black food coloring, a little at a time, until you achieve the desired grey color of Pusheen. Stir well after each addition.
-
Thin the melted candy melts with vegetable oil, 1 tablespoon at a time. The consistency should be thin enough to easily coat the cake pops, but not so runny that it drips excessively.
-
Dip the tip of each popsicle stick into the melted candy melts. Then, insert the dipped end of the stick into the bottom of each chilled cake pop. The melted candy acts as a glue, securing the stick to the cake pop.
-
Allow the candy coating on the sticks to set completely. This will ensure that the cake pops stay securely attached to the sticks during dipping.
-
Dip each cake pop into the melted grey candy melts, ensuring it is fully coated. Gently tap off any excess coating to create a smooth finish.
-
Carefully and quickly press the marzipan horn, mane, tail, and cloud onto the body of the cake pop while the candy coating is still wet. If needed, use a small amount of melted candy melts to help the decorations adhere securely.
-
Let the candy coating set completely before painting the details.
-
Loosen the remaining food dyes (red, orange, yellow, green, blue, purple) with a tiny bit of water in small bowls. This will create edible paint.
-
Using a small, fine-tipped brush, paint the colors onto the marzipan mane and tail. Be creative and use your imagination!
-
Using royal icing tinted to the appropriate colors (black and white), pipe the face onto each Pusheenicorn. Add the signature whiskers, eyes, and a cute little smile.
Expert Tips & Tricks
- For a smoother candy coating, use a heat gun or hair dryer on low setting to gently warm the surface of the dipped cake pops, which will help to smooth out any imperfections.
- If your candy melts become too thick, add a small amount of vegetable shortening instead of oil to thin them out.
- To prevent the cake pops from cracking, avoid sudden temperature changes. Make sure the cake pops are thoroughly chilled before dipping them in the warm candy melts.
- If you are short on time, you can use store-bought cake instead of baking your own cupcakes.
Serving & Storage Suggestions
Serve the Pusheenicorn cake pops immediately after the candy coating has completely set and the royal icing has dried. They make a delightful treat for parties, birthdays, or any special occasion.
To store leftover cake pops, wrap them individually in cellophane bags or place them in an airtight container. They can be stored at room temperature for up to 2-3 days, in the refrigerator for up to a week, or in the freezer for up to a month. If freezing, thaw them in the refrigerator before serving.
Nutritional Information
| Nutrient | Amount per Serving | % Daily Value |
|---|---|---|
| Calories | 250 kcal | 13% |
| Total Fat | 12g | 18% |
| Saturated Fat | 8g | 40% |
| Cholesterol | 20mg | 7% |
| Sodium | 150mg | 7% |
| Total Carbohydrate | 35g | 12% |
| Dietary Fiber | 1g | 4% |
| Sugars | 25g | – |
| Protein | 2g | 4% |
Note: Nutritional information is an estimate and may vary based on specific ingredients and brands used.
Variations & Substitutions
- For a gluten-free option, use a gluten-free cake mix.
- To make these dairy-free, use dairy-free frosting and dairy-free white chocolate candies. Ensure the food coloring is also dairy-free.
- Instead of marzipan, you can use fondant or modeling chocolate for the horn, mane, tail, and cloud.
- Experiment with different flavor combinations by adding extracts or zest to the cake batter or frosting. Lemon, almond, or peppermint extract would all be delicious.
- For a festive twist, add sprinkles or edible glitter to the cake pops before the candy coating sets.
FAQs (Frequently Asked Questions)
Q: My candy melts are too thick. What can I do?
A: Add a small amount of vegetable oil or shortening, one teaspoon at a time, until the candy melts reach a smooth, pourable consistency. Be careful not to add too much, as this can make the coating too thin.
Q: The cake pops keep falling off the sticks. What am I doing wrong?
A: Make sure the cake pops are thoroughly chilled before dipping them. Also, ensure that the melted candy used to secure the sticks is completely set before dipping the cake pops in the coating.
Q: Can I use chocolate instead of candy melts?
A: Yes, you can use real chocolate, but it needs to be tempered properly to achieve a smooth, glossy finish. Candy melts are often easier to work with as they don’t require tempering.
Q: How can I prevent the candy coating from cracking?
A: Avoid sudden temperature changes. Make sure the cake pops are cold and the candy melts are not too hot. Also, tapping off excess coating gently can help prevent cracking.
Q: How long do these cake pops last?
A: These cake pops can be stored at room temperature for up to 2-3 days, in the refrigerator for up to a week, or in the freezer for up to a month.
Final Thoughts
Creating these Pusheenicorn cake pops is more than just baking; it’s an invitation to embrace your inner child and get creative. The process is wonderfully therapeutic, and the end result is a delightful treat that’s guaranteed to bring a smile to anyone’s face. Don’t be afraid to experiment with different colors, decorations, and flavors to make them truly your own. And remember, the most important ingredient is always love! I encourage you to try this recipe and share your creations with friends and family. I’m sure they’ll love them!