
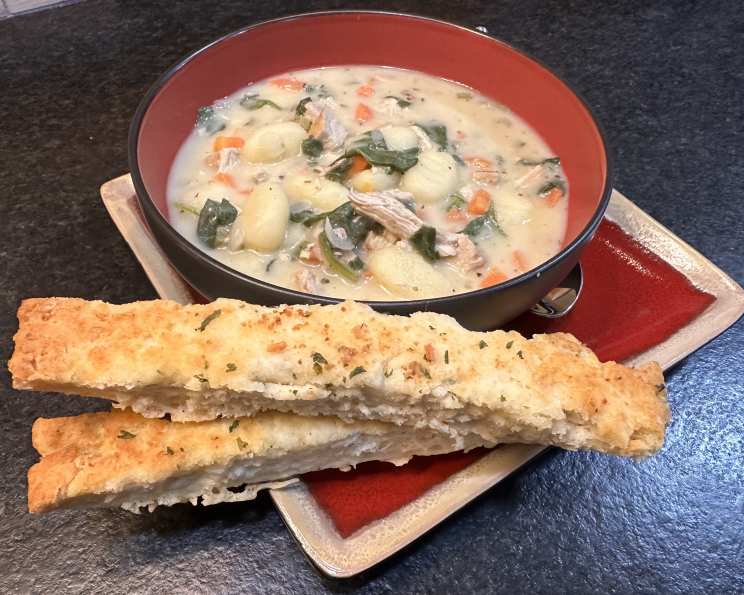
Quick & Easy Garlic Breadsticks: A Nostalgic Bite of Comfort
The aroma of garlic breadsticks baking in the oven is, for me, a direct portal back to childhood. I can almost see my grandmother bustling around her warm, inviting kitchen, the linoleum floor worn smooth from years of happy feet. She would always whip up a batch to accompany our family’s spaghetti night, and the best part was fighting over the crispiest edges. These weren’t fancy, artisan breadsticks; they were simple, buttery, garlicky goodness that filled our bellies and warmed our hearts. And now, I’m thrilled to share this equally simple and satisfying recipe with you, a testament to the idea that the best things in life, like garlic breadsticks, don’t need to be complicated.
Recipe Overview
- Prep Time: 10 minutes
- Cook Time: 20 minutes
- Total Time: 30 minutes
- Yields: 2-3 dozen
- Dietary Type: Vegetarian
Ingredients
- 3 cups flour
- 1 teaspoon salt
- 1 teaspoon garlic powder
- 1 tablespoon dried parsley (for decoration, optional)
- 1 tablespoon baking powder
- 1 cup milk
- ½ cup margarine
- 1 teaspoon garlic powder
- ½ teaspoon salt (optional)
Equipment Needed
- Large Mixing Bowl
- Measuring Cups and Spoons
- Large Spoon
- Rolling Pin
- 9×13 inch Baking Pan
- Oven
Instructions
- Preheat your oven to 425°F (220°C).
- In a large mixing bowl, measure and combine the flour, salt, garlic powder, parsley (if using), and baking powder.
- Stir the dry ingredients thoroughly to ensure they are evenly distributed.
- Pour in the milk.
- Stir with a large spoon until a ball of dough forms that pulls away from the sides of the bowl. If the dough seems too sticky, dust it with a little flour.
- Gently knead the dough right in the bowl for about 5 or 6 times. This brief kneading helps bring the dough together without overworking it.
- Transfer the dough to a clean counter. For easier cleanup, you can place a piece of waxed paper or parchment paper underneath.
- Using a rolling pin, roll the dough out into a rectangular shape. Don’t stress about perfection; just aim for a rectangle that will fit into your 9×13-inch pan. If the edges become uneven, gently reshape them with your hands.
- Once the dough is the desired size, set it aside temporarily.
- Now, place the margarine in the 9×13-inch pan. Place the pan in the preheated 425°F oven to melt the margarine.
- When the margarine is completely melted, carefully remove the pan from the oven. Be cautious, as the pan will be hot.
- Sprinkle the remaining 1 teaspoon of garlic powder and the ½ teaspoon of salt (if using) into the melted margarine in the pan.
- Very carefully lay the rectangular dough into the pan, positioning it directly over the melted margarine mixture.
- Using a knife or pizza cutter, cut the rectangle into narrow strips. A simple method is to first cut the dough in half lengthwise, then cut each half in half again (quartering the dough), and finally, cut each quarter into narrow strips.
- As you cut the strips, the melted margarine will seep up between them. This is perfectly normal and contributes to the breadsticks’ delicious texture.
- Place the pan back into the oven, still at 425°F, and bake for 20 minutes.
- The breadsticks are done when they are golden brown and crispy.
- The parsley is optional and purely for decoration. It adds a touch of visual appeal but doesn’t significantly alter the flavor or texture. If you don’t have any parsley on hand or prefer to skip it, feel free to omit it. You can also add the parsley before baking for a slightly toasted flavor.
Expert Tips & Tricks
- Don’t Over Knead: Overworking the dough will result in tough breadsticks. The brief kneading in this recipe is sufficient.
- Even Margarine Distribution: Make sure the margarine is evenly melted in the pan before placing the dough. This ensures that all the breadsticks get a good dose of buttery flavor.
- Crispier Breadsticks: For extra-crispy breadsticks, consider baking them on the lower rack of your oven for the last few minutes. Watch them closely to prevent burning.
- Garlic Intensity: Adjust the amount of garlic powder to your liking. If you’re a garlic lover, feel free to add a little more. You can also use fresh minced garlic for a more intense flavor, but be careful not to burn it. Add it to the margarine after it melts, stirring quickly.
- Homemade Garlic Butter Alternative: For a richer flavor, make a garlic butter sauce separately. Melt the margarine on the stovetop, add the garlic powder and salt, and brush it generously over the breadsticks before baking.
Serving & Storage Suggestions
These garlic breadsticks are best served warm, straight from the oven. They make a fantastic accompaniment to pasta dishes, soups, salads, or even as a snack on their own.
Storage: Leftover breadsticks can be stored in an airtight container at room temperature for up to 2 days. To maintain their crispness, avoid storing them in the refrigerator. For longer storage, you can freeze them in a freezer-safe bag for up to 2 months.
Reheating: To reheat, preheat your oven to 350°F (175°C). Place the breadsticks on a baking sheet and bake for 5-10 minutes, or until warmed through and crispy. You can also reheat them in a toaster oven or microwave, but they will lose some of their crispness.
Nutritional Information
Please note that these values are estimates and may vary based on specific ingredients and portion sizes.
| Nutrient | Amount per Serving | % Daily Value |
|---|---|---|
| Calories | 1178.9 kcal | N/A |
| Calories from Fat | 465 g | 39% |
| Total Fat | 51.7 g | 79% |
| Saturated Fat | 11 g | 54% |
| Cholesterol | 17.1 mg | 5% |
| Sodium | 2303.5 mg | 95% |
| Total Carbohydrate | 153 g | 50% |
| Dietary Fiber | 5.3 g | 21% |
| Sugars | 1.2 g | 4% |
| Protein | 24.4 g | 48% |
Variations & Substitutions
- Cheese Lovers: Sprinkle the breadsticks with Parmesan cheese, Romano cheese, or Italian cheese blend before or after baking for a cheesy twist.
- Herb Garden: Add other dried herbs like Italian seasoning, oregano, or basil to the dough for added flavor.
- Spicy Kick: Sprinkle a pinch of red pepper flakes into the margarine mixture for a touch of heat.
- Dairy-Free: Use a dairy-free milk alternative (such as almond, soy, or oat milk) and a vegan margarine to make these breadsticks dairy-free.
- Whole Wheat: Substitute up to half of the all-purpose flour with whole wheat flour for a nuttier flavor and added fiber.
- Pizza Dough Breadsticks: Use store-bought or homemade pizza dough for a chewier texture. Simply roll out the dough, spread with garlic butter, cut into strips, and bake.
FAQs (Frequently Asked Questions)
Q: Can I use fresh garlic instead of garlic powder?
A: Yes, you can. Use about 2-3 cloves of minced fresh garlic. Add it to the melted margarine after removing it from the oven, stirring quickly to prevent burning.
Q: My dough is too sticky. What should I do?
A: Add a little extra flour, one tablespoon at a time, until the dough becomes easier to handle and doesn’t stick to your hands or the bowl.
Q: Can I make the dough ahead of time?
A: Yes, you can prepare the dough ahead of time. Wrap it tightly in plastic wrap and refrigerate for up to 24 hours. Allow the dough to come to room temperature for about 30 minutes before rolling it out.
Q: My breadsticks are burning on the bottom. What am I doing wrong?
A: Your oven may be running hot. Try lowering the oven temperature by 25°F (15°C) and check the breadsticks more frequently. You can also place a baking sheet on the rack below to deflect some of the heat.
Q: Can I freeze the baked breadsticks?
A: Yes, you can freeze the baked breadsticks. Let them cool completely before placing them in a freezer-safe bag or container. They can be frozen for up to 2 months. Reheat them in the oven for the best results.
Final Thoughts
These quick and easy garlic breadsticks are a simple pleasure, perfect for adding a touch of homemade goodness to any meal. They’re a blank canvas for your creativity, so feel free to experiment with different flavors and toppings to create your own signature version. Don’t hesitate to share your creations and feedback! Pair them with a hearty bowl of tomato soup or a crisp Caesar salad for a complete and satisfying meal. So, gather your ingredients, preheat your oven, and get ready to enjoy the irresistible aroma of freshly baked garlic breadsticks!