
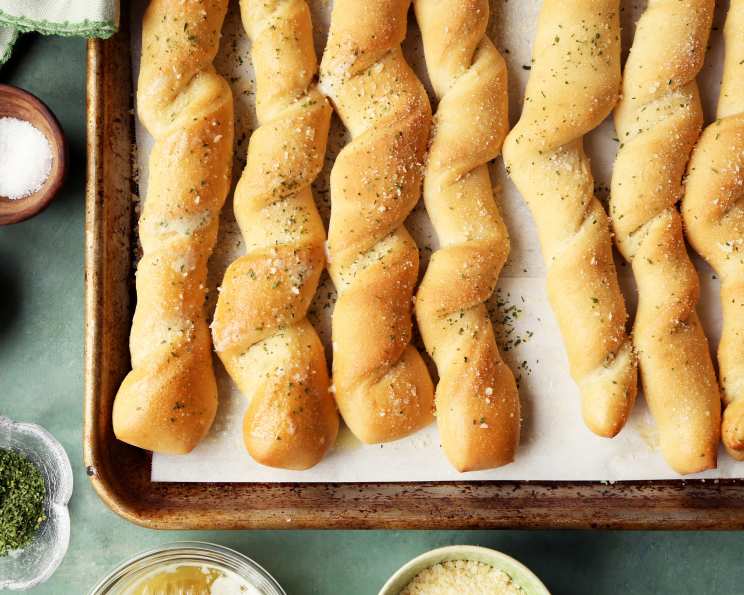
Quick Soft Breadsticks: A Culinary Embrace
I remember the first time I made breadsticks completely from scratch. It wasn’t a fancy restaurant or a professional kitchen, but my grandmother’s sun-drenched kitchen. The air was thick with the aroma of yeast and warmth radiating from the oven. We’d pull up stools to her countertop, watching the dough rise in anticipation. These weren’t just breadsticks; they were vessels of love and connection. The simple act of twisting each strip of dough with her, our flour-dusted hands intertwined, created a memory more satisfying than any Michelin-star meal. These quick breadsticks evoke that feeling of comfort and home, ready in minutes, perfect for busy weeknights or impromptu gatherings.
Recipe Overview
- Prep Time: 15 minutes
- Cook Time: 10-15 minutes
- Total Time: 35 minutes
- Yields: 18 breadsticks
- Dietary Type: Vegetarian
Ingredients
- 1 cup warm water
- 3 tablespoons brown sugar
- 1 teaspoon salt
- ¼ cup oil
- 3 cups bread flour
- 2 ½ teaspoons yeast
- Melted butter, for brushing
- Garlic salt, for sprinkling
- Parmesan cheese, for sprinkling (optional)
Equipment Needed
- Large bowl or stand mixer
- Measuring cups and spoons
- Rolling pin
- Pizza cutter or knife
- Greased cookie sheet
Instructions
-
Combine Wet Ingredients: In a large bowl, or the bowl of your stand mixer, whisk together the warm water, brown sugar, salt, and oil. The water should be warm to the touch, not hot, to properly activate the yeast. Aim for between 105-115°F (40-46°C).
-
Add Dry Ingredients: Gradually add the bread flour and yeast to the wet ingredients. If using a stand mixer, use the dough hook attachment. If mixing by hand, stir until a shaggy dough forms.
-
Knead the Dough: If using a stand mixer, knead the dough on medium speed for about 5-7 minutes, or until it forms a smooth, elastic ball. If kneading by hand, turn the dough out onto a lightly floured surface and knead for 8-10 minutes, until it is smooth and elastic. The dough should be slightly tacky but not sticky.
-
Roll and Cut: On a lightly floured surface, use a rolling pin to roll the dough into a 10×12 inch rectangle. Use a pizza cutter or knife to cut the rectangle into strips about ¾ inch wide.
-
Twist and Place: Pick up each strip of dough and gently twist it a few times. Place the twisted breadsticks onto a greased cookie sheet, leaving a little space between each one.
-
Rise: Cover the cookie sheet with a clean kitchen towel and let the breadsticks rise for at least 20 minutes. If you have more time, allowing them to rise for 30-40 minutes will result in even softer breadsticks. The warmer the environment, the faster they will rise.
-
Bake: Preheat your oven to 375°F (190°C). Place the cookie sheet with the risen breadsticks in the preheated oven and bake for 10-15 minutes, or until they are golden brown. Keep a close eye on them during the last few minutes to prevent burning.
-
Brush and Season: Remove the breadsticks from the oven and immediately brush them with melted butter. Sprinkle generously with garlic salt and parmesan cheese, if desired.
-
Cool (Slightly) and Serve: Let the breadsticks cool on the cookie sheet for a few minutes before serving. They are best enjoyed warm.
Expert Tips & Tricks
- Flour Power: Bread flour is crucial for achieving that chewy texture. Its higher protein content develops more gluten, giving the breadsticks a satisfying bite. If you only have all-purpose flour, you can use it, but the texture will be slightly different (softer and less chewy).
- Yeast Matters: Always check the expiration date on your yeast to ensure it’s still active. If you’re unsure, proof the yeast by dissolving it in the warm water with a teaspoon of sugar. If it foams up within 5-10 minutes, it’s good to go.
- Even Baking: For even baking, rotate the cookie sheet halfway through the baking time.
- Softness Secret: Brushing the baked breadsticks with butter is essential for that soft, golden crust. Don’t skip this step!
- Flavor Boost: Consider adding other herbs and spices to the dough, such as Italian seasoning, rosemary, or oregano, for extra flavor.
- Dough Stickiness: If the dough is too sticky to handle, add flour one tablespoon at a time. It should be slightly tacky, not overly sticky.
- Extra Rise Time: A longer rise time will always result in a better texture. If you have time to spare, let the dough rise in a bowl for an hour before rolling it out.
Serving & Storage Suggestions
These quick soft breadsticks are best served warm, straight from the oven. They make a delicious accompaniment to soups, salads, pasta dishes, or simply enjoyed as a snack with marinara sauce.
- Room Temperature: Breadsticks can be stored at room temperature in an airtight container for up to 2 days. However, they are best enjoyed fresh.
- Refrigerator: For longer storage, keep in the refrigerator for up to 5 days.
- Freezer: Freeze for up to 2 months. Wrap them tightly in plastic wrap and then place them in a freezer bag.
- Reheating: To reheat, wrap the breadsticks in foil and bake at 350°F (175°C) for 5-10 minutes, or until warmed through. You can also microwave them for a few seconds, but be careful not to overheat them, as they can become tough.
Nutritional Information
(Estimated values per breadstick, without butter and toppings)
| Nutrient | Amount per Serving | % Daily Value |
|---|---|---|
| Calories | 113 kcal | 6% |
| Total Fat | 3.3 g | 5% |
| Saturated Fat | 0.4 g | 2% |
| Cholesterol | 0 mg | 0% |
| Sodium | 130.9 mg | 5% |
| Total Carbohydrate | 18.4 g | 6% |
| Dietary Fiber | 0.7 g | 2% |
| Sugars | 2.3 g | 9% |
| Protein | 2.4 g | 4% |
Variations & Substitutions
- Garlic Breadsticks: Mix minced garlic with the melted butter before brushing on the breadsticks.
- Herb Breadsticks: Sprinkle dried herbs, such as rosemary, thyme, or oregano, over the breadsticks before baking.
- Cheese-Filled Breadsticks: Before twisting, sprinkle shredded cheese down the center of each strip of dough.
- Sweet Breadsticks: Omit the garlic salt and sprinkle with cinnamon sugar for a sweet treat.
- Whole Wheat Breadsticks: Substitute half of the bread flour with whole wheat flour for a nuttier flavor.
- Dairy-Free Breadsticks: Use olive oil instead of butter for brushing.
- Gluten-Free Breadsticks: Use a gluten-free bread flour blend, but be aware that the texture may be different.
FAQs (Frequently Asked Questions)
Q: Can I use active dry yeast instead of instant yeast?
A: Yes, you can. However, you’ll need to proof the active dry yeast in the warm water with the sugar for 5-10 minutes before adding it to the flour.
Q: My dough is too sticky. What should I do?
A: Add flour one tablespoon at a time, kneading until the dough is smooth and elastic but not sticky.
Q: Can I make the dough ahead of time?
A: Yes, you can make the dough ahead of time and store it in the refrigerator for up to 24 hours. Let it come to room temperature before rolling out and baking.
Q: How do I know when the breadsticks are done?
A: The breadsticks are done when they are golden brown and sound hollow when tapped.
Q: Can I bake these in an air fryer?
A: Yes, you can! Preheat your air fryer to 350°F (175°C) and bake the breadsticks for 6-8 minutes, or until golden brown, flipping halfway through. You may need to bake them in batches, depending on the size of your air fryer.
Final Thoughts
These quick soft breadsticks are more than just a recipe; they’re an invitation to create moments of joy and connection in your kitchen. Gather your loved ones, get your hands flour-dusted, and experience the simple pleasure of making something delicious together. Don’t be afraid to experiment with flavors and toppings to create your own signature breadsticks. And most importantly, share your creations and your experiences with others. Bon appétit!