
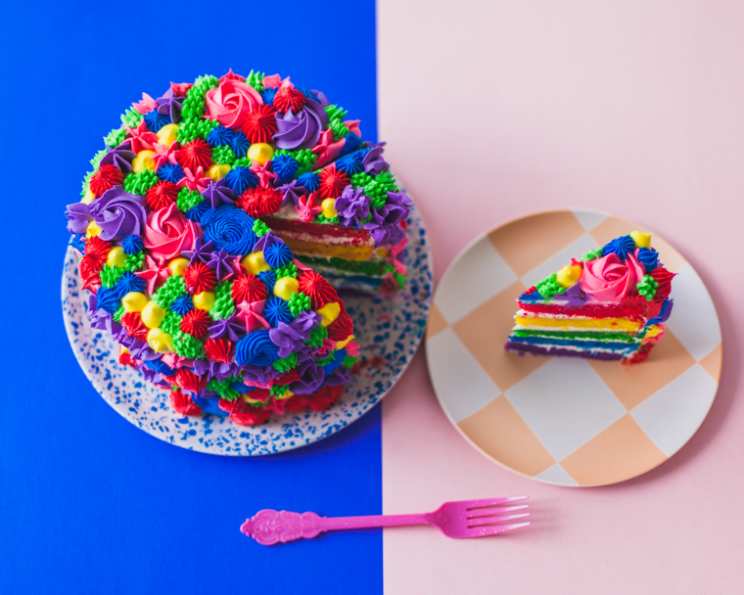
Rainbow Buttercream Cake: A Celebration of Color and Flavor
I’ll never forget the look on my niece Lily’s face when I presented her with her fifth birthday cake: a towering confection erupting with vibrant buttercream blooms. Her eyes, wide with wonder, mirrored the kaleidoscope of colors that adorned the cake. It wasn’t just sugar and flour; it was a moment of pure joy, a memory woven into the very layers of that cake. That day, I realized the power of baking – not just to create something delicious, but to craft edible moments of happiness that last a lifetime. And this Rainbow Buttercream Cake? It’s a guaranteed smile-inducer.
Recipe Overview
- Prep Time: 45 minutes
- Cook Time: 20 minutes
- Total Time: 1 hour 5 minutes
- Yields: 1 7 inch cake
- Dietary Type: Vegetarian
Ingredients
For the Vanilla Cake:
- 1 cup unsalted butter, at room temperature
- 1 ¾ cups granulated sugar
- 4 large eggs
- 2 teaspoons vanilla extract
- 3 cups cake flour
- 1 tablespoon baking powder
- ¾ teaspoon salt
- 1 cup heavy cream (33% milk fat)
- 1 cup whole milk (3.25% milk fat)
For the Buttercream:
- 3 cups unsalted butter, at room temperature
- 6 cups icing sugar, sifted
- 3 teaspoons vanilla extract
- 1 pinch salt
Other Essentials:
- Gel food coloring in red, pink, yellow, green, purple, and blue
Equipment Needed
- Five 7 x 2 inch round cake pans
- Piping bags
- Various piping tips (e.g., Wilton 1M, Wilton #234, Wilton #4B, an open circle tip)
- 5 medium bowls
- Stand mixer
- Wire racks
- Cake bench scraper
Instructions
-
Prepare the Pans: Begin by spritzing the five 7 x 2 inch round cake pans with vegetable oil. Cut parchment paper circles to fit the bottom of each pan and line them. This ensures the cakes release cleanly and easily.
-
Preheat the Oven: Preheat your oven to 350 degrees F (175 degrees C). Accurate oven temperature is crucial for even baking.
-
Combine Dry Ingredients: In a large bowl, sift together the cake flour, baking powder, and salt. Sifting is essential for creating a light and airy cake texture.
-
Cream Butter and Sugar: In the bowl of a stand mixer fitted with the paddle attachment, beat the butter and sugar on high speed until light and fluffy, about two minutes. This process, called creaming, incorporates air into the batter, contributing to a tender crumb.
-
Incorporate Eggs and Vanilla: With the mixer on low speed, add the eggs one at a time, gently incorporating each egg before adding the next. Add the vanilla extract. Mixing on low speed at this stage prevents over-mixing and gluten development.
-
Prepare Wet Mixture: Whisk together the cream and milk in a separate bowl. This combines the dairy elements for even distribution in the batter.
-
Combine Wet and Dry Ingredients: With the mixer on low speed, add the dry flour mixture in three additions, alternating with the milk and cream mixture, ending with the flour mix. Mix for about one minute in total, until the batter is smooth and free of lumps and bumps. Avoid overmixing, which can result in a tough cake.
-
Divide and Color the Batter: Divide the batter evenly into the five medium bowls. Add a different color of gel food coloring to each bowl, mixing gently to combine. Remember that to get a bright shade of red, you will likely need more red gel color than the other colors. Start with less and add more as needed until you achieve the desired shade.
-
Bake the Cakes: Pour each colored batter into its own separate cake pan. Gently rap the cake pan a few times on the counter to discourage air bubbles. Bake for 15-20 minutes, until the cake pulls away from the sides of the pan and a toothpick inserted in the center comes out with moist crumbs.
-
Cool the Cakes: Let the cakes cool completely on wire racks before frosting with buttercream. Cooling completely prevents the buttercream from melting.
-
Prepare the Buttercream: In the bowl of a stand mixer fitted with the paddle attachment, beat the butter, icing sugar, vanilla, and a tiny pinch of salt on high speed until light and fluffy and doubled in volume, about three minutes. Sifted icing sugar ensures a smooth buttercream.
-
Assemble the Cake: With the cake layers completely cool, fill and frost the cake with the plain white vanilla buttercream, stacking the layers following the ROYGBIV colors. If you want the red layer to be on the top, start with the purple layer, top with frosting, then stack the blue, then green, yellow, and finish with the red. Frost and coat the entire exterior of the cake, using a cake bench scraper to smooth as you go.
-
Color the Remaining Buttercream: Divide the remaining buttercream into five or six bowls, depending on what shades you want for your rainbow piping.
-
Tint the Buttercream: Add ¼ teaspoon of gel color to each bowl to start, mixing in the color to get the desired shade. Again, with the red gel color, you will need more gel color to get that vibrant red.
-
Pipe the Decoration: Fill your piping bags fitted with the various piping tips each with a different buttercream color. Pipe rosettes, drop stars, and furry bits of grassy buttercream all over the cake. Start on the top and pipe the top of the cake first, making sure your colors and patterns are evenly dispersed! Work with one color, piping all over, then switch colors, then add more colors, and then fill in any naked spots at the end.
-
Chill and Serve: For a sharp, clean cut, chill your cake for 10 minutes in the freezer first before slicing!
Expert Tips & Tricks
- Room Temperature is Key: Ensure both the butter and eggs are at room temperature for a smooth and emulsified batter. This will give your cake a more even crumb.
- Don’t Overmix: Overmixing develops the gluten in the flour, leading to a tough cake. Mix until just combined.
- Leveling the Layers: If your cake layers have a dome, use a serrated knife to carefully level them for a more professional look.
- Crumb Coat: Apply a thin layer of buttercream (a crumb coat) before the final frosting layer. This traps loose crumbs and creates a smooth surface. Chill the crumb-coated cake for 15-20 minutes before the final frosting.
- Gel Food Coloring: Gel food coloring provides more vibrant and concentrated color than liquid food coloring. Use it sparingly to achieve your desired hues.
- Buttercream Consistency: If your buttercream is too stiff, add a teaspoon of milk or cream at a time until it reaches a pipeable consistency. If it’s too soft, add a tablespoon of sifted icing sugar at a time.
- Piping Practice: Practice your piping techniques on parchment paper before decorating the cake. This will help you perfect your skills and avoid mistakes on the final product.
Serving & Storage Suggestions
Serve the Rainbow Buttercream Cake chilled or at room temperature. The vibrant colors and playful decorations make it a show-stopping centerpiece for birthdays, celebrations, or any occasion that calls for a touch of whimsy.
Store leftover cake in an airtight container in the refrigerator for up to 3-4 days. For longer storage, you can freeze individual slices wrapped tightly in plastic wrap and then foil for up to 2-3 months. Thaw in the refrigerator before serving. While the cake can sit at room temperature, the buttercream will soften, so refrigeration is ideal.
Nutritional Information
| Nutrient | Amount per Serving | % Daily Value |
|---|---|---|
| Calories | 13476.9 kcal | N/A |
| Calories from Fat | 7695 g | 57% |
| Total Fat | 855 g | 1315% |
| Saturated Fat | 532.6 g | 2662% |
| Cholesterol | 3046.7 mg | 1015% |
| Sodium | 3595.6 mg | 149% |
| Total Carbohydrate | 1415.3 g | 471% |
| Dietary Fiber | 7 g | 28% |
| Sugars | 1071.3 g | 4285% |
| Protein | 79.1 g | 158% |
Note: Nutritional information is an estimate and may vary based on specific ingredients and portion sizes.
Variations & Substitutions
- Gluten-Free: Substitute the cake flour with a gluten-free blend, ensuring it contains xanthan gum for binding.
- Dairy-Free: Use dairy-free butter and milk alternatives such as almond, soy, or oat milk. Be sure the alternative butter is solid at room temperature.
- Reduced Sugar: Reduce the amount of sugar in both the cake and buttercream by up to 25%, but be aware this can affect the texture and sweetness.
- Flavor Variations: Add different extracts to the cake batter and buttercream, such as almond, lemon, or orange.
- Ombre Effect: Instead of distinct layers of color, create an ombre effect by gradually blending the buttercream colors as you frost the cake.
- Seasonal Colors: Adapt the color palette to match the season. Think pastel shades for spring, warm tones for autumn, or cool blues and silvers for winter.
FAQs (Frequently Asked Questions)
Q: Can I make the cake layers ahead of time?
A: Yes, you can bake the cake layers a day or two in advance. Wrap them tightly in plastic wrap and store them at room temperature or in the refrigerator.
Q: Can I freeze the decorated cake?
A: Yes, but the buttercream may become slightly softer upon thawing. Freeze the cake uncovered for an hour to harden the buttercream, then wrap it tightly in plastic wrap and foil.
Q: What if I don’t have cake flour?
A: You can make a substitute by measuring out 1 cup of all-purpose flour, removing 2 tablespoons, and replacing it with 2 tablespoons of cornstarch. Sift together well before using.
Q: How do I prevent the cake layers from sticking to the pan?
A: Thoroughly grease and flour the cake pans, or line the bottoms with parchment paper circles as described in the recipe.
Q: What if my buttercream is too runny?
A: Add sifted icing sugar, one tablespoon at a time, until it reaches the desired consistency. Be sure to mix well after each addition.
Final Thoughts
This Rainbow Buttercream Cake is more than just a dessert; it’s a celebration of color, creativity, and the joy of sharing something delicious with loved ones. Don’t be intimidated by the multiple steps – each one is simple and rewarding. So, gather your ingredients, preheat your oven, and let your inner artist shine. I can’t wait to hear about your colorful creations! Share your photos and feedback, and remember, every cake is a masterpiece in its own right. This cake pairs perfectly with a scoop of vanilla ice cream or a glass of chilled milk. Enjoy!