
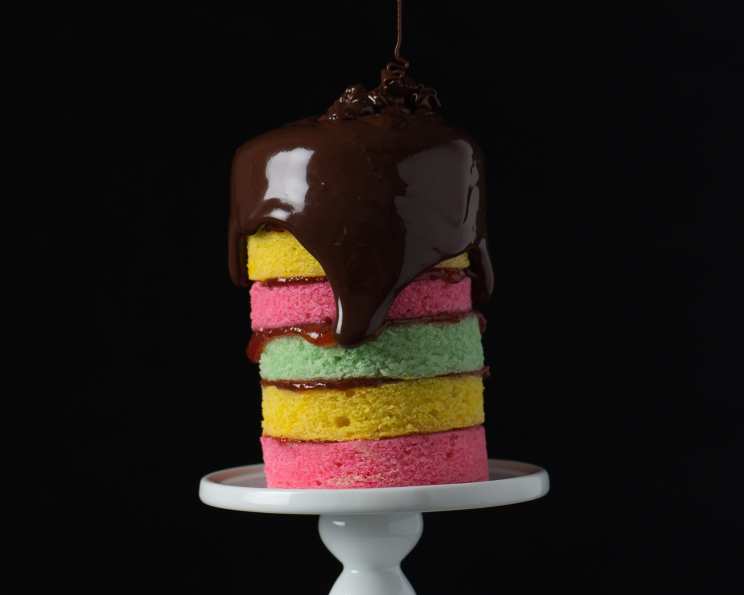
Rainbow Cookie Cake: A Slice of Happiness Inspired by Cakes by Melissa
Growing up, my grandmother, Nana Rose, always had a special treat waiting for us after school – her take on rainbow cookies. They weren’t the traditional almond kind; Nana Rose, ever the rebel, used a simple vanilla cake base and layered it with brightly colored buttercream. The pure joy those pastel layers brought to my young heart is a feeling I still chase. This Rainbow Cookie Cake, inspired by Melissa Ben-Ishay’s version, reminds me of Nana Rose’s kitchen, the sweet scent of vanilla, and the unwavering love she poured into every single bite. It’s a celebration of color, flavor, and the simple magic of homemade goodness.
Recipe Overview
- Prep Time: 2 hours
- Cook Time: 30 minutes
- Total Time: 2 hours 30 minutes
- Yields: 1 cake
- Servings: Varies based on slice size
Ingredients
For the Almond Cake:
- ½ lb unsalted butter, plus more for greasing the pan
- 2 cups sugar
- One 7-ounce package almond paste
- 2 teaspoons pure vanilla extract
- 4 large eggs
- 3 cups all-purpose flour
- 2 teaspoons baking powder
- ¼ teaspoon fine sea salt
- 1 ¾ cups whole milk (or buttermilk)
For Assembly:
- 1 ½ recipes of Almond Cake (as prepared above)
- Pink, green, and yellow food coloring
- One 13-ounce jar store-bought strawberry jam
For the Chocolate Glaze:
- 2 recipes worth of Chocolate Glaze (recipe follows)
For the Glaze:
- 2 cups powdered sugar
- ½ cup unsweetened cocoa powder
- ½ cup plus 1 tablespoon whole milk, at room temperature, plus more as needed
- ½ teaspoon pure vanilla extract
- 2 pinches fine sea salt
For Toppings:
- ½ cup pink, green, and yellow sprinkles and nonpareils, mixed
Equipment Needed
- 3 quarter-sheet pans (or baking pans lined with wax paper/parchment paper)
- Hand mixer or stand mixer with paddle attachment
- Food processor
- Spatula
- 3 ½-inch round cutter
- Turntable (optional, but recommended)
- Mixing bowls
Instructions
-
Prepare the Oven and Pans: Preheat your oven to 350°F (175°C). Butter three quarter-sheet pans. Alternatively, butter the pans and then line them with wax paper or parchment paper, ensuring you butter the paper as well for easy cake release.
-
Make the Almond Cake Batter: Follow these steps to create the almond cake batter. First, ensure all your ingredients are at room temperature. This is crucial for proper emulsification and a smooth batter.
-
Cream the Butter: In a mixing bowl, with a hand mixer or a stand mixer fitted with the paddle attachment, whip ½ lb unsalted butter for 1 minute on high speed. Scrape down the sides of the bowl with a spatula to ensure even mixing.
-
Combine Sugar and Almond Paste: In the bowl of a food processor, pulse together 2 cups sugar and one 7-ounce package almond paste until completely combined. This step breaks down the almond paste and prevents lumps in your final cake.
-
Incorporate Sugar Mixture: Add the sugar mixture to the creamed butter and beat on high speed for 2 minutes. This incorporates air into the mixture, creating a light and fluffy base. Scrape down the sides of the bowl again to ensure everything is well combined.
-
Add Vanilla and Eggs: With the mixer on medium-low speed, add 2 teaspoons pure vanilla extract. Then, add 4 large eggs one at a time, allowing each egg to fully incorporate before adding the next. Scrape down the sides of the bowl midway through to prevent uneven mixing.
-
Combine Dry Ingredients: In a separate bowl, whisk together 3 cups all-purpose flour, 2 teaspoons baking powder, and ¼ teaspoon fine sea salt. This ensures the baking powder and salt are evenly distributed throughout the flour.
-
Alternate Wet and Dry Ingredients: With the mixer on low speed, add half of the flour mixture to the batter. When it’s mostly incorporated, add half of the 1 ¾ cups whole milk (or buttermilk). Add the remainder of the dry and wet ingredients, scraping down the sides of the bowl between additions. Stop mixing as soon as you have a smooth batter. Overmixing can develop gluten, resulting in a tough cake.
-
Divide and Color the Batter: Divide the almond cake batter among three bowls. Add pink, green, and yellow food coloring to each bowl of batter, one drop at a time, until you reach the desired colors. Be careful not to add too much food coloring, as it can affect the taste and texture of the cake.
-
Bake the Cake Layers: Pour one color of batter into each prepared pan. Spread the batter evenly. Bake until the middle of the cake feels springy when you gently press your finger against it, about 30 minutes. All ovens are different, so it’s important to do the fingerprint test to see if the cake is done. If your fingerprint leaves a lasting indentation, it needs more time.
-
Cool the Cakes: Let the cakes cool completely in the pans. Once cooled, use a 3 ½-inch round cutter to cut two rounds from each pan.
-
Make the Chocolate Glaze: Sift 2 cups powdered sugar into a large mixing bowl. Add ½ cup unsweetened cocoa powder, ½ cup plus 1 tablespoon whole milk, ½ teaspoon pure vanilla extract, and 2 pinches fine sea salt. Whisk or stir with a spoon until smooth. If the glaze is too thick, add a little more milk to thin it to the desired consistency. The glaze should be drippy enough to coat the cake evenly.
-
Assemble the Cake: Place one pink layer on a turntable (if using) or a plate. Spread the top with a thin layer of store-bought strawberry jam. Repeat with a yellow and then a green layer, then repeat the sequence one more time. Don’t spread jam on the top layer. This creates the signature rainbow effect and adds a burst of fruity sweetness.
-
Glaze the Cake: Mix the chocolate glaze to a drippy consistency and pour it over the top of the cake. Gently nudge the glaze over the edges to encourage it to run down the sides and cover the entire cake.
-
Add Sprinkles: Immediately coat the glazed cake with the ½ cup pink, green, and yellow sprinkles and nonpareils mixture. The glaze will act as the “glue” to hold the sprinkles in place.
-
Chill and Serve: Allow the glaze to set slightly before slicing and serving.
Expert Tips & Tricks
- Room Temperature Ingredients: Ensure all ingredients, especially butter and eggs, are at room temperature. This helps create a smoother batter and a more tender cake.
- Don’t Overmix: Overmixing the batter can develop gluten, resulting in a tough cake. Mix only until just combined.
- Even Layers: Use a kitchen scale to ensure each cake layer has an equal amount of batter for uniform baking.
- Clean Cuts: Chill the cake slightly before cutting for cleaner, more defined slices.
- Homemade Jam: For a more intense strawberry flavor, consider making your own strawberry jam using fresh or frozen strawberries.
- Glaze Consistency: Adjust the milk in the chocolate glaze to achieve the desired consistency. It should be drippy enough to coat the cake but not so thin that it runs off completely.
- Consider adding a tiny drop of almond extract in each layer for a little more flavor!
Serving & Storage Suggestions
Serve the Rainbow Cookie Cake chilled or at room temperature. It pairs well with a scoop of vanilla ice cream or a cup of freshly brewed coffee.
To store, wrap the cake tightly in plastic wrap or place it in an airtight container. It will keep at room temperature for up to 2 days or in the refrigerator for up to 5 days. For longer storage, freeze individual slices wrapped in plastic wrap for up to 2 months. Thaw in the refrigerator before serving.
Nutritional Information
| Nutrient | Amount per Serving | % Daily Value |
|---|---|---|
| Calories | 6228.1 kcal | N/A |
| Calories from Fat | 2074 g | 33% |
| Total Fat | 230.6 g | 354% |
| Saturated Fat | 137.2 g | 685% |
| Cholesterol | 1287 mg | 428% |
| Sodium | 2114.9 mg | 88% |
| Total Carbohydrate | 981.9 g | 327% |
| Dietary Fiber | 24.4 g | 97% |
| Sugars | 665.6 g | 2662% |
| Protein | 91.5 g | 183% |
Note: Nutritional information is an estimate and may vary based on specific ingredients and serving size.
Variations & Substitutions
- Gluten-Free: Substitute the all-purpose flour with a gluten-free all-purpose flour blend.
- Different Flavors: Experiment with different food coloring combinations or swap out the strawberry jam for raspberry, apricot, or fig jam.
- Nut-Free: If you have a nut allergy, omit the almond paste and add a teaspoon of almond extract to enhance the almond flavor.
- Lemon Variation: Instead of almond, try a lemon-infused cake using lemon zest and lemon extract. The layers could be pastel shades of pink, yellow, and white with a lemon glaze.
FAQs (Frequently Asked Questions)
Q: Can I make the cake layers ahead of time?
A: Yes, you can bake the cake layers a day or two in advance. Wrap them tightly in plastic wrap and store them at room temperature or in the refrigerator.
Q: Can I use a different size pan?
A: Yes, but you may need to adjust the baking time accordingly. Keep an eye on the cake and use the fingerprint test to determine doneness.
Q: Can I freeze the finished cake?
A: Yes, but the glaze and sprinkles may become slightly soft upon thawing. Wrap the cake tightly in plastic wrap and freeze for up to 2 months.
Q: Can I use homemade almond paste?
A: Absolutely! Homemade almond paste will enhance the flavor of the cake.
Q: My chocolate glaze is too thick. What should I do?
A: Add a little more milk, one tablespoon at a time, until you reach the desired consistency.
Final Thoughts
This Rainbow Cookie Cake is more than just a dessert; it’s a nostalgic journey back to simpler times, a burst of color and flavor that’s sure to bring a smile to anyone’s face. Don’t be intimidated by the multiple steps – each one is straightforward and rewarding. I encourage you to try this recipe, to make it your own, and to share it with those you love. And if you do make it, I’d love to hear about your experience! Pair it with a glass of cold milk, a warm cup of tea, or even a sparkling glass of Prosecco for a truly celebratory experience. Happy baking!