
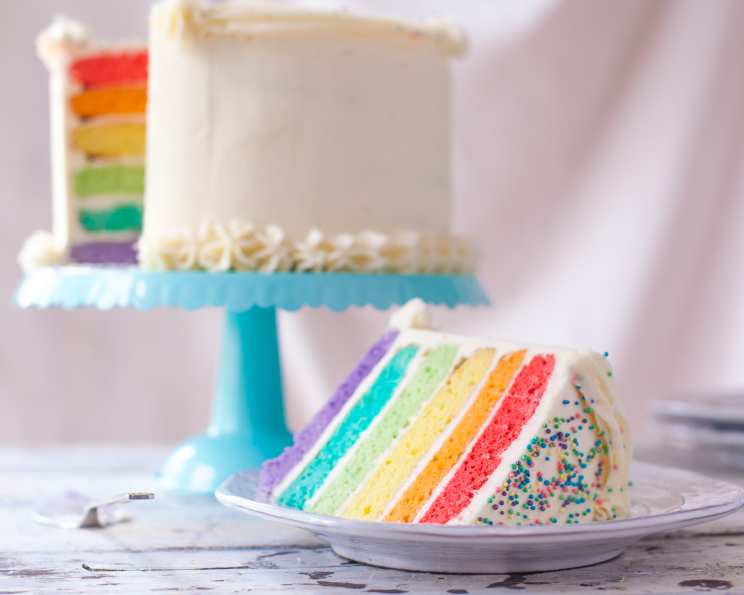
Rainbow Layer Cake: A Culinary Spectrum of Joy
I still remember the look on my niece Lily’s face when I presented her with a towering rainbow cake for her fifth birthday. Her eyes, wide with wonder, mirrored the explosion of colors before her. It wasn’t just a cake; it was a symbol of celebration, a vibrant testament to the joy and magic of childhood. That moment, etched in my memory, is a reminder of why I love baking – the power of food to create unforgettable experiences and spread happiness, one colorful layer at a time.
Recipe Overview
- Prep Time: 45 minutes
- Cook Time: 20 minutes
- Total Time: 2 hours 30 minutes
- Servings: 10
- Yield: 1 cake
- Dietary Type: Vegetarian
Ingredients
- 2 (15 1/4 ounce) boxes vanilla cake mix
- 2 cups water
- 1 cup vegetable oil
- 6 eggs
- Food coloring (red, blue, green, yellow)
- 1 cup shortening
- 1 cup butter, softened
- 1 (2 lb) bag powdered sugar
- 2 teaspoons vanilla extract
- 3-4 tablespoons milk
Equipment Needed
- Electric mixer
- 3 (8-inch) round cake pans
- Cooking spray
- 6 small bowls
- Cooling racks
- Serving plate
Instructions
-
Preheat your oven to 350°F (175°C). Prepare your cake pans by spraying 3 (8-inch) round cake pans with cooking spray. This will ensure the cakes release easily after baking.
-
In a large bowl, combine the vanilla cake mix, water, vegetable oil, and eggs. Use an electric mixer to beat the ingredients on low speed for 30 seconds, then increase the speed to medium and beat for 2 minutes. Be sure to scrape the bowl occasionally to ensure all ingredients are fully incorporated. A well-mixed batter is key to a light and fluffy cake.
-
Divide the batter evenly among 6 small bowls, approximately 1 1/3 cups of batter per bowl.
-
Now for the fun part! Using food coloring, tint the batter in 1 bowl blue, 1 bowl red, 1 bowl green, 1 bowl yellow, 1 bowl orange (achieved by mixing red and yellow), and 1 bowl purple (achieved by mixing blue and red). Add the food coloring gradually, mixing well until you achieve your desired vibrancy. Gel food coloring typically produces more intense colors than liquid food coloring.
-
Refrigerate 3 colors of batter until ready to bake. This prevents the colors from bleeding together during baking. Pour the remaining 3 colors of batter into the prepared cake pans. Distribute the batter evenly among the pans.
-
Bake the cakes for 18 to 20 minutes, or until a toothpick inserted into the center comes out clean and the cake springs back when touched lightly in the center. The cake should also begin to pull away from the side of the pan. Keep a close eye on the cakes; baking times can vary depending on your oven.
-
Let the cakes cool in the pans for 10 minutes before inverting them onto cooling racks to cool completely.
-
Wash and dry the cake pans. Then, bake and cool the remaining 3 cake layers as directed in steps 6 and 7. Ensure the pans are completely clean and dry before baking the next set of layers to prevent sticking.
-
While the cakes are cooling, prepare the frosting. In a large bowl, beat the shortening and butter with an electric mixer on medium speed until the mixture is light yellow and creamy. This step is crucial for a smooth and fluffy frosting.
-
On low speed, gradually beat in the powdered sugar. Mixing slowly at first prevents a powdered sugar cloud from engulfing your kitchen!
-
Beat in the vanilla extract.
-
Add the milk, 1 tablespoon at a time, beating until the frosting is smooth. Then, increase the speed to high and beat until the frosting is light and fluffy. The frosting should be easy to spread and hold its shape.
-
Once the cakes are completely cooled, trim the rounded tops off the cakes to level them, if needed. A serrated knife works best for this task, ensuring even layers and a professional-looking cake.
-
On a serving plate, place the purple cake layer. Spread with frosting to within 1/4 inch of the edge. This prevents the frosting from spilling over the sides when the next layer is added. Repeat with the blue, green, yellow, orange, and red cake layers.
-
Spread a light coat of frosting on the top and side of the cake to seal in crumbs. This “crumb coat” is essential for a smooth and flawless final frosting layer.
-
Frost the entire cake with the remaining frosting. Get creative with your frosting design! You can create swirls, rosettes, or even use different piping tips for added flair.
Expert Tips & Tricks
- For an extra moist cake, brush each layer with simple syrup (equal parts sugar and water, heated until the sugar dissolves) before frosting.
- If your frosting is too stiff, add a little more milk, 1 teaspoon at a time, until you reach the desired consistency. If it’s too thin, add more powdered sugar, 1 tablespoon at a time.
- To prevent the cake from sliding, place a small dab of frosting on the serving plate before placing the first cake layer. This acts as glue to hold the cake in place.
- If you’re short on time, you can use store-bought frosting. However, homemade frosting truly elevates the flavor of the cake.
- For a more intense color, use gel food coloring instead of liquid.
- Make sure the butter is properly softened before creaming it with the shortening. This will prevent lumps in your frosting.
Serving & Storage Suggestions
Serve the rainbow layer cake chilled or at room temperature. For an extra touch, garnish with sprinkles, fresh berries, or edible flowers. Leftover cake can be stored in an airtight container at room temperature for up to 2 days, in the refrigerator for up to 5 days, or in the freezer for up to 3 months. To freeze, wrap individual slices tightly in plastic wrap and then in foil. Thaw in the refrigerator overnight before serving.
Nutritional Information
| Nutrient | Amount per Serving | % Daily Value |
|---|---|---|
| Calories | 1312 kcal | N/A |
| Calories from Fat | 664 g | 51% |
| Total Fat | 73.8 g | 113% |
| Saturated Fat | 22.2 g | 110% |
| Cholesterol | 162.8 mg | 54% |
| Sodium | 779.3 mg | 32% |
| Total Carbohydrate | 158.7 g | 52% |
| Dietary Fiber | 0.9 g | 3% |
| Sugars | 126.5 g | 505% |
| Protein | 7.9 g | 15% |
Note: Nutritional information is an estimate and can vary based on specific ingredients and preparation methods.
Variations & Substitutions
- Gluten-Free: Use a gluten-free vanilla cake mix and ensure all other ingredients are gluten-free.
- Dairy-Free: Substitute the butter in the frosting with a dairy-free butter alternative. Use a dairy-free milk alternative, such as almond milk or soy milk, in the frosting.
- Different Flavors: Experiment with different cake flavors, such as chocolate, strawberry, or lemon. Match the frosting flavor to the cake flavor for a cohesive taste.
- Ombre Effect: Instead of distinct layers of color, create an ombre effect by gradually lightening each layer with white food coloring.
- Seasonal Adaptations: In the fall, add a hint of cinnamon or nutmeg to the cake batter for a warm, cozy flavor. In the summer, incorporate fresh fruit, such as berries or peaches, into the frosting or as a garnish.
FAQs (Frequently Asked Questions)
Q: Can I use store-bought cake mix for this recipe?
A: Yes, using store-bought cake mix is perfectly acceptable for this recipe. It saves time and ensures consistent results.
Q: Can I make the cake layers ahead of time?
A: Absolutely! The cake layers can be baked, cooled, and wrapped tightly in plastic wrap up to 2 days in advance. Store them at room temperature or in the refrigerator.
Q: How do I prevent the cake layers from sticking to the pan?
A: Make sure to grease and flour the cake pans thoroughly before pouring in the batter. You can also line the bottom of the pans with parchment paper for extra insurance.
Q: What if my frosting is too sweet?
A: Add a pinch of salt or a tablespoon of lemon juice to the frosting to balance the sweetness.
Q: Can I freeze the finished cake?
A: Yes, you can freeze the finished cake for up to 3 months. Wrap it tightly in plastic wrap and then in foil. Thaw in the refrigerator overnight before serving.
Final Thoughts
Baking a rainbow layer cake is more than just following a recipe; it’s about creating a visual masterpiece that embodies joy and celebration. Don’t be afraid to experiment with different colors, frosting designs, and flavors to make it your own. Whether you’re celebrating a birthday, a special occasion, or simply a sunny day, this cake is sure to bring a smile to everyone’s face. So, gather your ingredients, preheat your oven, and let your creativity shine! I encourage you to try this recipe and share your creations with loved ones. And if you have any tips or variations of your own, I’d love to hear about them! Pair it with a scoop of vanilla ice cream or a refreshing glass of lemonade for the ultimate treat.