
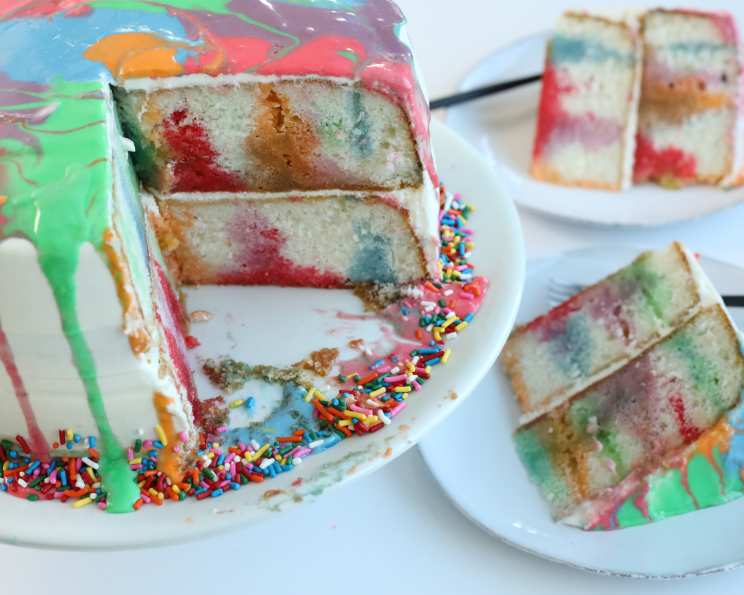
Rainbow Poke Cake: A Celebration of Color and Flavor
I remember the first time I saw a rainbow poke cake. It was at my grandmother’s annual summer picnic. The children (myself included) flocked to it, mesmerized by the vibrant colors peeking through the fluffy white frosting. It wasn’t just the visual appeal; it was the sweet, slightly tangy flavor that danced on my tongue, a memory that still brings a smile to my face decades later. This recipe is my tribute to that joyful, sugary masterpiece.
Recipe Overview
- Prep Time: 20 minutes
- Cook Time: 0 minutes (excluding the cake baking time)
- Total Time: 3 hours 20 minutes
- Servings: 12
- Yield: 1 double-layer cake
- Dietary Type: Not specified. Can be modified to be gluten-free by using gluten-free cake mix.
Ingredients
- 2 white cake layers, cooled (9-inch rounds)
- 2 ½ cups boiling water
- ½ (3 ounce) package red gelatin
- ½ (3 ounce) package orange gelatin
- ½ (3 ounce) package green gelatin
- ½ (3 ounce) package blue gelatin
- ½ (3 ounce) package purple gelatin
- 12 ounces whipped topping, thawed (Cool Whip)
- 1 large egg white
- 2 cups confectioners’ sugar
- ½ lemon, juice of
- Red, green, blue, purple, orange food coloring
Equipment Needed
- Two 9-inch round cake pans
- Skewers
- Mixing bowls (at least 6)
- Electric mixer
- Spatula
Instructions
-
Place the cooled white cake layers, top side up, in two separate 9-inch round cake pans. This helps contain any spillage during the next step.
-
Using skewers, pierce the surface of both cake layers at ½-inch intervals. Be thorough, as these holes are crucial for the gelatin to seep into the cake.
-
In five separate bowls, prepare the gelatin. In each bowl, stir ½ cup of the boiling water into one flavor of gelatin: red, orange, green, blue, and purple. Stir each mixture for 2 minutes, or until the gelatin is completely dissolved. Ensure there are no granules remaining.
-
Now for the fun part! Start pouring each different color gelatin into the holes in both cake layers. Only pour one color into each hole. Continue pouring until all the holes are completely filled with color. The cakes should appear vibrant and saturated.
-
Carefully transfer the cake pans to the refrigerator and refrigerate for at least 3 hours. This allows the gelatin to fully set and infuse the cake with its flavor and color.
-
Once the gelatin has set, it’s time to unmold the first cake layer. Dip one cake pan in warm water for about 10 seconds. This loosens the cake from the pan. Then, invert the cake pan onto a serving plate.
-
Spread about 1 cup of the thawed whipped topping evenly over the top of the first cake layer. This will act as the “glue” for the second layer.
-
Repeat the warm water dipping process with the second cake layer, then carefully unmold it and place it on top of the first cake layer, creating a double-layer cake.
-
Frost the entire cake with the remaining whipped topping, ensuring a smooth and even coating.
-
Return the cake to the refrigerator to chill, allowing the whipped topping to firm up. This usually takes about 30 minutes.
-
While the cake is chilling, prepare the glaze. In a medium mixing bowl, place the egg white and beat with an electric mixer until soft peaks form. This adds a light, airy texture to the glaze.
-
Add the confectioners’ sugar and lemon juice to the egg white mixture. Stir with a spatula to combine until smooth. The consistency is crucial here.
-
The glaze should be a thick but still flowing paste. If it’s too thin, it will run right off the cake; if it’s too thick, it won’t mix and drip down the sides properly. Adjust with a tiny bit more lemon juice or confectioners’ sugar to reach the desired consistency.
-
Split the glaze mixture into five separate bowls. Add one color of food coloring (orange, red, purple, blue, and green) to each bowl and mix well.
-
Now, drizzle the colored glaze over the top of the chilled cake. Start from the center and work your way outwards. Use small amounts of each color to gauge when there is enough icing for it to just start overflowing around the edge of the cake. This technique creates a beautiful, cascading effect.
-
Chill the completed cake until ready to serve. This allows the glaze to set slightly and the flavors to meld together.
Expert Tips & Tricks
- For a more intense flavor, use flavored cake mixes corresponding to your gelatin colors (e.g., strawberry cake mix for red gelatin).
- To prevent the gelatin from spilling while pouring, you can place a baking sheet underneath the cake pans.
- If you don’t have skewers, you can use a fork to poke holes in the cake. Just be careful not to tear the cake too much.
- The consistency of the glaze is key. Test a small amount on the side of the cake before glazing the entire top.
- For an extra touch, add sprinkles or edible glitter to the glaze while it’s still wet.
Serving & Storage Suggestions
Serve the Rainbow Poke Cake chilled for the best flavor and texture. Slice it carefully to showcase the vibrant colors inside. Leftovers should be stored in an airtight container in the refrigerator. The cake will stay fresh for up to 3 days. The whipped cream topping might soften a bit over time, but the flavor will remain delicious. Freezing is not recommended as it can alter the texture of the cake and whipped cream.
Nutritional Information
| Nutrient | Amount per Serving | % Daily Value |
|---|---|---|
| Calories | 482.8 kcal | N/A |
| Calories from Fat | 142g | 30% |
| Total Fat | 15.8 g | 24% |
| Saturated Fat | 6.6 g | 32% |
| Cholesterol | 24.3 mg | 8% |
| Sodium | 340.8 mg | 14% |
| Total Carbohydrate | 72.5 g | 24% |
| Dietary Fiber | 0.6 g | 2% |
| Sugars | 54.4 g | 217% |
| Protein | 14.8 g | 29% |
Note: Nutritional information is an estimate and can vary based on specific ingredients and portion sizes.
Variations & Substitutions
- Gluten-Free: Use gluten-free cake mixes for the base. Ensure the gelatin is also gluten-free (most are, but always check the label).
- Lower Sugar: Use sugar-free gelatin and a sugar substitute in the glaze. You can also reduce the amount of confectioners’ sugar.
- Different Flavors: Experiment with different gelatin flavors to create unique flavor combinations. Consider using complementary flavors like raspberry and lemon.
- Cake Base: Instead of white cake, try yellow cake, chocolate cake, or even a funfetti cake for added visual appeal.
FAQs (Frequently Asked Questions)
Q: Can I use a store-bought cake instead of baking my own?
A: Absolutely! Store-bought cakes are a great shortcut, especially if you’re short on time. Just make sure they are cooled completely before proceeding.
Q: Can I make this cake a day ahead of time?
A: Yes, in fact, it’s recommended! The chilling time allows the flavors to meld and the cake to become even more moist. Prepare the cake up to the point of glazing, then add the glaze just before serving.
Q: What if my gelatin doesn’t fully dissolve?
A: Make sure the water is truly boiling and stir vigorously for the full 2 minutes. If there are still granules, you can gently microwave the mixture for a few seconds, but be careful not to overheat it.
Q: Can I use regular frosting instead of whipped topping?
A: While you can, whipped topping provides a lighter, more delicate texture that complements the moistness of the cake. If you prefer frosting, choose a light and fluffy variety.
Q: My glaze is too runny. How can I fix it?
A: Gradually add more confectioners’ sugar, a tablespoon at a time, until you reach the desired consistency. Be careful not to add too much, or the glaze will become too thick.
Final Thoughts
The Rainbow Poke Cake is more than just a dessert; it’s a vibrant celebration on a plate, perfect for birthdays, picnics, or any occasion that calls for a little extra joy. Don’t be afraid to experiment with different flavors and colors to create your own unique masterpiece. I encourage you to bake this cake, share it with loved ones, and let the colors and flavors brighten their day. Let me know in the comments what colors and flavors you used.