
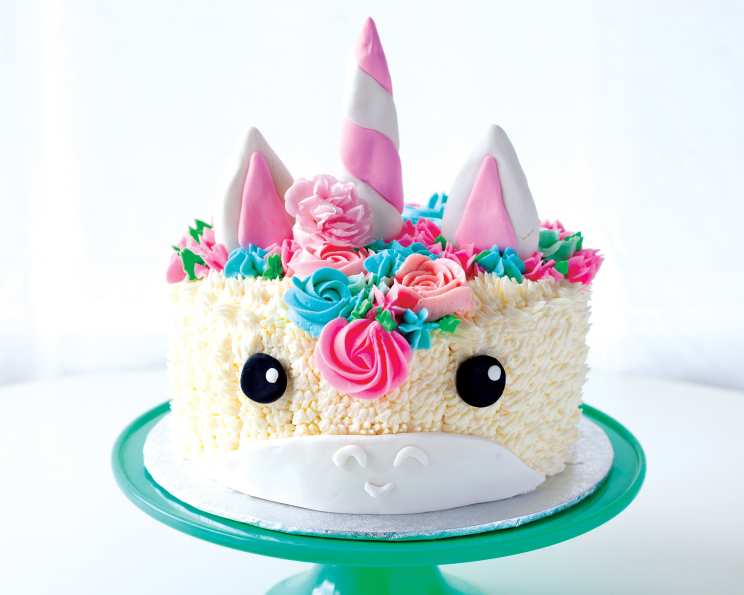
Rainbow Unicorn Cake: A Slice of Magic
My earliest baking memories are filled with the intoxicating aroma of vanilla and the electric excitement of food coloring. While I’ve since refined my palate and techniques, there’s a part of me that will always adore the pure, unadulterated joy of a brightly colored, whimsical cake. This Rainbow Unicorn Cake is a direct portal back to that childhood wonder, a reminder that sometimes, the most delightful creations are the ones that embrace a little bit of fantasy. It’s not just a cake; it’s a celebration of imagination, perfect for birthdays, special occasions, or simply a day that needs a touch of sparkle.
Recipe Overview
- Prep Time: 2 hours
- Cook Time: 10 minutes
- Total Time: 2 hours 10 minutes
- Yields: 1 8-inch cake
- Servings: 8-12
- Dietary Type: Not specified
Ingredients
For the Cake Base
- 1 recipe of cake of your choice for the cake
- Three 8 by 2-inch round cake pans for the cake
For the Cake Decoration
- 1 1⁄2 recipes of Simple Vanilla Buttercream Frosting (recipe follows)
- 1 recipe of Vanilla Swiss Meringue Buttercream Frosting (recipe follows)
- 1⁄8 teaspoon gel green food coloring
- 1⁄8 teaspoon gel pink food coloring
- 1⁄8 teaspoon gel sky blue food coloring
- 6 inches ball white fondant
- 2 inches ball of pink fondant
- 2 inches ball of black fondant
For Simple Vanilla Buttercream Frosting
- 2 cups unsalted butter, room temperature
- 4 cups confectioners’ sugar, sifted
- 2 teaspoons pure vanilla extract
- 1-2 teaspoons whole milk, optional. If the buttercream is too stiff, a touch of milk will help loosen it a little
For Vanilla Swiss Meringue Buttercream Frosting
- 1 cup egg white (about 7 to 8 large eggs)
- 2 1⁄4 cups granulated sugar
- 2 teaspoons pure vanilla extract
- Seeds of 1 vanilla bean (optional)
- 1 pinch fine sea salt
Equipment Needed
- Stand mixer with paddle and whisk attachments
- Three 8-inch round cake pans
- Piping bag fitted with a multi-opening tip
- Piping bag fitted with a small leaf tip
- 2 piping bags each fitted with open star tips
- Wooden skewers
- Thermometer
- Spatula
- Medium saucepan
- Paring knife or pizza roller
- Toothpick
Instructions
-
Prepare the Simple Vanilla Buttercream Frosting: In the bowl of a stand mixer with a paddle attachment, beat the butter on high speed until it is light and fluffy, about 2 minutes. Scrape down the sides of the bowl with a spatula. Add the sifted confectioners’ sugar, vanilla extract, and milk, if using. Mix on low speed to combine the ingredients. Once the sugar is incorporated, crank the mixer to high speed and beat the mixture for another 2 minutes, until it has more than doubled in volume, for a fluffy whipped frosting.
Leftover buttercream can be stored in an airtight container in the fridge for up to 2 weeks or in the freezer for 1 month; bring it back to room temperature and rewhip in a stand mixer before using. This recipe can easily be halved or doubled. -
Prepare the Swiss Meringue Buttercream Frosting: To ensure that the metal bowl of your stand mixer is completely clean, dry, and free of grease, give it a quick wipe out with a halved lemon, then rinse and dry it thoroughly.
In the bowl of the stand mixer fitted with the whisk attachment, mix the egg whites and the sugar on low to combine into a sugary slurry. Fill a medium saucepan with a few inches of water and place it on the stovetop over medium-high heat. Set the mixer bowl on top of the saucepan to create a kind of double boiler, making sure the mixer bowl doesn’t touch the water. -
Heat the Egg and Sugar Mixture: Heat the egg and sugar mixture until it reaches 160°F on a thermometer or is hot to the touch, whisking occasionally. This usually takes about 5 to 7 minutes.
-
Whip the Meringue: Carefully return the metal mixing bowl to the stand mixer, with the whisk attachment in place. Now, bring the mixer up to high speed and beat the mixture for 8 to 10 minutes, until you’ve created medium-stiff peaks and it’s a billowy, sticky, cloudy meringue. Whipping the meringue will also help cool down the bowl.
-
Incorporate the Butter: Swap out the whisk for the paddle attachment. Make sure your meringue has cooled sufficiently before adding the butter—the bowl shouldn’t be hot, just slightly warm, if that. With the mixer on low speed, add the butter a few pieces at a time, until all the butter is incorporated—it will look like a thick soup at this point. Add the vanilla extract, if using, the vanilla bean seeds, along with the pinch of salt (and any small amount of gel color if so desired), then bring the speed up to medium-high and beat until a fluffy, silky, magical buttercream has formed, about 2 to 3 minutes.
If your Swiss meringue buttercream turns into a soupy disaster, try placing the whole bowl in the fridge for about 5 to 10 minutes to cool it down a bit, then bring it out and try whipping it again, first on low speed, then bringing it up to high speed. Or try adding a few more chunks of butter to the mix.
If your Swiss meringue buttercream becomes a gross-looking, curdled mess, try lightly heating the whole bowl over a low-boiling pot of water for 1 minute, just to get some heat back in there. Once it’s warmed up a teensy bit, try mixing it again. You will be amazed at how a bowl of seemingly awful-looking buttercream can actually be saved and whipped back into a gorgeous, fluffy, satiny, creamy frosting.
Vanilla Swiss Meringue Buttercream will keep in an airtight container for up to 1 week in the fridge or up to 1 month in the freezer. Bring it back to room temperature and gently rewhip before using.
-
Prepare the Cake Layers: Prepare the cake. Bake the three layers of cake according to the recipe instructions. Level, fill, and frost your cake using the uncolored simple vanilla buttercream.
-
Pipe the Fur: Fill a piping bag fitted with a multi-opening tip with about half of the uncolored simple vanilla buttercream.
Starting at the bottom edge of the cake, hold the piping bag at a 90-degree angle against the cake and squeeze in short spurts to create a line of frosting dots from bottom to top. Continue piping lines all the way around the cake, nestling the lines closely together. Pipe the top of the cake in the same manner until the entire exterior is covered in fur. -
Tint the Buttercream: Place ½ cup of the remaining simple vanilla buttercream into a medium-sized bowl and tint it green. Fill the leaf-tipped piping bag with this buttercream. Divide the rest of the Swiss Meringue buttercream evenly between two medium-sized bowls, tinting one pink and the other, blue. Fill one of the star-tipped piping bags with the pink buttercream and the other with the blue.
-
Make the Fondant Features: Clean and dry your hands completely. First we will make the ears. Pull off two 1½-inch balls of white fondant; shape them into triangles about ½ inch thick. Using a 1-inch ball of pink fondant, form two flat triangles for the inner ears. Adhere these to the white triangles with a tiny amount of water. Insert wooden skewers into the bottoms of the ears and set aside.
-
Create the Unicorn Horn: To make the unicorn horn, pull apart 1½ inches of white fondant and roll it into a thick snake about 4 inches long. Do the same with the remaining pink fondant. Twist the white and pink fondant together, then roll the twist between your hands to compress it. Shape the tip of the horn into a point, then insert the additional skewer through the bottom center of the horn.
-
Craft the Snout: Reserve two tiny bits of white fondant for the eye highlights. To make the snout, use the remaining white fondant and roll out a half circle 6½ inches wide by 1½ inches high by about ? inch thick. Using a sharp paring knife or pizza roller, trim to shape. With the trimmings, make three little ½-inch-long U shapes; attach to the half circle with a tiny amount of water to make two nostrils and a smile.
-
Form the Eyes: Divide the black fondant into two equal balls, flattening them gently with your fingers to make ?-inch-thick circles. Use the two bits of reserved white fondant to create two tiny dots. Adhere the dots onto the black eyes using a toothpick and a teensy amount of water.
-
Assemble the Unicorn: Place the ears and horn on the top of the cake. Place the eyes and snout on the front of the cake. Gently press all the pieces into the buttercream.
-
Pipe the Mane: Using your two piping bags fitted with the open star tips and filled with colored buttercream, begin piping rosettes and drop stars on the unicorn head, alternating colors as you see fit and adding a cascade of swirls and drop stars to the center front, like a tendril of hair. Continue the curls and swirls all the way down the back of the unicorn’s head—create a power mane full of magic! Finish by adding piped leaves using the piping bag fitted with the leaf tip for more texture and color.
Tip: For an extra flowery feel, add a few edible flower petals or whole organic flowers, such as roses or carnations. This is also a great time to use any extra buttercream roses you might have stored in your freezer.
Expert Tips & Tricks
- Cake Consistency: Choose a cake recipe that’s sturdy enough to hold the weight of the fondant and buttercream. Pound cake or a dense vanilla cake work well.
- Fondant Softness: If your fondant is too hard to work with, knead it with a little bit of vegetable shortening to make it more pliable.
- Buttercream Stability: Swiss meringue buttercream is more stable in warmer temperatures than American buttercream. If you’re making this cake in a hot climate, stick with the Swiss version.
- Piping Practice: Practice your piping techniques on a piece of parchment paper before decorating the cake. This will help you achieve a more polished look.
Serving & Storage Suggestions
Serve the Rainbow Unicorn Cake chilled or at room temperature. For optimal flavor and texture, allow the cake to sit at room temperature for about 30 minutes before serving. Leftovers should be stored in an airtight container in the refrigerator for up to 3 days. You can also freeze the cake for up to 1 month. To freeze, wrap the cake tightly in plastic wrap and then in aluminum foil. Thaw overnight in the refrigerator before serving.
Nutritional Information
Note: Nutritional information is an estimate and can vary depending on specific ingredients and serving sizes.
| Nutrient | Amount per Serving | % Daily Value |
|---|---|---|
| Calories | 704 kcal | N/A |
| Total Fat | 37g | 57% |
| Saturated Fat | 23g | 117% |
| Cholesterol | 98mg | 32% |
| Sodium | 59mg | 2% |
| Total Carbohydrate | 93g | 31% |
| Dietary Fiber | 0g | 0% |
| Sugars | 92g | N/A |
| Protein | 3g | 6% |
Variations & Substitutions
- Gluten-Free Unicorn: Use a gluten-free cake mix or recipe as the base.
- Vegan Unicorn: Substitute the butter in the buttercream with a vegan butter alternative and use a vegan cake recipe. Replace the egg whites in the Swiss meringue with aquafaba (chickpea brine).
- Different Flavors: Experiment with different cake flavors, such as chocolate, strawberry, or lemon. You can also add extracts or flavorings to the buttercream.
- Customize the Colors: Use different gel food colors to create your own unique unicorn color scheme.
FAQs (Frequently Asked Questions)
Q: Can I make the cake layers ahead of time?
A: Yes! The cake layers can be baked, cooled, wrapped tightly in plastic wrap, and stored in the refrigerator for up to 2 days or in the freezer for up to 1 month.
Q: Is it necessary to use Swiss meringue buttercream?
A: While Swiss meringue buttercream provides a smoother, more stable frosting, you can substitute it with American buttercream if you prefer. Just be aware that American buttercream may not hold its shape as well in warmer temperatures.
Q: How do I prevent the fondant from drying out?
A: Keep the fondant wrapped tightly in plastic wrap when you’re not using it. If it starts to dry out, knead it with a little bit of vegetable shortening to restore its pliability.
Q: Can I use pre-made fondant instead of making my own?
A: Absolutely! Pre-made fondant is a convenient option, especially if you’re short on time.
Q: My buttercream is too soft. What should I do?
A: If your buttercream is too soft, refrigerate it for about 15-20 minutes to firm it up before piping.
Final Thoughts
Crafting this Rainbow Unicorn Cake is more than just baking; it’s an experience of pure joy and creativity. Don’t be afraid to embrace the whimsy and let your imagination run wild with colors and decorations. Whether you’re celebrating a special occasion or simply craving a slice of magic, this cake is sure to bring a smile to everyone’s face. I encourage you to try this recipe, share your creations, and let the magic of unicorns and rainbows fill your kitchen!