
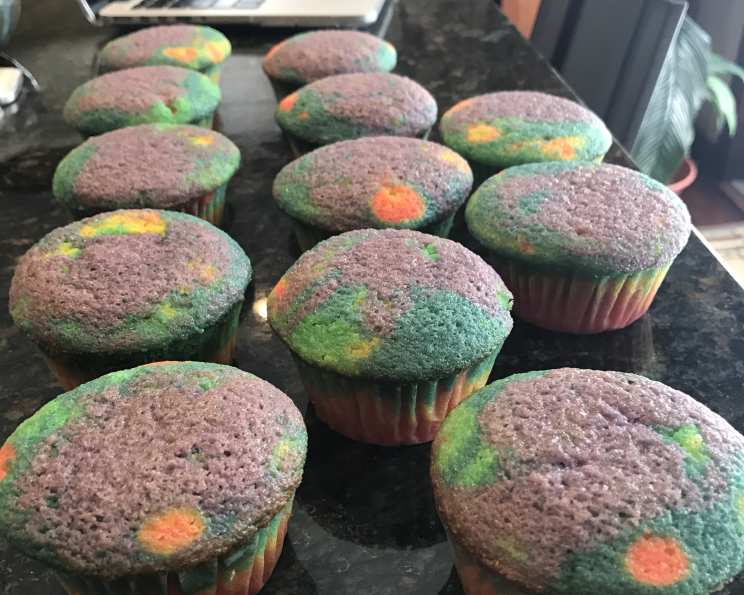
Rainbow Vanilla Cupcakes: A Burst of Joy in Every Bite
I remember the first time I made rainbow cupcakes. It was for my niece Lily’s fifth birthday, and she wanted a party as colorful as a unicorn’s mane. The look on her face when she saw those vibrant swirls of red, orange, yellow, green, blue, and purple frosting was pure magic. Suddenly, a simple cupcake transformed into a symbol of joy, celebration, and the boundless imagination of childhood. That day, I learned that baking isn’t just about following a recipe; it’s about creating moments of happiness.
Recipe Overview
- Prep Time: 20 minutes
- Cook Time: 15-20 minutes
- Total Time: 1 hour 5 minutes (including cooling time)
- Servings: 24 cupcakes
- Yield: 24 cupcakes
- Dietary Type: Vegetarian
Ingredients
- 3/4 cup unsalted butter, softened
- 1 3/4 cups sugar
- 2 large eggs
- 3 teaspoons pure vanilla extract
- 1/2 teaspoon salt
- 2 1/2 teaspoons baking powder
- 2 1/2 cups flour
- 1 1/4 cups skim milk
- 6 ounces food coloring (gel or liquid, assorted colors)
- 2 cups frosting (vanilla buttercream recommended)
Equipment Needed
- Large mixing bowl
- Electric mixer (handheld or stand mixer)
- Several smaller bowls (for coloring batter)
- Measuring cups and spoons
- Muffin tin (24-cup capacity)
- Paper cupcake liners
- Spoons
- Cooling rack
- Piping bag (optional, for frosting)
Instructions
-
Begin by preheating your oven to 375°F (190°C). This is crucial for even baking and a perfect rise.
-
In a large mixing bowl, cream together the softened butter and sugar using an electric mixer until light and fluffy. This usually takes about 3-5 minutes. Make sure the butter is properly softened, but not melted, for the best texture.
-
Add the eggs, two teaspoons of vanilla extract, salt, and baking powder to the creamed butter and sugar mixture. Beat until well combined. The vanilla adds a wonderful aroma and enhances the overall flavor.
-
Gradually add the flour and milk in batches, starting and ending with the flour. This prevents the gluten in the flour from developing too much, resulting in a more tender cupcake. Stir until the batter is smooth and satiny, but be careful not to overmix.
-
Evenly divide the prepared batter into several different bowls. The number of bowls depends on the number of colors you wish to use. I find that six bowls, for the classic rainbow of colors, works best.
-
Add food coloring to each bowl, stirring until you achieve the desired color intensity. Gel food coloring tends to be more vibrant and concentrated, so you’ll need less. Liquid food coloring works fine too, but may require more drops to achieve the same level of color.
-
For a classic rainbow effect, I recommend using six colors: red, orange, yellow, green, blue, and purple. Get creative and experiment with your own color combinations!
-
Line your muffin tin with paper cupcake liners. This prevents the cupcakes from sticking and makes them easier to remove.
-
Spoon the colored batter into the prepared cupcake liners. For six colors, I recommend spooning in about ½ tablespoon of each color into each cup. If you’re using a smaller number of colors, you can increase the amount to 1 tablespoon per color. Layer the colors randomly or in a specific order for a unique look. A toothpick can be used to swirl the colors together gently. Be careful not to overfill the liners; they should be about two-thirds full.
-
Bake at 375°F (190°C) for 15-20 minutes, or until a wooden skewer inserted into the center comes out clean. Keep a close eye on them, as baking times can vary depending on your oven.
-
Allow the cupcakes to cool in the muffin tin for about 10 minutes before transferring them to a cooling rack to cool completely. This prevents them from becoming soggy. Let them cool for approximately 45 minutes before frosting.
-
Frost the cooled cupcakes with your favorite frosting. I highly recommend a classic vanilla buttercream, but chocolate frosting or cream cheese frosting would also be delicious. Use a piping bag with a decorative tip for a professional look, or simply spread the frosting on with a knife or spatula.
Expert Tips & Tricks
- For extra moist cupcakes, add a tablespoon of sour cream or plain yogurt to the batter.
- To prevent the cupcakes from sticking to the liners, lightly spray the liners with cooking spray before filling them with batter.
- If you don’t have multiple bowls for coloring the batter, you can use resealable plastic bags. Simply add the batter and food coloring to the bag, seal it tightly, and massage the color in. Then, snip off a corner of the bag and pipe the batter into the cupcake liners.
- To create a marbled effect, gently swirl the colors together with a toothpick before baking. Be careful not to overmix, as this can muddy the colors.
- If your frosting is too thick, add a tablespoon or two of milk or cream to thin it out. If it’s too thin, add a tablespoon or two of powdered sugar to thicken it.
Serving & Storage Suggestions
Serve these vibrant rainbow cupcakes at parties, celebrations, or simply as a fun treat. They are best enjoyed the same day they are baked, but can be stored in an airtight container at room temperature for up to 2 days. For longer storage, keep them in the refrigerator for up to 5 days. You can also freeze unfrosted cupcakes for up to 2 months. Thaw them completely before frosting.
Nutritional Information
| Nutrient | Amount per Serving | % Daily Value |
|---|---|---|
| Calories | 248.1 kcal | N/A |
| Calories from Fat | 84 g | 34% |
| Total Fat | 9.4 g | 14% |
| Saturated Fat | 4.4 g | 21% |
| Cholesterol | 31 mg | 10% |
| Sodium | 136.4 mg | 5% |
| Total Carbohydrate | 38.5 g | 12% |
| Dietary Fiber | 0.3 g | 1% |
| Sugars | 26.8 g | 107% |
| Protein | 2.4 g | 4% |
Note: Nutritional information is an estimate and may vary based on specific ingredients and portion sizes.
Variations & Substitutions
- Gluten-Free Rainbow Cupcakes: Substitute the all-purpose flour with a gluten-free blend. Ensure the blend contains xanthan gum for optimal texture.
- Dairy-Free Rainbow Cupcakes: Use a dairy-free butter substitute and plant-based milk (such as almond or soy milk).
- Vegan Rainbow Cupcakes: Substitute the butter with a vegan butter alternative, the eggs with applesauce or flax eggs (1 tablespoon ground flaxseed mixed with 3 tablespoons of water per egg), and the milk with plant-based milk. Ensure the food coloring is also vegan.
- Seasonal Flavors: Add a touch of citrus zest (lemon, orange, or lime) to the batter for a summery twist, or a pinch of cinnamon or nutmeg for a cozy autumn flavor.
FAQs (Frequently Asked Questions)
Q: Can I use different colors than the classic rainbow?
A: Absolutely! Get creative and experiment with any color combination you like. Pastel colors, neon colors, or even shades of the same color can create a beautiful and unique effect.
Q: Can I make these cupcakes ahead of time?
A: Yes, you can bake the cupcakes a day or two in advance. Store them in an airtight container at room temperature or in the refrigerator until you’re ready to frost them.
Q: My cupcakes are sinking in the middle. What am I doing wrong?
A: This can be caused by overmixing the batter, using too much liquid, or opening the oven door too frequently during baking. Make sure to measure your ingredients accurately, avoid overmixing, and resist the urge to peek until the cupcakes are almost done.
Q: Can I use a box cake mix for this recipe?
A: While it’s possible, the results may not be as good as from scratch. Box mixes often contain additives that can affect the texture and flavor of the cupcakes. For best results, I recommend following the recipe as written.
Q: What’s the best way to store leftover frosting?
A: Store leftover frosting in an airtight container in the refrigerator for up to a week. Let it come to room temperature before using, and re-whip it with an electric mixer to restore its fluffy texture.
Final Thoughts
I hope this recipe brings a little bit of sunshine and happiness into your kitchen! Rainbow Vanilla Cupcakes are a perfect way to celebrate any occasion, big or small. Don’t be afraid to get creative with the colors and flavors, and most importantly, have fun! Share your creations with friends and family, and let them experience the joy of a truly delightful treat. Happy baking!