
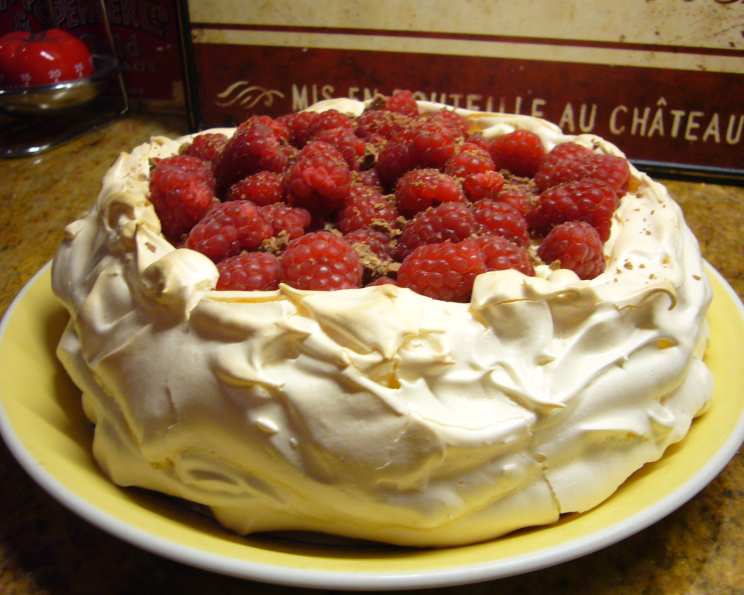
Raspberry Cream Pavlova: A Cloud of Summer Delight
I remember the first time I saw a pavlova. It was at my childhood best friend’s birthday party, and it looked like a giant, ethereal cloud had landed on their dessert table. Its pristine white surface, adorned with vibrant berries and billows of whipped cream, held me spellbound. It wasn’t just a cake; it was a statement, a centerpiece of pure joy. That first bite – the crisp, airy shell giving way to a soft, marshmallowy interior and the burst of fresh fruit – was pure magic, a memory etched in my mind forever.
Recipe Overview
- Prep Time: 20 minutes
- Cook Time: 1 hour
- Cooling Time: Several hours
- Servings: 12
- Dietary Type: Gluten-Free
Ingredients
- 3 egg whites
- 175 g caster sugar
- 1 teaspoon vinegar (white vinegar or cider vinegar work well)
- 1 teaspoon cornflour
- ½ pint whipping cream, well chilled
- 225 g fresh raspberries (or fruit of your choice, such as strawberries, blueberries, or passionfruit pulp)
Equipment Needed
- Baking sheet
- Silicone paper or parchment paper
- Pencil
- Electric mixer (stand mixer or hand mixer)
- Measuring spoons and cups
- Large mixing bowl
- Rubber spatula
Instructions
-
Preheat your oven to 150 degrees C (300 degrees F). Accuracy is crucial here; an oven thermometer is your best friend.
-
Line a baking sheet with silicone paper or parchment paper. Using a pencil, mark an 8-inch circle on the paper. This will act as a guide for shaping your pavlova.
-
In a clean, dry bowl, whisk the egg whites until they form stiff peaks. It’s essential that your bowl and whisk are completely free of any grease, as this can prevent the egg whites from whipping properly.
-
Gradually whisk in the caster sugar, one teaspoon at a time. This is a crucial step; adding the sugar slowly ensures that it fully dissolves into the egg whites, creating a smooth and glossy meringue. Continue whisking until all the sugar is incorporated, and the meringue is stiff and shiny. It should hold its shape when you lift the whisk.
-
In a small bowl, blend the vinegar with the cornflour to form a slurry. This mixture acts as a stabilizer, giving the pavlova its characteristic marshmallowy center.
-
Gently whisk the vinegar and cornflour mixture into the meringue until just combined. Be careful not to overmix at this stage, as this can deflate the meringue.
-
Spread the meringue mixture out to cover the circle you marked on the silicone paper. Build up the sides slightly, creating a shallow well in the center. This well will hold the whipped cream and raspberries later.
-
Place the baking sheet in the preheated oven. Immediately turn the oven temperature down to 140 degrees C (275 degrees F).
-
Leave the pavlova to cook for 1 hour. The goal is to dry out the meringue, not to bake it like a cake.
-
After 1 hour, turn the oven off completely, but leave the pavlova inside to cool completely. This slow cooling process helps to prevent cracking and ensures that the pavlova develops its signature crisp shell and soft center. This cooling process may take several hours, or even overnight.
-
Once the pavlova is completely cool, gently remove it from the baking sheet.
-
To serve, whip the whipping cream until it forms soft peaks. Be careful not to overwhip the cream, or it will become grainy.
-
Gently fold the fresh raspberries (or your chosen fruit) into the whipped cream.
-
Pile the cream and fruit mixture into the center of the pavlova.
-
Leave to stand in the fridge for about an hour before serving. This allows the flavors to meld together and the cream to slightly soften the pavlova.
Expert Tips & Tricks
- Perfect Peaks: Ensure your egg whites are at room temperature for maximum volume when whipping. A pinch of cream of tartar can also help stabilize the meringue.
- Don’t Open the Oven! Resist the urge to peek during baking. Opening the oven can cause temperature fluctuations that lead to cracking.
- Salvaging Cracks: If your pavlova cracks (it happens!), don’t worry. The whipped cream will cover it, and it will still taste delicious.
- Meringue Troubleshooting: If your meringue seems grainy, it’s likely the sugar wasn’t fully dissolved. Next time, whisk more slowly and ensure the sugar is very fine.
- Flavor Infusion: Experiment with adding a few drops of vanilla extract or almond extract to the meringue for added flavor.
Serving & Storage Suggestions
Serve the Raspberry Cream Pavlova immediately after assembling for the best texture. The meringue will start to soften as it absorbs moisture from the cream and fruit. If you need to prepare it ahead of time, bake the pavlova shell and store it in an airtight container at room temperature. Whip the cream and prepare the fruit just before serving.
Leftover assembled pavlova is best eaten within a few hours. Store it in the refrigerator, but be aware that the meringue will soften over time. Assembled pavlova is not suitable for freezing. You can freeze the baked meringue shell, but it may become slightly more delicate upon thawing.
Nutritional Information
(Estimated values – will vary based on specific ingredients and serving size)
| Nutrient | Amount per Serving | % Daily Value |
|---|---|---|
| Calories | 180 kcal | 9% |
| Total Fat | 7g | 11% |
| Saturated Fat | 4g | 20% |
| Cholesterol | 25mg | 8% |
| Sodium | 15mg | 1% |
| Total Carbohydrate | 28g | 9% |
| Dietary Fiber | 1g | 4% |
| Sugars | 25g | – |
| Protein | 2g | 4% |
Variations & Substitutions
- Berry Bliss: Try using a mix of berries, such as strawberries, blueberries, and blackberries, for a vibrant and flavorful topping.
- Tropical Twist: Substitute the raspberries with passionfruit pulp and mango chunks for a tropical twist.
- Chocolate Indulgence: Drizzle melted dark chocolate over the pavlova before adding the cream and fruit.
- Lemon Dream: Add lemon zest to the meringue for a bright and citrusy flavor. You can also use lemon curd instead of whipped cream.
- Dairy-Free Delight: Use coconut whipped cream instead of traditional whipping cream for a dairy-free option.
FAQs (Frequently Asked Questions)
Q: Why is my pavlova cracking?
A: Cracking is common and often caused by temperature fluctuations. Slow cooling in the oven can help prevent it, but even if it cracks, it will still taste delicious.
Q: Can I make the pavlova ahead of time?
A: Yes! You can bake the meringue shell a day or two in advance and store it in an airtight container at room temperature. Assemble just before serving.
Q: Why is my pavlova sticky instead of crispy?
A: This usually means the pavlova wasn’t cooked long enough or the oven temperature was too low. Ensure your oven is at the correct temperature and cook for the full hour.
Q: Can I use a different type of sugar?
A: Caster sugar (superfine sugar) is recommended because it dissolves easily. Granulated sugar can be used, but it may result in a slightly grainier meringue.
Q: Can I freeze the baked pavlova shell?
A: Yes, you can freeze the baked meringue shell, but it may become slightly more delicate upon thawing. Wrap it tightly in plastic wrap and then foil to prevent freezer burn.
Final Thoughts
The Raspberry Cream Pavlova is more than just a dessert; it’s an experience. From the satisfying crack of the meringue to the creamy, fruity explosion of flavor, every bite is a celebration. Don’t be intimidated by its elegant appearance; this recipe is surprisingly simple to make, and the results are always spectacular. Gather your ingredients, preheat your oven, and prepare to create a masterpiece that will impress your friends and family. And most importantly, don’t forget to share the joy – and maybe a slice – with those you love. Bon appétit!