
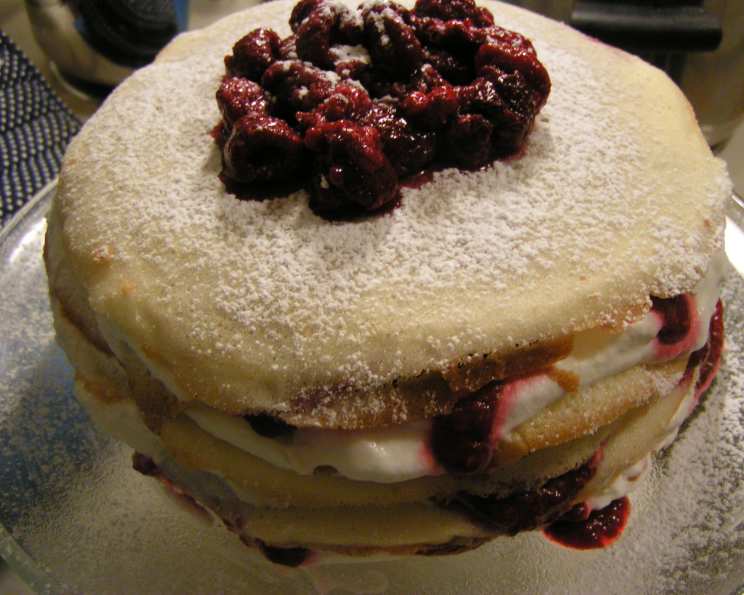
Raspberry Cream Torte: A Symphony of Sweetness and Texture
The first time I tasted a Raspberry Cream Torte was at a small patisserie tucked away on a quiet street in Montreal. The delicate layers of crisp wafers, the tangy-sweet raspberry sauce, and the billowy whipped cream created a dessert that was both elegant and comforting. I remember thinking, “This is what happiness tastes like.” Inspired by that experience, I’ve spent years perfecting my own version, eager to share this exceptional treat with you. This recipe, adapted from a Canadian Living classic, promises to be a showstopper that will delight your friends and family.
Recipe Overview
- Prep Time: 1 hour
- Cook Time: 10 minutes
- Total Time: 1 hour 50 minutes
- Servings: 8
- Yield: 1 torte
- Dietary Type: Not Gluten-Free
Ingredients
For the Wafers:
- 6 egg whites
- 1 1/2 cups sugar
- 1 cup all-purpose flour
- 3/4 cup unsalted butter, melted
- 2 tablespoons water
- 1 tablespoon vanilla
For the Raspberry Sauce:
- 2 (300 g) packages unsweetened raspberries, thawed
- 1/2 cup instant dissolving fruit sugar
- 2 teaspoons raspberry liqueur (optional)
For the Cream Filling:
- 2 cups whipping cream
- 1/3 cup icing sugar
Garnish:
- Icing sugar, for dusting
- Whole half-frozen raspberries, for topping
Equipment Needed
- Baking sheets
- Parchment paper
- Large bowl
- Whisk
- Metal spatula
- Food processor or blender
- Sieve
- Serving plate
Instructions
-
Prepare the Baking Sheets: Trace two 8-inch circles on each of two pieces of parchment paper. Invert the parchment paper and place them on baking sheets. These will be your guides for the wafers.
-
Mix the Wafer Batter: In a large bowl, lightly whisk the egg whites. Gradually whisk in the sugar, flour, melted butter, water, and vanilla just until everything is blended. Be careful not to overmix; a smooth, even batter is what you’re aiming for.
-
Shape the Wafers: Drop 1/3 cup of the batter onto each traced circle on the parchment paper. Gently spread the batter to completely cover each circle. Aim for a thin, even layer to ensure crisp wafers.
-
Bake the Wafers: Bake one sheet at a time in the upper half of a 400°F (200°C) oven for 8 to 10 minutes, or until the edges are just beginning to brown. Keep a close eye on them, as they can burn quickly.
-
Cool and Transfer the Wafers: Let the wafers cool on the baking sheet on a rack for about 2 minutes. Using a metal spatula, carefully transfer the wafers to a flat surface to cool completely. This step is crucial for preventing breakage.
-
Repeat: Repeat steps 3-5 with the remaining batter until you have made 9 wafers in total.
-
Prepare the Raspberry Sauce: In a food processor or blender, puree the thawed raspberries until smooth. Press the puree through a sieve into a bowl to remove the seeds. This step is essential for a smooth, luxurious sauce.
-
Sweeten the Raspberry Sauce: Whisk in the instant dissolving fruit sugar and raspberry liqueur (if using) into the raspberry sauce. Taste and adjust the sweetness if necessary.
-
Make the Whipped Cream: In a bowl, whip the whipping cream with the icing sugar until soft peaks form. Be careful not to overwhip, as the cream can become grainy.
-
Assemble the Torte: Place one wafer on a serving plate. Spread with 1/2 cup of the whipped cream. Drizzle with 1/4 cup of the raspberry sauce.
-
Layer the Torte: Repeat the layering process with the remaining wafers, cream, and sauce. Top with the remaining wafer.
-
Chill the Torte: Cover the torte and refrigerate for 1 1/2 to 2 hours, or until the wafers have softened just enough to cut into wedges. This allows the flavors to meld and the torte to set.
-
Garnish and Serve: Before serving, top the last wafer with sifted icing sugar and whole half-frozen raspberries. This adds a beautiful finishing touch.
Expert Tips & Tricks
- Wafer Storage: The baked wafers can be layered between waxed paper in an airtight container and stored for up to 2 days. This is great for prepping ahead of time.
- Sauce Consistency: If the raspberry sauce seems too thin, you can add a pinch of cornstarch mixed with a little water and heat it gently in a saucepan until it thickens slightly.
- Even Layers: Use a piping bag or a spoon to ensure even distribution of the whipped cream and raspberry sauce between the layers.
- Preventing Soggy Wafers: Make sure the wafers are completely cooled before layering, as warmth can cause them to soften too quickly.
- Berry Variety: Feel free to experiment with different berries in the sauce. Blackberries or a mix of berries can add interesting flavor dimensions.
Serving & Storage Suggestions
To serve the Raspberry Cream Torte, carefully cut it into wedges using a sharp knife. The torte is best enjoyed chilled, as the wafers will have softened to the perfect consistency. For a more elegant presentation, add a few extra fresh raspberries and a sprig of mint to each plate.
Leftover torte should be stored in the refrigerator in an airtight container. It will last for up to 3 days. Keep in mind that the wafers will continue to soften over time, so it is best enjoyed sooner rather than later. Freezing is not recommended, as it can affect the texture of the cream and wafers.
Nutritional Information
| Nutrient | Amount per Serving | % Daily Value |
|---|---|---|
| Calories | 635.8 kcal | N/A |
| Calories from Fat | 359 g | 57% |
| Total Fat | 40 g | 61% |
| Saturated Fat | 24.7 g | 123% |
| Cholesterol | 127.3 mg | 42% |
| Sodium | 67.4 mg | 2% |
| Total Carbohydrate | 65.4 g | 21% |
| Dietary Fiber | 5.3 g | 21% |
| Sugars | 46.2 g | 184% |
| Protein | 6.6 g | 13% |
Note: Nutritional information is an estimate and may vary based on specific ingredients and portion sizes.
Variations & Substitutions
- Gluten-Free: For a gluten-free version, substitute the all-purpose flour with a gluten-free flour blend. Be sure to choose a blend that is designed for baking and contains xanthan gum for binding.
- Dairy-Free: Replace the whipping cream with a non-dairy whipped topping made from coconut cream or soy cream. Ensure the butter is replaced with a vegan alternative.
- Flavor Variations: Infuse the whipped cream with different flavors, such as lemon zest, orange zest, or a hint of almond extract.
- Fruit Options: Substitute the raspberries with other fruits like strawberries, blueberries, or peaches. Adjust the amount of sugar in the sauce according to the sweetness of the fruit.
- Chocolate Version: Melt semi-sweet chocolate and drizzle over the layers for a decadent twist.
FAQs (Frequently Asked Questions)
Q: Can I use frozen raspberries instead of fresh ones for the sauce?
A: Yes, frozen raspberries work perfectly well for the sauce. Just make sure to thaw them completely before pureeing and remove any excess liquid.
Q: Can I make the wafers ahead of time?
A: Absolutely! The wafers can be made up to 2 days in advance. Store them layered between waxed paper in an airtight container at room temperature.
Q: My whipped cream is not holding its shape. What should I do?
A: Make sure your whipping cream and bowl are well-chilled before whipping. You can also add a stabilizer like cream of tartar or a small amount of cornstarch to help the cream hold its shape.
Q: How do I prevent the wafers from sticking to the parchment paper?
A: Make sure to grease the parchment paper lightly with cooking spray or butter before placing the batter on it.
Q: Can I use a different liqueur in the raspberry sauce?
A: Yes, you can substitute the raspberry liqueur with other liqueurs such as Kirsch, Grand Marnier, or even a splash of vanilla extract for a non-alcoholic option.
Final Thoughts
Now that you’re equipped with the knowledge and inspiration, it’s time to bring this Raspberry Cream Torte to life! Don’t be intimidated by the multiple steps; each one is simple and rewarding. This torte is more than just a dessert; it’s an experience, a labor of love meant to be shared and savored. So, gather your ingredients, preheat your oven, and prepare to create a show-stopping masterpiece. I can’t wait to hear about your baking adventures and the smiles this torte brings to your table. Consider pairing it with a light, sparkling wine or a cup of herbal tea for the perfect finishing touch. Happy baking!