
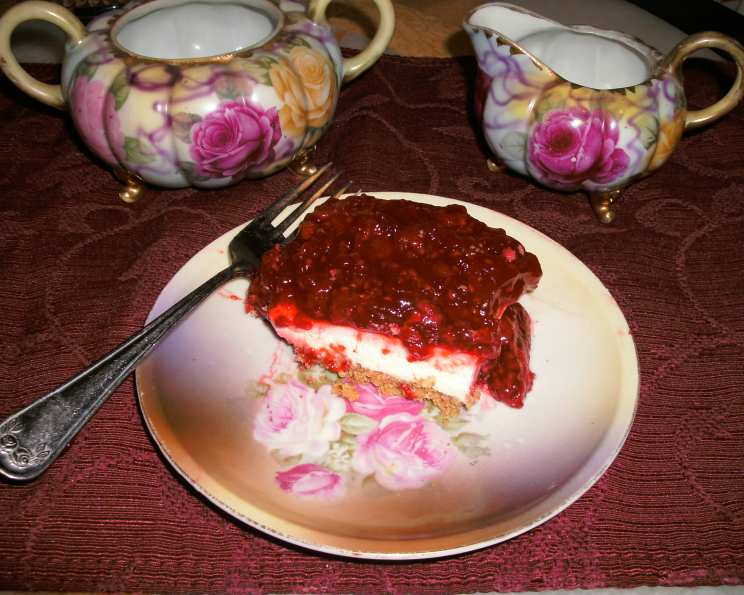
Raspberry Dream Dessert: A Culinary Memory
Raspberries. The very word conjures up images of sun-drenched summer days spent picking these jewel-toned berries straight from the thorny bushes in my grandmother’s garden. My little hands, stained crimson with juice, would eagerly reach for each plump, sweet-tart morsel, knowing that the best ones were always hidden just a little deeper. This Raspberry Dream Dessert is my attempt to recapture that feeling – a slice of sunshine, nostalgia, and pure, unadulterated joy. And while my grandmother used fresh-picked berries (naturally!), this recipe is delicious with frozen, making it accessible year-round.
Recipe Overview
- Prep Time: 30 minutes
- Cook Time: 10 minutes
- Total Time: 1 hour 30 minutes (includes chilling)
- Servings: 16
- Yield: One 9×12 inch pan
- Dietary Type: Not specified (contains dairy)
Ingredients
Crust
- 1 1/4 cups graham cracker crumbs
- 3/4 cup finely chopped pecans
- 5 tablespoons melted butter
Filling
- 3 ounces lemon Jell-O gelatin
- 1 cup boiling water
- 4 tablespoons lemon juice
- 1 cup sugar
- 1 teaspoon vanilla
- 8 ounces cream cheese, softened
- 1 cup heavy whipping cream
Topping
- 1 (4 3/4 ounce) package raspberry junket danish dessert mix
- 2 (10 ounce) packages frozen raspberries, thawed, drained, and juice reserved
- Whipped cream, for topping
Equipment Needed
- 9×12 inch baking pan
- Mixing bowls
- Electric mixer
- Spatula
- Measuring cups and spoons
- Saucepan
Instructions
-
Preheat your oven to 300°F (150°C).
-
Prepare the Crust: In a mixing bowl, combine the graham cracker crumbs, finely chopped pecans, and melted butter. Mix well until the mixture resembles damp sand.
-
Press the crust mixture evenly into the bottom of the 9×12 inch baking pan.
-
Bake the crust in the preheated oven for 10 minutes. Remove from the oven and let cool completely.
-
Prepare the Jell-O Layer: In a heat-safe bowl, combine the lemon Jell-O gelatin and boiling water. Stir until the gelatin is completely dissolved, following the instructions on the Jell-O box.
-
Instead of adding cold water as indicated on the Jell-O box, add the lemon juice to the dissolved gelatin mixture.
-
Set the Jell-O mixture aside to cool in the refrigerator. It needs to thicken slightly but not fully set. Keep an eye on it; this usually takes about 30-45 minutes.
-
Once the Jell-O begins to thicken, use an electric mixer to beat it until fluffy. This incorporates air and lightens the texture.
-
Prepare the Cream Cheese Layer: In a separate mixing bowl, beat together the sugar, vanilla, and softened cream cheese until smooth and creamy. Ensure the cream cheese is properly softened to avoid any lumps in the final dessert.
-
Gradually beat the cream cheese mixture into the thickened Jell-O mixture until well combined.
-
Whip the Heavy Cream: In another clean mixing bowl, beat the heavy whipping cream using an electric mixer until stiff peaks form. Be careful not to overwhip, or it will turn into butter. You should end up with about 2 cups of whipped cream.
-
Gently fold the whipped cream into the Jell-O and cream cheese mixture. Folding helps to maintain the airy texture of the whipped cream.
-
Pour the cream cheese mixture over the cooled graham cracker crust in the baking pan.
-
Chill the dessert in the refrigerator until the cream cheese layer is completely set. This usually takes at least 2 hours, or preferably overnight.
-
Prepare the Raspberry Topping: Add enough water to the reserved juice from the thawed frozen raspberries to make a total of 2 cups of liquid.
-
In a saucepan, combine the diluted raspberry juice with the raspberry junket danish dessert mix.
-
Mix well and bring to a boil over medium heat, stirring constantly to prevent scorching.
-
Once boiling, continue to boil for 1 minute, stirring constantly. This activates the thickening agents in the Danish dessert mix.
-
Remove the saucepan from the heat and let the raspberry mixture cool slightly.
-
Gently fold in the thawed and drained frozen raspberries into the cooled raspberry mixture.
-
Pour the raspberry mixture evenly over the set cream cheese layer in the baking pan.
-
Chill the dessert in the refrigerator again until the raspberry topping is set, about 1-2 hours.
-
Before serving, top the Raspberry Dream Dessert with whipped cream.
Expert Tips & Tricks
- For a thicker raspberry sauce, consider using just 3/4 cup of water to the Danish dessert mix instead of diluting the raspberry juice to 2 cups. This will result in a more concentrated flavor and a firmer set.
- To ensure a perfectly smooth cream cheese layer, bring the cream cheese to room temperature well in advance. If you’re short on time, you can microwave it in 10-second intervals, but be extremely careful not to melt it.
- If you want to add a little extra zing, consider adding a teaspoon of lemon zest to the cream cheese layer.
- For a more intense raspberry flavor, consider using a raspberry extract in the cream cheese layer as well. Just a half teaspoon will do the trick.
- If your crust starts to brown too quickly in the oven, tent it with foil to prevent burning.
Serving & Storage Suggestions
To serve this Raspberry Dream Dessert, cut it into squares or rectangles and arrange them on a platter. A dollop of fresh whipped cream and a few fresh raspberries on top make for an elegant presentation.
Leftovers should be stored in an airtight container in the refrigerator. It will keep well for up to 3 days.
This dessert is best served chilled and is not suitable for freezing due to the gelatin and dairy components. Freezing may alter the texture.
Nutritional Information
| Nutrient | Amount per Serving | % Daily Value |
|---|---|---|
| Calories | 302.6 kcal | N/A |
| Calories from Fat | 165 kcal | N/A |
| Total Fat | 18.4 g | 28% |
| Saturated Fat | 9.2 g | 46% |
| Cholesterol | 45.5 mg | 15% |
| Sodium | 138.3 mg | 5% |
| Total Carbohydrate | 33.5 g | 11% |
| Dietary Fiber | 2.2 g | 9% |
| Sugars | 27.2 g | N/A |
| Protein | 3 g | 6% |
Note: Percent Daily Values are based on a 2000 calorie diet. Nutritional information is an estimate and may vary based on specific ingredients used.
Variations & Substitutions
- Gluten-Free Crust: Substitute the graham cracker crumbs with gluten-free graham-style crackers or a blend of almond flour and gluten-free oats for a gluten-free version.
- Dairy-Free Filling: Use a dairy-free cream cheese alternative (like Tofutti or Kite Hill) and coconut whipped cream for a completely dairy-free dessert. Be aware that the flavor and texture may differ slightly.
- Berry Medley: Instead of just raspberries, use a mixed berry blend for a more complex flavor profile. Blackberries, blueberries, and strawberries all work well.
- Lemon Crust: Add lemon zest to the crust for a boost of citrus flavor that complements the raspberry filling.
- Individual Servings: Press the crust into individual ramekins or small glasses for elegant single-serving desserts.
FAQs (Frequently Asked Questions)
Q: Can I use fresh raspberries instead of frozen?
A: Absolutely! Fresh raspberries will work beautifully and provide a slightly brighter, less mushy texture. Use the same quantity as the frozen raspberries specified in the recipe.
Q: How can I prevent the crust from getting soggy?
A: Make sure to bake the crust until it is lightly golden brown. This will help to seal it and prevent it from absorbing moisture from the filling. Cooling the crust completely before adding the filling also helps.
Q: What if I don’t have lemon Jell-O?
A: You can substitute with another flavor of Jell-O that complements raspberries, such as raspberry or strawberry. Alternatively, you can use unflavored gelatin and add extra lemon juice to achieve a similar flavor profile.
Q: Can I make this dessert ahead of time?
A: Yes, this dessert is perfect for making ahead. In fact, it benefits from chilling for several hours or even overnight, as this allows the flavors to meld and the layers to set properly.
Q: Why is my raspberry topping runny?
A: Ensure you are boiling the raspberry mixture for the full minute as instructed. This is crucial for activating the thickening agents in the Danish dessert mix. If it’s still too runny, you can simmer it for an additional minute or two, stirring constantly, until it reaches the desired consistency.
Final Thoughts
This Raspberry Dream Dessert is more than just a recipe; it’s a journey back to simpler times, a celebration of summer flavors, and a testament to the power of food to evoke cherished memories. I encourage you to try this recipe and share it with your loved ones. Whether you use fresh berries or frozen, I hope this dessert brings a little bit of sunshine to your day. And if you happen to have any family secrets or variations of your own, I’d love to hear about them! Happy baking!