
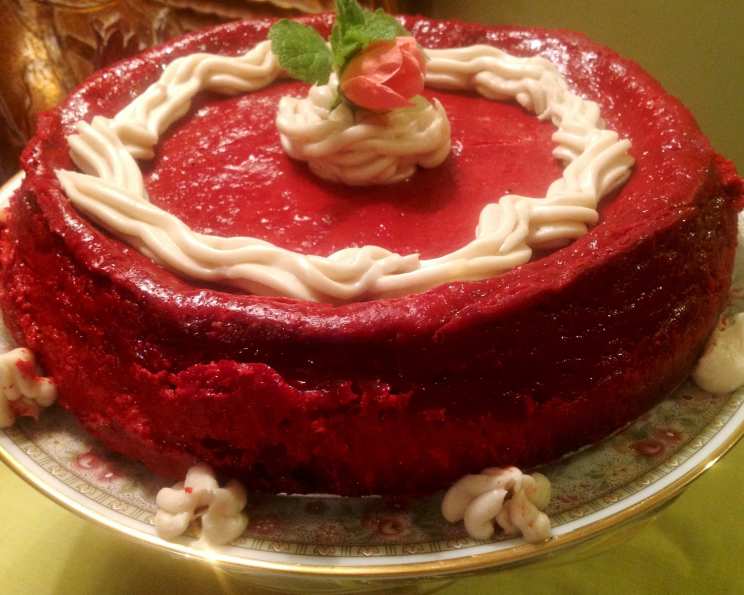
Red Velvet Cheesecake: A Decadent Delight
I still remember the first time I tasted red velvet cake. It was at my grandmother’s house, a surprise for my tenth birthday. The vibrant color and subtle chocolate flavor, combined with the tangy cream cheese frosting, were unlike anything I had ever experienced. Years later, when I first encountered a red velvet cheesecake, it felt like rediscovering that childhood joy all over again, but with an added layer of creamy sophistication. This recipe, a fusion of two classic desserts, brings that same sense of comforting nostalgia and elegant indulgence to every slice.
Recipe Overview
- Prep Time: 30 minutes
- Cook Time: 1 hour 25 minutes
- Total Time: 11 hours 25 minutes (includes chilling)
- Servings: 8-10
- Yield: 1 9-inch cheesecake
- Dietary Type: Not Gluten-Free
Ingredients
For the Crust:
- 1 1⁄2 cups chocolate graham cracker crumbs
- 1⁄4 cup butter, melted
- 1 tablespoon granulated sugar
For the Red Velvet Cheesecake Filling:
- 3 (8 ounce) packages cream cheese, softened
- 1 1⁄2 cups granulated sugar
- 4 large eggs, lightly beaten
- 3 tablespoons unsweetened cocoa
- 1 cup sour cream
- 1⁄2 cup whole buttermilk
- 2 teaspoons vanilla extract
- 1 teaspoon distilled white vinegar
- 2 (1 ounce) bottles red food coloring
For the Cream Cheese Topping:
- 1 (3 ounce) package cream cheese, softened
- 1⁄4 cup butter, softened
- 2 cups powdered sugar
- 1 teaspoon vanilla extract
For Garnish (Optional):
- Fresh mint sprigs
Equipment Needed
- 9-inch springform pan
- Electric mixer
- Mixing bowls
- Measuring cups and spoons
- Wire rack
Instructions
- Prepare the Crust: In a medium bowl, stir together the chocolate graham cracker crumbs, melted butter, and 1 tablespoon granulated sugar.
- Press the mixture firmly into the bottom of a 9-inch springform pan. Ensure it’s evenly distributed to create a stable base for the cheesecake.
- Make the Red Velvet Filling: In a large bowl, using an electric mixer on medium-low speed, beat 3 (8 ounce) packages of softened cream cheese and 1 1/2 cups granulated sugar for about 1 minute until smooth and creamy. It’s crucial that the cream cheese is adequately softened to avoid lumps in the filling.
- Add the 4 lightly beaten eggs and the next 6 ingredients (3 tablespoons unsweetened cocoa, 1 cup sour cream, 1⁄2 cup whole buttermilk, 2 teaspoons vanilla extract, 1 teaspoon distilled white vinegar, and 2 bottles red food coloring).
- Mix on low speed just until everything is fully combined. Avoid overmixing, which can incorporate too much air and cause the cheesecake to crack during baking.
- Pour the red velvet batter into the prepared graham cracker crust. Gently smooth the surface with a spatula.
- Bake: Preheat your oven to 325°F (160°C). Place the springform pan in the center of the preheated oven.
- Bake at 325°F for the first 10 minutes. Then, without opening the oven door, reduce the heat to 300°F (150°C) and continue to bake for 1 hour and 15 minutes, or until the center of the cheesecake is firm but still has a slight jiggle. Maintaining a consistent temperature is key to preventing cracks.
- Cooling Process: Once baked, run a knife along the outer edge of the cheesecake to loosen it from the sides of the springform pan. This also helps prevent cracking as the cheesecake cools.
- Turn off the oven and let the cheesecake stand inside for 30 minutes with the door closed. This gradual cooling helps to prevent the cheesecake from sinking in the center.
- Remove the cheesecake from the oven and cool it in the pan on a wire rack for another 30 minutes.
- Chill: Cover the cheesecake and chill it in the refrigerator for at least 8 hours, or preferably overnight. This chilling time is essential for the cheesecake to fully set and develop its rich flavor.
- Prepare the Topping: In a medium bowl, beat 1 (3 ounce) package of softened cream cheese and 1/4 cup of softened butter at medium speed with an electric mixer until smooth.
- Gradually add the 2 cups of powdered sugar and 1 teaspoon of vanilla extract, beating until the topping is smooth and creamy. Adjust the amount of powdered sugar to reach your desired consistency.
- Assemble: Once the cheesecake is thoroughly chilled, spread the cream cheese topping evenly over the top.
- Remove the sides of the springform pan carefully.
- Garnish with fresh mint sprigs, if desired, for an elegant presentation.
Expert Tips & Tricks
- Water Bath: For an even creamier cheesecake, consider baking it in a water bath. Wrap the bottom of the springform pan tightly in aluminum foil, then place it in a larger roasting pan. Fill the roasting pan with hot water until it reaches about halfway up the sides of the springform pan. The steam from the water bath helps to prevent the cheesecake from drying out and cracking.
- Preventing Cracks: Avoid opening the oven door frequently during baking. Temperature fluctuations can cause the cheesecake to crack. If you notice the top browning too quickly, tent it loosely with aluminum foil.
- Cream Cheese Temperature: Make sure your cream cheese is completely softened before mixing. This will help to create a smooth, lump-free batter.
- Cocoa Powder: Use a high-quality unsweetened cocoa powder for the best flavor. Dutch-processed cocoa powder will provide a richer, more intense chocolate flavor.
- Make-Ahead: The cheesecake can be made up to 2 days in advance. Store it covered in the refrigerator until ready to serve.
- Red Food Coloring: Gel food coloring is recommended over liquid food coloring because it is more concentrated and will give a more vibrant color without thinning the batter too much.
- Fixing a Cracked Cheesecake: If your cheesecake does crack, don’t worry! The cream cheese topping will easily cover any imperfections.
Serving & Storage Suggestions
Serve the red velvet cheesecake chilled for the best flavor and texture. Cut into slices with a warm, damp knife for clean, even cuts. To elevate the presentation, consider adding a drizzle of melted white chocolate or a dusting of cocoa powder.
Store leftover cheesecake in an airtight container in the refrigerator for up to 3-4 days. For longer storage, you can freeze the cheesecake. Wrap it tightly in plastic wrap and then in aluminum foil. Frozen cheesecake can be stored for up to 2-3 months. Thaw it in the refrigerator overnight before serving.
Nutritional Information
| Nutrient | Amount per Serving | % Daily Value |
|---|---|---|
| Calories | 798 kcal | N/A |
| Calories from Fat | 473 g | 59% |
| Total Fat | 52.6 g | 81% |
| Saturated Fat | 30 g | 150% |
| Cholesterol | 243.9 mg | 81% |
| Sodium | 469.1 mg | 19% |
| Total Carbohydrate | 75.3 g | 25% |
| Dietary Fiber | 0.7 g | 2% |
| Sugars | 72.8 g | N/A |
| Protein | 9.9 g | 19% |
Note: Nutritional information is an estimate and may vary based on specific ingredients and portion sizes.
Variations & Substitutions
- Gluten-Free Crust: Substitute the chocolate graham cracker crumbs with gluten-free graham cracker crumbs or a mixture of almond flour and cocoa powder.
- Chocolate Crust: Use an Oreo cookie crust instead of the graham cracker crust for an even more intense chocolate flavor. Remove the cream filling from the Oreo cookies before crushing them.
- Flavor Extracts: Experiment with different flavor extracts in the filling, such as almond extract or peppermint extract, for a unique twist.
- Lower-Fat Option: Use low-fat cream cheese and sour cream to reduce the fat content of the cheesecake. Be aware that this may slightly alter the texture.
- Decorations: Get creative with your decorations! Use fresh berries, chocolate shavings, or a drizzle of caramel sauce to personalize your cheesecake.
FAQs (Frequently Asked Questions)
Q: Why is my cheesecake cracking?
A: Cheesecakes crack due to temperature fluctuations, overbaking, or overmixing. Avoid opening the oven door frequently, bake at a consistent temperature, and don’t overmix the batter.
Q: How do I know when the cheesecake is done?
A: The cheesecake is done when the edges are set but the center still has a slight jiggle. It will continue to set as it cools.
Q: Can I freeze this cheesecake?
A: Yes, you can freeze the cheesecake for up to 2-3 months. Wrap it tightly in plastic wrap and then in aluminum foil. Thaw it in the refrigerator overnight before serving.
Q: Can I use a different type of crust?
A: Absolutely! A shortbread crust or a chocolate cookie crust would also work well with the red velvet cheesecake filling.
Q: What can I substitute for buttermilk?
A: If you don’t have buttermilk, you can make a substitute by adding 1 tablespoon of lemon juice or white vinegar to a liquid measuring cup and then filling the cup with milk to reach 1/2 cup. Let it sit for 5 minutes before using.
Final Thoughts
This Red Velvet Cheesecake is more than just a dessert; it’s an experience. The rich, velvety texture, the subtle chocolate flavor, and the tangy cream cheese frosting all come together to create a truly unforgettable treat. Don’t be intimidated by the multiple steps – the results are well worth the effort. Whether you’re celebrating a special occasion or simply craving something decadent, this cheesecake is sure to impress. I encourage you to give it a try and share your feedback. Perhaps pair it with a glass of chilled sparkling wine or a cup of freshly brewed coffee for the perfect indulgence. Happy baking!