
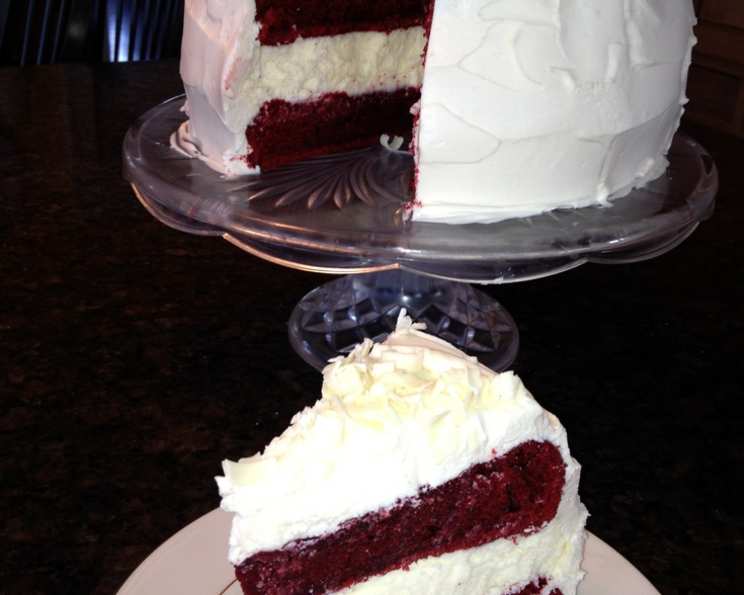
The Ultimate Red Velvet Cheesecake-Cake
There’s something undeniably magical about red velvet. It’s not just the striking color, but the subtle tang and cocoa notes that dance on your tongue. I still remember the first time I tasted a red velvet cake – it was at my grandmother’s house during a sweltering summer afternoon. The creamy frosting, the moist crumb, the sheer decadence of it all… it was an instant love affair. And then, years later, the epiphany: why not combine its allure with the rich, creamy satisfaction of cheesecake? The result, as you’re about to discover, is a dessert experience that transcends both.
Recipe Overview
- Prep Time: 45 minutes
- Cook Time: 45 minutes
- Cool Time: 3 hours
- Total Time: 5 hours
- Servings: 12-16
- Yield: 1 cake
- Dietary Type: Not Gluten-Free
Ingredients
Cheesecake Layer
- 16 ounces cream cheese, at room temperature
- 2/3 cup granulated sugar
- 1 pinch salt
- 2 large eggs
- 1/3 cup sour cream
- 1/3 cup heavy whipping cream
- 1 teaspoon vanilla extract
Red Velvet Cake
- 2 1/2 cups all-purpose flour
- 1 1/2 cups granulated sugar
- 3 tablespoons unsweetened cocoa powder
- 1 1/2 teaspoons baking soda
- 1 teaspoon salt
- 2 large eggs, at room temperature
- 1 1/2 cups vegetable oil
- 1 cup buttermilk
- 1/4 cup red food coloring
- 2 teaspoons vanilla extract
- 2 teaspoons white vinegar
Cream Cheese Frosting
- 2 1/2 cups powdered sugar, sifted lightly to remove any lumps
- 16 ounces cream cheese, at room temperature
- 1/2 cup unsalted butter, at room temperature
- 1 tablespoon vanilla extract
Equipment Needed
- 9-inch springform pan
- Two 9-inch round metal baking pans
- Large roasting pan
- Electric mixer
- Mixing bowls
- Wire rack
- Parchment paper
- Aluminum foil
- Rubber spatula
- Long, thin spatula
Instructions
-
Prepare the cheesecake layer: Preheat oven to 325 degrees F (160 degrees C). Place a large roasting pan on the lower third rack of the oven. Place a kettle of water on the stove to boil. Spray a 9-inch springform pan with nonstick spray and line the bottom with a round of parchment paper. Wrap a double layer of foil around the bottom and up the sides of the pan (you want to seal it so the water from the water bath doesn’t seep into the pan).
-
In a large bowl, use an electric mixer to mix the cream cheese – blend until it is nice and smooth and creamy. Mix in sugar and salt and blend for 2 minutes, scraping down sides of the bowl as needed.
-
Add eggs, one at a time, blending after each addition. Finally, mix in sour cream, whipping cream and vanilla. Mix until smooth.
-
Pour the batter into the prepared pan. Set the pan into the roasting pan in the pre-heated oven.
-
Carefully pour the hot water from your kettle into the roasting pan (it will fill the pan surrounding the cheesecake). Pour enough water so that there is about an inch of water coming up the foil along the sides of the cheesecake pan.
-
Bake the cheesecake for 45 minutes. It should be set to the touch and not jiggly.
-
Remove the cheesecake from the roasting pan and let it cool on a wire rack for at least an hour. When it has cooled, place the pan into the freezer and let the cheesecake freeze completely. This can be done in several hours- or overnight.
-
Prepare the cake layers: Preheat oven to 350 degrees F (175 degrees C). Grease and flour two 9-inch round metal baking pans (or spray with nonstick baking spray with flour).
-
In a large bowl, whisk together flour, sugar, cocoa powder, baking soda and salt. Add eggs, oil, buttermilk, food coloring, vanilla and vinegar to the flour mixture.
-
Using an electric mixer on medium-low speed, beat for 1 minute, until blended. Scrape sides and bottom of bowl with a rubber spatula. Beat on high speed for 2 minutes.
-
Spread the batter evenly into the prepared pans, dividing equally.
-
Bake 30 to 35 minutes or until a toothpick inserted in the center comes out with a few moist crumbs attached.
-
Let cool in pans on a wire rack for 10 minutes. Run a knife around the edge of the pans, then invert cakes onto a rack to cool completely.
-
Prepare the frosting: In a large bowl, using an electric mixer on medium-high speed, beat powdered sugar, cream cheese, butter and vanilla until it is smooth and creamy (do not overbeat).
-
Assemble the cake: Place one cake layer into the center of a cake plate or platter. Remove the cheesecake from the freezer, take off the sides of the pan, and slide a knife under the parchment to remove the cheesecake from the pan. Peel off the parchment.
-
Measure your cheesecake layer against the cake layers. If the cheesecake layer turns out to be a slightly larger round than your cake, move it to a cutting board and gently shave off some of the exterior of the cheesecake to get it to the same size as your cake layers. Place the cheesecake layer on top of the first cake layer. Place the 2nd cake layer on top of the cheesecake.
-
Frost the cake: Apply a crumb coat layer to the cake- use a long, thin spatula to cover the cake completely with a thin and even layer of frosting. Be sure to wipe off your spatula each time you are about to dip it back into the bowl to get more frosting (this way you won’t be transferring any red crumbs into the bowl of frosting). Don’t worry at this point about the crumbs being visible in the frosting on the cake. When your cake has a thin layer of frosting all over it, place it into the refrigerator for 30 minutes to “set” the frosting.
-
Once the first layer of frosting is set, apply the 2nd layer. Start by adding a large scoop of frosting onto the top of the cake. Use a long, thin spatula to spread the frosting evenly across the top and then spread it down the sides of the cake too. Because you applied a crumb-coat layer, you shouldn’t have any red crumbs floating around in the final frosting layer. Decorate, as desired. I recommend white chocolate shavings. Keep this cake refrigerated.
Expert Tips & Tricks
- Room Temperature is Key: Ensuring your cream cheese and eggs are at room temperature is crucial for a smooth, lump-free batter in both the cheesecake and the cake.
- Don’t Overmix: Overmixing the cake batter can lead to a tough, dense cake. Mix until just combined.
- Water Bath Wisdom: The water bath is essential for a creamy cheesecake. The steam prevents the top from cracking and ensures even cooking. If you don’t have a roasting pan large enough, you can carefully wrap the springform pan multiple times in heavy-duty foil to create a watertight seal.
- Freezing the Cheesecake: Freezing the cheesecake makes it much easier to handle and prevents it from crumbling when assembling the cake. Don’t skip this step!
- Crumb Coat is Crucial: The crumb coat seals in any loose crumbs and prevents them from ending up in your final frosting layer. It’s a small step that makes a big difference in the final appearance.
- White Chocolate Shavings: For an elegant touch, use a vegetable peeler to create delicate white chocolate shavings to decorate the top of the cake.
Serving & Storage Suggestions
Serve the Red Velvet Cheesecake-Cake chilled, ideally after it has been refrigerated for at least an hour to allow the frosting to set completely. For a beautiful presentation, garnish with white chocolate shavings, fresh berries, or a dusting of cocoa powder.
Leftovers should be stored in an airtight container in the refrigerator. The cake will keep for up to 3-4 days. While it can be frozen, the texture of the frosting may change slightly upon thawing. To freeze, wrap individual slices tightly in plastic wrap and then place them in a freezer-safe container. Thaw in the refrigerator overnight before serving.
Nutritional Information
| Nutrient | Amount per Serving | % Daily Value |
|---|---|---|
| Calories | 976 kcal | 49% |
| Total Fat | 66.76g | 103% |
| Saturated Fat | 25.64g | 128% |
| Cholesterol | 177.19mg | 59% |
| Sodium | 656.37mg | 27% |
| Total Carbohydrate | 85.71g | 29% |
| Dietary Fiber | 1.14g | 5% |
| Sugars | 63.93g | N/A |
| Protein | 10.47g | 21% |
Note: Nutritional information is an estimate and may vary based on specific ingredients and portion sizes.
Variations & Substitutions
- Gluten-Free Version: Substitute the all-purpose flour in the cake layers with a gluten-free all-purpose blend. Be sure to check that all other ingredients are also gluten-free.
- Vegan Option: This recipe is difficult to make completely vegan due to the cream cheese. However, you could experiment with vegan cream cheese alternatives, plant-based butter, and flax eggs. Be aware that the texture and flavor will be significantly different.
- Reduced Sugar: Reduce the amount of sugar in the cake and frosting for a slightly less sweet dessert. You can also use a sugar substitute like Stevia or Monk Fruit, but be mindful of potential flavor alterations.
- Chocolate Chips: Fold chocolate chips into the cake batter for an extra layer of chocolatey goodness.
- Seasonal Adaptation: In the fall, add a teaspoon of cinnamon and a pinch of nutmeg to the cake batter for a spiced red velvet cake.
FAQs (Frequently Asked Questions)
Q: Can I make the cheesecake layer ahead of time?
A: Absolutely! The cheesecake layer can be made up to 2 days in advance and stored in the refrigerator. Just be sure to wrap it tightly to prevent it from drying out. You can also freeze it as instructed in the recipe.
Q: Why is a water bath important for the cheesecake?
A: The water bath creates a humid environment that helps the cheesecake bake evenly and prevents it from cracking on top. It also contributes to the creamy texture.
Q: Can I use a different size pan?
A: While a 9-inch springform pan is recommended for the cheesecake, you can use an 8-inch pan, but the baking time may need to be adjusted. Avoid using a pan larger than 9 inches, as the cheesecake will be too thin. Using different sized pans for the red velvet cake is not recommended.
Q: How do I prevent the red velvet cake from being dry?
A: Ensure you are using the correct measurements of ingredients, especially the oil and buttermilk, which contribute to the cake’s moisture. Also, avoid overbaking the cake. Check for doneness with a toothpick, and remove the cake from the oven as soon as it’s ready.
Q: My cream cheese frosting is too soft. How can I fix it?
A: If your cream cheese frosting is too soft, try chilling it in the refrigerator for 30 minutes to an hour before using it. If it’s still too soft, you can add a tablespoon or two of powdered sugar at a time until it reaches the desired consistency. Be careful not to add too much, as it can make the frosting overly sweet.
Final Thoughts
This Red Velvet Cheesecake-Cake isn’t just a dessert; it’s a statement. It’s the kind of creation that elicits gasps of admiration and satisfied sighs with every bite. While it may seem a bit ambitious, the end result is well worth the effort. So, gather your ingredients, preheat your oven, and prepare to embark on a culinary adventure that will delight your taste buds and impress your friends and family. Don’t hesitate to share your creations and experiences – I’m eager to hear how this recipe becomes a cherished tradition in your own kitchen! Perhaps pair it with a glass of chilled champagne or a rich cup of coffee to complete the experience. Happy baking!