
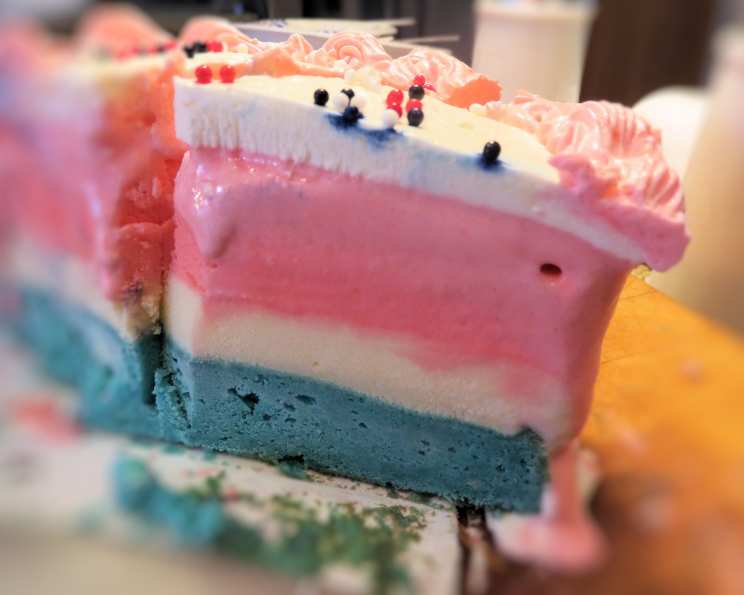
Red, White, and Blue Ice Cream Cake With Whipped Cream Frosting
I can still picture it: Fourth of July, humid air thick with the smell of barbecue, sparklers popping in the twilight. My grandmother, Nana, always made the most spectacular desserts for the occasion, and one year, it was this incredible ice cream cake. The vibrant red, white, and blue layers were a showstopper, and the creamy sweetness was the perfect antidote to the summer heat. It tasted like pure celebration, and now, years later, recreating this cake always brings back that feeling of joyful nostalgia.
Recipe Overview
- Prep Time: 43 minutes (not including ice cream softening time)
- Cook Time: 18-20 minutes
- Total Time: Approximately 1 hour + freeze time
- Servings: 14
- Yield: 1 8-inch Cake
- Dietary Type: Not specified
Ingredients
For the Blue Cake Layer:
- ¼ cup salted butter, room temperature
- ½ cup sugar
- ¼ cup sour cream
- 1 teaspoon vanilla extract
- 2 large egg whites
- ¾ cup all-purpose flour
- 1 ¼ teaspoons baking powder
- ¼ cup milk
- 1 tablespoon water
- Blue gel food coloring
For the Ice Cream:
- 1 ½ quarts vanilla ice cream (x2)
- Red gel food coloring
For the Stabilized Whipped Cream Frosting:
- 1 teaspoon plain gelatin
- 1 tablespoon cold water
- 1 cup whipping cream
- 1 tablespoon powdered sugar
- 1 teaspoon vanilla extract
Equipment Needed
- 8-inch cake pan
- Parchment paper
- Clear plastic wrap
- Mixing bowls
- Electric mixer
- Rubber spatula
- Cardboard cake circle or serving platter
- Saucepan
Instructions
-
Preheat your oven to 350°F (176°C). Prepare an 8-inch cake pan by lining the bottom with a circle of parchment paper and greasing the sides. This will ensure the cake releases easily.
-
To make the cake batter, cream together the sugar and butter in a mixing bowl using an electric mixer. Beat until the mixture is light in color and fluffy, about 3-4 minutes. Don’t skimp on the creaming process, as it’s crucial for a tender cake.
-
Add the sour cream and vanilla extract to the creamed mixture and mix until well incorporated.
-
Add the egg whites and mix until just combined. Be careful not to overmix at this stage.
-
In a separate bowl, whisk together the flour and baking powder.
-
Add half of the dry ingredients to the wet ingredients and mix until just combined.
-
Add the milk and water and mix until well combined.
-
Add the remaining dry ingredients and mix until everything is thoroughly incorporated.
-
Stir in the blue gel food coloring until you achieve your desired shade of blue.
-
Spread the cake batter evenly into the bottom of the prepared pan.
-
Bake for 18-20 minutes, or until a toothpick inserted into the center comes out with a few crumbs.
-
Set the cake aside to cool completely.
-
While the cake is cooling, line two 8-inch cake pans with clear plastic wrap, ensuring it covers both the bottom and sides of the pans. This will make it easy to remove the ice cream layers later.
-
Once the cake has cooled completely, remove any dome from the top of the blue cake layer using a serrated knife. Place the cake layer in the bottom of one of the prepared cake pans.
-
Soften the vanilla ice cream slightly. Let the cartons sit out at room temperature for about 15-20 minutes.
-
Transfer all but about a quarter of the softened ice cream to a large bowl. Use a rubber spatula to stir it well until it reaches a consistency similar to soft-serve ice cream.
-
Divide the softened ice cream in half, placing half of the ice cream into another bowl and setting it in the freezer for a few minutes while you work with the other half. This will prevent it from melting too quickly.
-
Spread the white vanilla ice cream evenly over the blue cake layer. Place the pan in the freezer to freeze completely. This might take several hours or even overnight.
-
Remove the remaining half of the vanilla ice cream from the freezer and color it with red gel icing color, stirring until you achieve your desired shade of red.
-
Spread the red ice cream evenly into the other prepared cake pan. Freeze until firm.
-
Once both ice cream layers are firm, remove the blue cake layer/white ice cream from its pan and place it on a cardboard cake circle or serving platter. Keep in mind that the cake needs to fit back into your freezer.
-
Remove the red ice cream layer from its pan and carefully set it on top of the white ice cream layer. Place the cake back in the freezer to freeze completely.
-
Prepare the stabilized whipped cream frosting. In a small bowl, add the gelatin to the cold water.
-
Set the bowl over a saucepan with boiling water (creating a double boiler) until the gelatin is completely dissolved and the liquid is clear.
-
Remove the bowl from the heat and let the gelatin mixture cool to room temperature.
-
Meanwhile, in a mixing bowl, whip the whipping cream until it reaches medium-stiff peaks.
-
With the mixer still running on low speed, slowly pour the cooled gelatin mixture into the center of the whipped cream.
-
Continue to whip until the mixture thickens slightly. Add the powdered sugar and vanilla extract.
-
Continue whipping until the cream forms soft peaks. Be careful not to overwhip, or it will become grainy.
-
At this point, you can optionally add food coloring to the whipped cream. Keep half of it white and color the other half red for a festive touch.
-
Remove the ice cream cake from the freezer. Frost the cake with the whipped cream frosting, decorating as desired with the white and red frosting. Work quickly to prevent the ice cream from melting too much.
-
Place the finished cake back in the freezer for at least 30 minutes to allow the frosting to set.
Expert Tips & Tricks
- Softening the Ice Cream: The key to a smooth ice cream cake is softening the ice cream to the right consistency. Don’t let it melt completely, just enough to be spreadable.
- Preventing Ice Crystals: Press plastic wrap directly onto the surface of the ice cream layers as they freeze to help prevent ice crystal formation.
- Gelatin for Stability: The gelatin in the whipped cream frosting helps stabilize it, preventing it from melting too quickly, especially on the cold ice cream. If you prefer not to use gelatin, you can use a commercial whipped cream stabilizer.
- Cake Pan Prep: Proper preparation of the cake pan is essential for easy release. Don’t skip the parchment paper and thorough greasing.
- Knife for Slicing: Use a long, sharp knife warmed under hot water to slice the ice cream cake cleanly. Wipe the blade between each slice.
Serving & Storage Suggestions
To serve, remove the ice cream cake from the freezer about 15-20 minutes before slicing to allow it to soften slightly for easier cutting. Serve immediately.
Store any leftovers in an airtight container in the freezer. It will keep for up to a week, though the texture may degrade slightly over time. Avoid thawing and refreezing, as this will affect the quality of the ice cream.
Nutritional Information
| Nutrient | Amount per Serving | % Daily Value |
|---|---|---|
| Calories | 274.7 kcal | Not Available |
| Calories from Fat | 151 g | 55% |
| Total Fat | 16.8 g | 25% |
| Saturated Fat | 10.4 g | 52% |
| Cholesterol | 59.6 mg | 19% |
| Sodium | 127 mg | 5% |
| Total Carbohydrate | 27.2 g | 9% |
| Dietary Fiber | 0.6 g | 2% |
| Sugars | 20 g | 79% |
| Protein | 3.9 g | 7% |
Variations & Substitutions
- Gluten-Free: Use a gluten-free flour blend in the cake layer.
- Different Flavors: Experiment with different ice cream flavors, such as strawberry or blueberry, to enhance the red, white, and blue theme. You could also use a chocolate cake layer.
- Dairy-Free: Substitute non-dairy ice cream and whipped cream alternatives. Look for coconut milk-based options for the richest flavor.
- Decorations: Add festive sprinkles, fresh berries, or small flags to the top of the cake for extra flair.
FAQs (Frequently Asked Questions)
Q: How far in advance can I make this ice cream cake?
A: You can assemble the ice cream cake up to a week in advance. Just make sure it’s well-wrapped to prevent freezer burn.
Q: My ice cream is too hard to spread. What should I do?
A: Let it sit at room temperature for a few more minutes, checking frequently until it’s soft enough to spread easily.
Q: Can I use a different size cake pan?
A: Yes, but adjust the baking time accordingly. A smaller pan will require a longer baking time, and a larger pan will require a shorter time.
Q: What if my whipped cream frosting melts too quickly?
A: Ensure the gelatin mixture is cooled before adding it to the whipped cream. Also, work quickly and keep the ice cream cake as cold as possible while frosting.
Q: Can I make this without the gelatin in the frosting?
A: Yes, but the frosting won’t be as stable. Consider using a store-bought whipped topping or a commercial whipped cream stabilizer.
Final Thoughts
This Red, White, and Blue Ice Cream Cake is more than just a dessert; it’s a celebration of flavor and festivity, perfect for any patriotic occasion. Don’t be intimidated by the multiple layers – it’s surprisingly simple to assemble, and the results are truly spectacular. So, gather your ingredients, put on some music, and get ready to create a show-stopping dessert that will delight your friends and family. I encourage you to make it your own by trying different ice cream flavors or decorations. And please, share your creations and feedback – I’d love to see your unique twists on this classic treat! Pair this cake with a refreshing glass of lemonade or iced tea for the ultimate summer indulgence. Happy baking!