
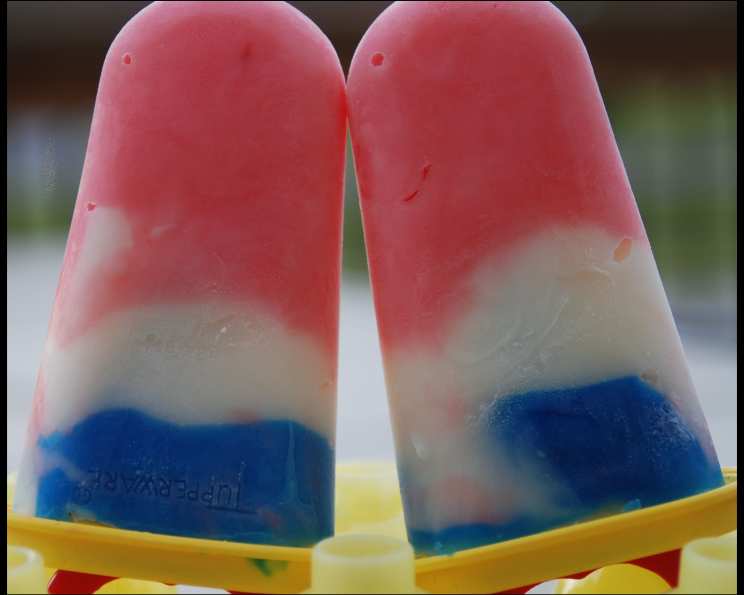
Red, White, and Blue Popsicles: A Slice of Summer Fun
I can almost feel the sticky sweetness on my fingers just thinking about these popsicles. As a kid, the Fourth of July wasn’t complete without those iconic rocket-shaped treats. The sugary layers, each bursting with a different artificial fruit flavor, were pure summer joy. These homemade versions aren’t exactly the same, but they capture the spirit perfectly—and are a whole lot more fun to make with little helpers in the kitchen. This recipe is a simple and delicious way to bring some patriotic cheer to your summer celebrations.
Recipe Overview
- Prep Time: 20 minutes
- Freeze Time: 4 hours
- Total Time: 4 hours 20 minutes
- Servings: 6
- Yield: 6 popsicles
- Dietary Type: Vegetarian
Ingredients
- 3 cups vanilla yogurt
- Red food coloring
- White food coloring (optional, for more vibrant white)
- Blue food coloring
- Wax paper
- 6 sugar ice cream cones
- 6 wooden popsicle sticks
Equipment Needed
- Mixing bowls
- Measuring spoons
- Scissors
- Tape
- Cone box or container to keep popsicles upright while freezing
Instructions
- To begin, divide your vanilla yogurt into three separate bowls. You’ll need one portion for each color: red, white, and blue.
- In one bowl, carefully tint 1/2 cup of the yogurt with red food coloring. Add the coloring a drop at a time, mixing thoroughly until you achieve a vibrant, even red hue.
- In another bowl, tint 1 1/2 cups of the yogurt with blue food coloring, again using a drop-by-drop approach until you get the desired shade of blue.
- Leave the remaining 1 cup of yogurt plain. If you desire a brighter white, you can add a tiny drop of white food coloring. This is optional but can enhance the contrast between the colors.
- Next, prepare your sugar cones. This step is crucial for creating the popsicle shape. Cut six 12-inch square sheets of wax paper.
- Fold each sheet of wax paper into a triangle. Wrap each triangle around a sugar cone, carefully molding the wax paper to the inside of the cone to create a liner.
- Use tape to secure the wax paper liner in place. This will prevent the yogurt from soaking into the cone and making it soggy. The wax paper acts as a barrier.
- Now, carefully place the wax paper-lined cones inside the sugar cones. This double-layer helps maintain the cone’s structure and prevents leaks.
- It’s time to layer the yogurt. Begin by filling each cone with 1 tablespoon of the red yogurt. Gently tap the cone on the counter to settle the yogurt and remove any air pockets.
- Follow with 2 tablespoons of the white yogurt, layering it on top of the red yogurt. Again, tap the cone gently.
- Finally, add 3 tablespoons of the blue yogurt to each cone, filling it to the top. Level the surface with the back of a spoon.
- Carefully insert a popsicle stick into the center of each cone, pushing it down through all three layers of yogurt. Ensure the stick is firmly in place so the popsicle can be easily held later.
- Place the cones in a freezer-safe container that will keep them upright. A cone box with six circles cut out is ideal, but you can also use a muffin tin or create a custom holder from cardboard.
- Freeze the popsicles until they are completely firm, which should take approximately 4 hours. The freezing time may vary depending on your freezer. They are ready when firm to the touch.
Expert Tips & Tricks
- For the most vibrant colors, use gel food coloring instead of liquid. Gel colors are more concentrated and won’t water down the yogurt as much.
- If you want a smoother texture, consider using Greek yogurt. It’s thicker and will result in a creamier popsicle.
- To prevent the wax paper liners from sticking to the popsicles, lightly spray them with cooking oil before inserting them into the cones.
- If you don’t have sugar cones, you can use small paper cups or popsicle molds. Adjust the layering amounts accordingly.
- For a fun twist, add a layer of fruit puree between the yogurt layers. Strawberry, blueberry, or raspberry puree would be delicious and add a burst of natural flavor.
- Want to go all-natural? Use fruit purees (like blended strawberries for red, and blueberries for blue) to color the yogurt and sweeten it naturally. Adjust the consistency by adding a touch of honey or maple syrup if needed.
Serving & Storage Suggestions
Serve these festive popsicles straight from the freezer for a refreshing treat on a hot summer day. They’re perfect for Fourth of July celebrations, picnics, or any occasion that calls for a little patriotic fun.
To store any leftover popsicles, wrap them individually in plastic wrap or place them in a freezer-safe bag. They will keep in the freezer for up to 2 weeks. However, for the best quality, it’s best to consume them within a week.
These popsicles are not suitable for leaving at room temperature for extended periods, as the yogurt will melt quickly.
Nutritional Information
| Nutrient | Amount per Serving | % Daily Value |
|---|---|---|
| Calories | 115 kcal | 6% |
| Total Fat | 4.4g | 6% |
| Saturated Fat | 2.6g | 13% |
| Cholesterol | 15.9mg | 5% |
| Sodium | 88.3mg | 3% |
| Total Carbohydrate | 14.1g | 4% |
| Dietary Fiber | 0.2g | 0% |
| Sugars | 8.3g | 33% |
| Protein | 5g | 10% |
Nutritional information is an estimate and may vary based on specific ingredients used.
Variations & Substitutions
- Dairy-Free: Use a plant-based yogurt such as coconut, almond, or soy yogurt. Make sure to choose a vanilla flavor.
- Lower Sugar: Opt for a plain yogurt and sweeten it with a sugar substitute like stevia or erythritol.
- Fruity Flavors: Add a teaspoon of vanilla extract, lemon zest, or a drop of almond extract to the yogurt for an extra layer of flavor.
- Adult Version: Add a splash of vodka or rum to the yogurt before freezing for an adult-friendly treat. (Please consume responsibly!)
FAQs (Frequently Asked Questions)
Q: Can I use different types of cones?
A: Absolutely! Waffle cones or cake cones can also be used. Just ensure that they are sturdy enough to hold the yogurt and stand upright in the freezer. You may need to adjust the wax paper lining accordingly.
Q: How do I prevent the popsicles from sticking to the cones?
A: The wax paper liners should prevent sticking, but a light spray of cooking oil on the wax paper can provide extra insurance.
Q: Can I make these ahead of time?
A: Yes, these popsicles can be made several days in advance. Just store them properly wrapped in the freezer.
Q: What if I don’t have popsicle sticks?
A: You can use wooden coffee stirrers or even plastic spoons as a substitute for popsicle sticks.
Q: My colors are bleeding together. What am I doing wrong?
A: Make sure each layer is partially frozen before adding the next. You can pop the cones into the freezer for 15-20 minutes between each layer to prevent bleeding.
Final Thoughts
These Red, White, and Blue Popsicles are more than just a dessert; they’re a symbol of summer, celebration, and shared joy. I encourage you to gather your family, get creative with the layering, and make a batch of these festive treats. They’re a perfect way to cool down on a hot day and create lasting memories. Don’t be afraid to experiment with different flavor combinations and variations – the possibilities are endless. And most importantly, have fun! Happy Fourth of July, and happy popsicle-making!