
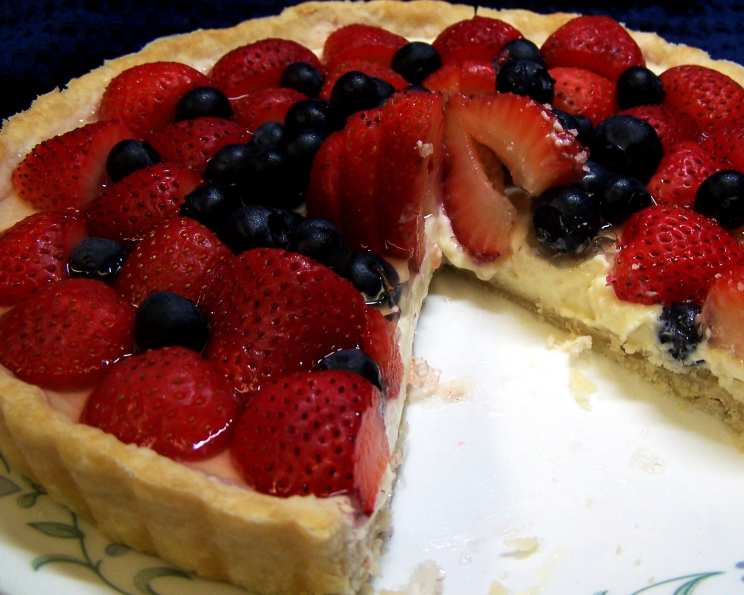
Red, White, and Blueberry Tart: A Slice of Summer
Every year, as the days grew longer and the fireflies began their nightly dance, my grandmother would start planning her Fourth of July feast. The centerpiece, without fail, was always her Red, White, and Blueberry Tart. I remember standing on a stool beside her, mesmerized as she carefully arranged the ruby-red strawberries and vibrant blueberries, creating a miniature edible flag. The sweet, tangy aroma filled the kitchen, a promise of summer celebrations and cherished family moments that I hold dear even today. This tart isn’t just a dessert; it’s a taste of nostalgia and a celebration of simple pleasures.
Recipe Overview
- Prep Time: 30 minutes
- Cook Time: 15 minutes
- Total Time: 1 hour 45 minutes (includes cooling and chilling)
- Servings: 6-8
- Yield: 1 tart
- Dietary Type: Reduced-Sugar
Ingredients
- 1 single pie crust (Premade or make your own.)
For the Filling:
- ½ cup Splenda granular
- 2 tablespoons cornstarch
- 1 pinch salt
- 1 cup reduced-fat milk
- 2 large eggs, lightly beaten
- 4 ounces neufchatel cheese, softened
- 1 teaspoon vanilla
For the Glaze:
- 1 teaspoon unflavored gelatin
- ½ cup water
- 1 ½ tablespoons Splenda granular
- 1 ½ tablespoons fresh lemon juice
- 1 pint fresh strawberries
- ½ – ¾ cup fresh blueberries
Equipment Needed
- 9-inch tart pan
- Foil
- Pie weights or dried beans
- Wire rack
- Heavy saucepan
- Whisk
- Mixing bowl
- Plastic wrap
Instructions
-
Prepare the crust: Preheat your oven to 425°F (220°C). Fit the pie crust into a 9-inch tart pan.
-
Trim and blind bake: Trim the edges of the crust to align with the top of the tart pan. Line the crust with foil and fill it with pie weights or dried beans. This prevents the crust from puffing up during baking.
-
Bake the crust: Bake for 10 minutes. Then, carefully remove the weights and foil. Continue baking for an additional 5 minutes, or until the crust is golden brown. Keep a close eye on it; you want it perfectly golden, not burnt.
-
Cool the crust: Remove the crust from the oven and place it on a wire rack to cool completely. This is essential for preventing a soggy bottom.
-
Make the custard: In a heavy saucepan, combine the ½ cup Splenda, 2 tablespoons cornstarch, salt, 1 cup milk, and 2 eggs. Use a whisk to ensure the mixture is smooth and free of lumps.
-
Cook the filling: Over medium heat, bring the mixture to a boil, stirring constantly. Once it boils, reduce the heat to low and cook for 1 minute, or until the mixture thickens into a custard. Constant stirring is key to prevent scorching.
-
Incorporate the cheese: In a separate mixing bowl, beat the 4 ounces of neufchatel cheese until it’s light and fluffy. This will give the filling a smooth, creamy texture. Gradually add the hot custard mixture to the beaten neufchatel cheese, beating until well blended.
-
Add vanilla: Stir in the 1 teaspoon of vanilla extract. This enhances the flavor and adds a touch of warmth to the filling.
-
Fill the tart: Spoon the filling into the cooled tart shell.
-
Cool the filling: Lightly press plastic wrap directly onto the surface of the filling. This prevents a skin from forming as it cools. Allow the tart to cool completely at room temperature.
-
Prepare the glaze: While the filling is cooling, sprinkle the 1 teaspoon of gelatin over ½ cup cold water in a small saucepan. Stir and let it stand for 1 minute. This allows the gelatin to bloom, ensuring a smooth glaze.
-
Dissolve and cook: Stir in the 1 ½ tablespoons Splenda and 1 ½ tablespoons lemon juice. Bring the mixture to a boil over medium heat, stirring until the gelatin dissolves completely. The lemon juice adds a bright, tangy note that complements the sweetness.
-
Cool the glaze: Allow the glaze mixture to cool to room temperature. It should thicken slightly but remain pourable.
-
Arrange the berries: Cut the 1 pint of strawberries in half and arrange them in 2 rows from the outside of the tart inward. Spoon the ½ – ¾ cup blueberries into the center of the tart. Get creative with your arrangement for a visually stunning presentation.
-
Glaze the tart: Lightly spoon the cooled glaze over the berries, ensuring they are evenly coated.
-
Chill and serve: Chill the tart for a minimum of 1 hour before serving. This allows the glaze to set completely and the flavors to meld together.
Expert Tips & Tricks
- Preventing a Soggy Crust: Ensure the crust is fully cooled before adding the filling. Also, lightly brush the cooled crust with melted white chocolate before adding the filling to create a moisture barrier.
- Creamy Filling: For an extra smooth and creamy filling, use full-fat cream cheese instead of neufchatel.
- Glaze Consistency: If the glaze becomes too thick while cooling, gently reheat it over low heat until it thins out again. Be careful not to overheat it.
- Berry Selection: Choose berries that are firm, ripe, and blemish-free. The quality of the berries will significantly impact the final flavor of the tart.
Serving & Storage Suggestions
Serve the Red, White, and Blueberry Tart chilled, ideally within 24 hours of assembly for the best flavor and texture. A dollop of whipped cream or a scoop of vanilla ice cream makes a delightful accompaniment.
Store any leftover tart in the refrigerator, covered, for up to 3 days. The crust may soften slightly over time, but the flavor will remain delicious. Freezing is not recommended, as the texture of the berries and crust will be compromised upon thawing.
Nutritional Information
| Nutrient | Amount per Serving | % Daily Value |
|---|---|---|
| Calories | 285.9 kcal | N/A |
| Calories from Fat | 153 g | 54% |
| Total Fat | 17.1 g | 26% |
| Saturated Fat | 6.3 g | 31% |
| Cholesterol | 88.1 mg | 29% |
| Sodium | 299.3 mg | 12% |
| Total Carbohydrate | 25.4 g | 8% |
| Dietary Fiber | 2.6 g | 10% |
| Sugars | 6.4 g | 25% |
| Protein | 8 g | 16% |
Note: Nutritional information is an estimate and may vary based on specific ingredients and portion sizes.
Variations & Substitutions
- Gluten-Free: Use a gluten-free pie crust for a gluten-free version of this tart. There are many excellent premade options available.
- Dairy-Free: Substitute the neufchatel cheese with a dairy-free cream cheese alternative. Use your favorite non-dairy milk in the filling.
- Berry Medley: Feel free to experiment with different berries, such as raspberries, blackberries, or mixed berry blends. Adjust the quantities as needed.
- Citrus Zest: Add a teaspoon of lemon or orange zest to the filling for a brighter, more aromatic flavor.
FAQs (Frequently Asked Questions)
Q: Can I make the tart crust ahead of time?
A: Absolutely! The crust can be baked and cooled up to 2 days in advance. Store it in an airtight container at room temperature.
Q: Can I use frozen berries?
A: While fresh berries are ideal, frozen berries can be used in a pinch. Thaw them completely and pat them dry before arranging them on the tart to prevent a soggy filling.
Q: How do I prevent the custard from curdling?
A: Constant stirring over medium heat and avoiding high temperatures will prevent the custard from curdling. If it does curdle slightly, whisk vigorously to smooth it out.
Q: Can I use a different sweetener?
A: While this recipe uses Splenda, you can substitute it with your preferred granulated sweetener. Keep in mind that the sweetness level may vary, so adjust accordingly.
Q: How long does the glaze take to set?
A: The glaze typically sets within 1 hour in the refrigerator. However, it’s best to chill the tart for at least 2 hours to ensure the glaze is firm and the flavors have melded together.
Final Thoughts
This Red, White, and Blueberry Tart is more than just a dessert; it’s a celebration on a plate. The bright, tangy flavors, the creamy filling, and the beautiful presentation make it a showstopper for any occasion. Don’t be intimidated by the steps – each one is simple and straightforward. I encourage you to try this recipe, put your own creative spin on it, and share it with loved ones. And perhaps, like me, you’ll create a few cherished memories along the way. Enjoy!