
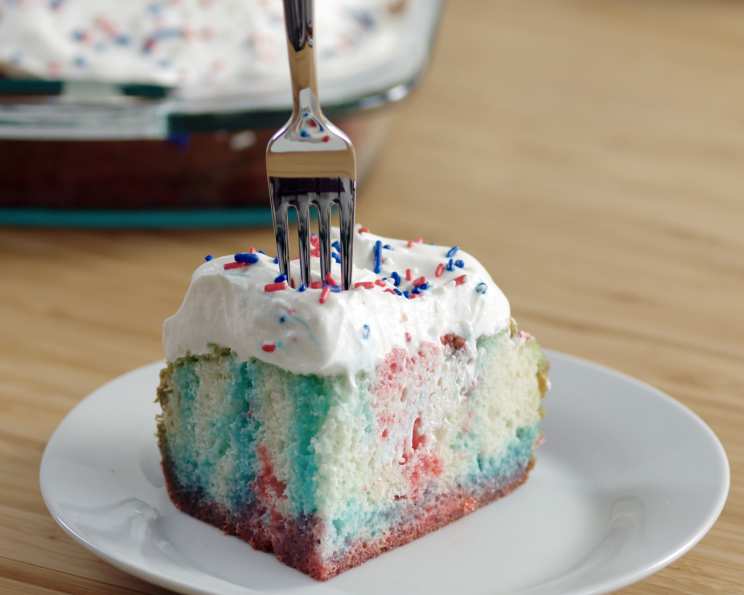
Red, White & Blue Poke Cake: A Star-Spangled Celebration on a Plate
I can still picture it: Fourth of July picnics at my grandmother’s house, the smell of charcoal grills and freshly mowed grass hanging in the air. After the fireworks faded, the grand finale was always dessert. While store-bought pies were often present, Grandma’s poke cake, studded with festive colors, always held a special place. It wasn’t just the vibrant hues; it was the light, airy texture soaked in sweet, fruity goodness. It was pure, unadulterated summer joy, a reminder of simpler times and shared laughter. Now, I carry on that tradition, bringing this simple, yet spectacular, dessert to my own family gatherings, ensuring those sweet memories live on.
Recipe Overview
- Prep Time: 20 minutes
- Chill Time: 4 hours
- Total Time: 4 hours 20 minutes
- Servings: 12-18
- Yield: 1 Poke Cake
- Dietary Type: Not Gluten-Free (can be adapted, see variations below)
Ingredients
- 1 (18 ounce) box white cake mix
- 1 (3 ounce) package cherry gelatin
- 1 (3 ounce) package blue raspberry gelatin
- 1 1/2 cups boiling water, divided
- 1 cup ice water, divided
- 2 cups heavy cream
- 1 tablespoon sour cream
- 2 tablespoons confectioners’ sugar
- 1/2 teaspoon vanilla extract
- 1/4 cup red, white, and blue candy sprinkles
Equipment Needed
- 9×13 inch baking pan
- Chopstick or skewer
- Two medium-sized bowls
- Measuring cups
- Electric mixer (handheld or stand mixer)
Instructions
- Begin by preparing the white cake mix according to the package instructions. This usually involves combining the mix with eggs, oil, and water, then baking in a 9×13 inch pan.
- Bake the cake as directed on the box. Typically, this will be around 30-35 minutes at 350°F (175°C), but always refer to the instructions on your specific cake mix. A toothpick inserted into the center should come out clean when it’s done.
- Once the cake is baked, allow it to cool for about 10 minutes. This is crucial so that the hot cake doesn’t melt the gelatin mixture later on.
- While the cake is cooling, prepare the gelatin. In two separate medium-sized bowls, combine each package of gelatin (the cherry and the blue raspberry) with ¾ cup of boiling water.
- Stir each mixture thoroughly until the gelatin is completely dissolved. This is essential to prevent any grainy texture in the final cake.
- Add ½ cup of ice water to each bowl of dissolved gelatin. The ice water helps to cool down the gelatin quickly, which is important for even absorption into the cake.
- Using a chopstick or skewer, poke holes all over the surface of the cooled cake. The more holes you poke, the more gelatin the cake will absorb, resulting in a more intensely flavored and colored cake.
- Now, the fun part! Use a measuring cup to carefully pour each gelatin mixture into alternating straight lines across the cake. Start with one color and pour a line, then switch to the other color and pour the next line, continuing until the entire cake is covered.
- Pour the gelatin slowly, allowing the cake to absorb the mixture completely. This might take a few minutes, so be patient. You want the gelatin to seep into every hole and crevice.
- Once all the gelatin has been poured, cover the cake and chill it in the refrigerator for at least 4 hours, or preferably overnight. This allows the gelatin to set completely, resulting in a moist and flavorful cake.
- When the cake is fully chilled, it’s time to make the whipped cream topping. In a cold bowl (chilling the bowl helps the cream whip up faster and hold its shape better), using a hand mixer on medium speed, beat the heavy cream, sour cream, confectioners’ sugar, and vanilla extract until medium peaks form.
- Spread the whipped cream evenly over the chilled cake.
- Finally, sprinkle the red, white, and blue candy sprinkles generously over the whipped cream.
- Cut the cake into squares and serve immediately.
Expert Tips & Tricks
- For an even more intense flavor, use flavored vodka (cherry or raspberry) in place of some of the ice water in the gelatin mixture. Be mindful of serving to children, of course.
- If you’re short on time, you can use store-bought whipped cream, but homemade always tastes better!
- The sour cream in the whipped cream stabilizes it, helping it hold its shape for longer. This is especially useful if you’re making the cake ahead of time.
- Make sure the cake is completely cooled before pouring the gelatin mixture over it. If the cake is too warm, the gelatin will melt and not set properly.
- To prevent the sprinkles from bleeding their color into the whipped cream, apply them just before serving.
Serving & Storage Suggestions
Serve the Red, White & Blue Poke Cake chilled for the best taste and texture. It’s the perfect centerpiece for any summer celebration.
Leftovers can be stored in the refrigerator for up to 3 days. Cover the cake tightly to prevent the whipped cream from drying out. The cake is best eaten within this timeframe, as the whipped cream may start to weep slightly after a couple of days. While freezing is not recommended due to the whipped cream‘s texture changing upon thawing, the cake itself will remain safe to eat.
Nutritional Information
| Nutrient | Amount per Serving | % Daily Value |
|---|---|---|
| Calories | 350.5 kcal | N/A |
| Calories from Fat | 175g | 50% |
| Total Fat | 19.6 g | 30% |
| Saturated Fat | 10 g | 49% |
| Cholesterol | 54.9 mg | 18% |
| Sodium | 315.7 mg | 13% |
| Total Carbohydrate | 35.9 g | 11% |
| Dietary Fiber | 0.4 g | 1% |
| Sugars | 24.8 g | 99% |
| Protein | 8.8 g | 17% |
Note: Nutritional information is an estimate and may vary based on specific ingredients and serving sizes.
Variations & Substitutions
- Gluten-Free: Use a gluten-free white cake mix. Ensure the sprinkles and gelatin are also certified gluten-free.
- Dairy-Free: Substitute the heavy cream with a plant-based whipping cream alternative, such as coconut cream or almond-based whipping cream. Omit the sour cream or replace it with a dairy-free alternative.
- Flavor Variations: Experiment with different gelatin flavors to customize the cake to your liking. Lemon, lime, or orange gelatin would also be delicious. Consider adding a layer of fruit filling (like sliced strawberries or blueberries) before topping with the whipped cream.
- Seasonal Twist: For a fall-themed poke cake, use a spice cake mix and apple or pumpkin spice gelatin.
FAQs (Frequently Asked Questions)
Q: Can I make this cake ahead of time?
A: Yes, you can prepare the cake and gelatin layers up to 2 days in advance. However, it’s best to add the whipped cream and sprinkles just before serving to prevent the whipped cream from weeping.
Q: What if I don’t have sour cream?
A: The sour cream helps stabilize the whipped cream, but you can omit it if you don’t have any on hand. Just be aware that the whipped cream might not hold its shape for as long.
Q: Can I use a different size pan?
A: While a 9×13 inch pan is ideal, you can use a slightly smaller or larger pan. Keep in mind that the baking time and the thickness of the cake layers will vary accordingly.
Q: Why is my gelatin not setting?
A: Ensure you are using the correct ratio of boiling water to gelatin, and that you’re adding ice water to help cool the mixture. Also, make sure the cake is completely cooled before pouring the gelatin over it. Finally, ensure you chill the cake for the recommended time.
Q: Can I use sugar-free gelatin?
A: Yes, you can use sugar-free gelatin for a lower-sugar version of this cake. Just be aware that the flavor might be slightly different.
Final Thoughts
This Red, White & Blue Poke Cake is more than just a dessert; it’s a celebration of flavor, color, and tradition. It’s a guaranteed crowd-pleaser that’s surprisingly simple to make. So, gather your ingredients, preheat your oven, and get ready to create a star-spangled masterpiece that will bring smiles to faces and sweet memories to hearts. Don’t hesitate to experiment with variations to make it your own and please feel free to share your experiences! Pair it with a refreshing glass of iced tea or lemonade for the ultimate summer treat. Happy baking!