
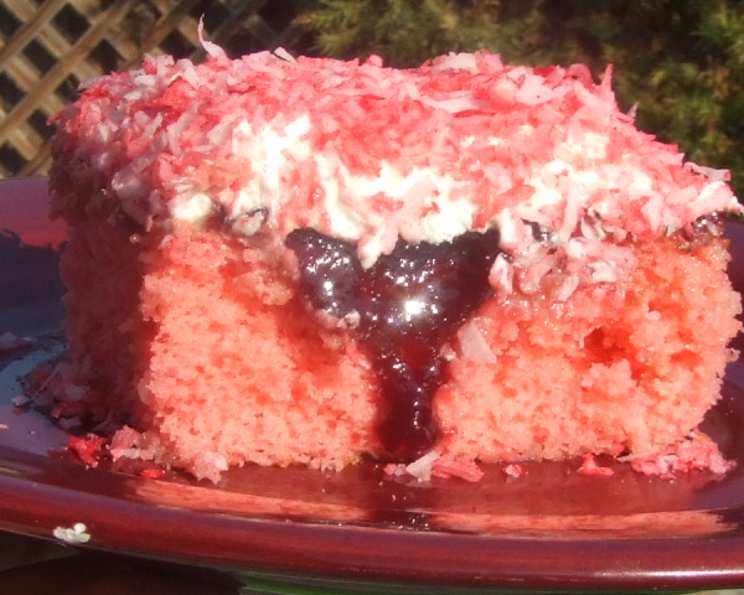
Red Zinger Cake: A Nostalgic Treat Reimagined
The scent of raspberry always transports me back to my grandmother’s kitchen. She wasn’t much of a baker, preferring simple, comforting dishes. But on special occasions, she’d pull out a box of cake mix and transform it into something magical with a few clever additions. I remember the bright pink hue of the cake and the sweet, tangy flavor that lingered on my tongue. It was pure, unadulterated joy in every bite, and this Red Zinger Cake captures that feeling perfectly.
Recipe Overview
- Prep Time: 15 minutes
- Cook Time: 30 minutes
- Total Time: 45 minutes
- Servings: 12
- Yield: 1 cake
- Dietary Type: Not specified
Ingredients
- 1 (18 1/4 ounce) box golden vanilla cake mix
- 1 1/4 cups water
- 1/2 cup vegetable oil
- 3 eggs
- 2 tablespoons raspberry gelatin powder
- 14 ounces sweetened condensed milk (Eagle brand)
- 1 cup seedless raspberry jam
- 1 (8 ounce) container Cool Whip
- 1 cup shredded coconut
- 1 tablespoon Chambord raspberry liquor (optional)
Equipment Needed
- 13×9 inch baking pan
- Large mixing bowl
- Electric mixer
- Fork
- Measuring cups and spoons
Instructions
-
Preheat your oven to 350°F (175°C). Grease the bottom only of a 13×9 inch baking pan.
-
Prepare the cake batter. In a large bowl, combine the golden vanilla cake mix, water, vegetable oil, and eggs. Beat on low speed for 30 seconds, then increase to medium speed and beat for 2 minutes. This ensures the batter is well combined and aerated.
-
Stir in the raspberry gelatin powder. Gently fold the powder into the batter until it is evenly distributed, giving the cake its signature flavor and color.
-
Pour the batter into the prepared 13×9 inch pan, spreading it evenly.
-
Bake for approximately 30 minutes, or until the cake is golden brown and a toothpick inserted into the center comes out clean. Keep a close eye on the cake, as baking times may vary depending on your oven. Follow the baking time indicated on your cake box as a guide.
-
Remove the cake from the oven. While the cake is still hot, immediately poke holes all over the top with a fork. This is crucial for allowing the sweetened condensed milk to soak into the cake.
-
Pour the sweetened condensed milk evenly over the top of the cake, ensuring it seeps into all the holes.
-
Spread the seedless raspberry jam over the condensed milk layer. For an extra burst of flavor, you can optionally add 1 tablespoon of Chambord raspberry liqueur to the jam before spreading. This adds a subtle depth and complexity to the raspberry flavor.
-
Let the cake cool completely. This is an important step, as it allows the flavors to meld together and the cake to firm up.
-
Once the cake is completely cool, top it with Cool Whip, spreading it evenly over the raspberry jam.
-
Finally, sprinkle the shredded coconut evenly over the Cool Whip.
-
Slice and serve!
Expert Tips & Tricks
- For a richer flavor, use a high-quality raspberry jam. Seedless is recommended for a smoother texture.
- If you don’t have Chambord, you can substitute with another raspberry-flavored liqueur or simply omit it.
- To prevent the coconut from browning too quickly in the oven, you can toast it lightly in a dry skillet before sprinkling it on top of the cake. This will enhance its flavor and texture.
- If you want to make the cake ahead of time, you can bake the cake, poke the holes, and pour the sweetened condensed milk over it. Cover and refrigerate overnight. Add the raspberry jam, Cool Whip, and coconut just before serving.
Serving & Storage Suggestions
This Red Zinger Cake is best served chilled. Cut it into squares and arrange them on a platter. The bright pink hue and fluffy white topping make it a visually appealing dessert.
Leftovers should be stored in an airtight container in the refrigerator. The cake will stay fresh for up to 3 days. Freezing is not recommended, as the Cool Whip may become watery upon thawing.
Nutritional Information
| Nutrient | Amount per Serving | % Daily Value |
|---|---|---|
| Calories | 564 kcal | N/A |
| Calories from Fat | 231 g | 41% |
| Total Fat | 25.7 g | 39% |
| Saturated Fat | 10.7 g | 53% |
| Cholesterol | 58.6 mg | 19% |
| Sodium | 377.8 mg | 15% |
| Total Carbohydrate | 78.2 g | 26% |
| Dietary Fiber | 1.1 g | 4% |
| Sugars | 57.4 g | 229% |
| Protein | 6.6 g | 13% |
Note: Nutritional information is an estimate and may vary based on specific ingredients and serving sizes.
Variations & Substitutions
- Gluten-Free: Use a gluten-free vanilla cake mix and ensure the raspberry gelatin powder is also gluten-free.
- Dairy-Free: Substitute the sweetened condensed milk with a dairy-free alternative, such as sweetened condensed coconut milk. Use a dairy-free whipped topping instead of Cool Whip.
- Different Flavors: Experiment with different flavors of gelatin powder, such as strawberry or cherry, to create unique variations of the cake. You can also use a different flavor of jam to complement the gelatin powder.
- Coconut Variation: Toast the coconut for a deeper flavor and richer color before sprinkling it on top.
FAQs (Frequently Asked Questions)
Q: Can I use a different size baking pan?
A: While a 13×9 inch pan is recommended, you can use a different size pan, but the baking time may need to be adjusted accordingly. A smaller pan will result in a thicker cake and may require a longer baking time.
Q: Can I make this cake without the gelatin powder?
A: The gelatin powder adds flavor and color to the cake, but it can be omitted if desired. However, the cake will not have the same vibrant pink hue or raspberry flavor.
Q: How do I prevent the cake from sticking to the pan?
A: Grease the bottom of the pan thoroughly with butter or cooking spray. You can also line the bottom of the pan with parchment paper for easy removal.
Q: Can I use fresh raspberries instead of raspberry jam?
A: Fresh raspberries can be used, but they will release moisture and may make the cake soggy. It is recommended to use raspberry jam for the best results.
Q: Why do I need to poke holes in the cake after baking?
A: Poking holes in the cake allows the sweetened condensed milk to soak into the cake, creating a moist and flavorful dessert. This step is essential for achieving the signature texture of Red Zinger Cake.
Final Thoughts
This Red Zinger Cake is more than just a dessert; it’s a trip down memory lane. It’s a reminder of simpler times, of home-baked goodness, and of the joy of sharing a sweet treat with loved ones. I encourage you to try this recipe and experience the magic for yourself. Don’t be afraid to experiment with different flavors and variations to create your own unique version. And most importantly, share it with someone you care about and spread the joy!