
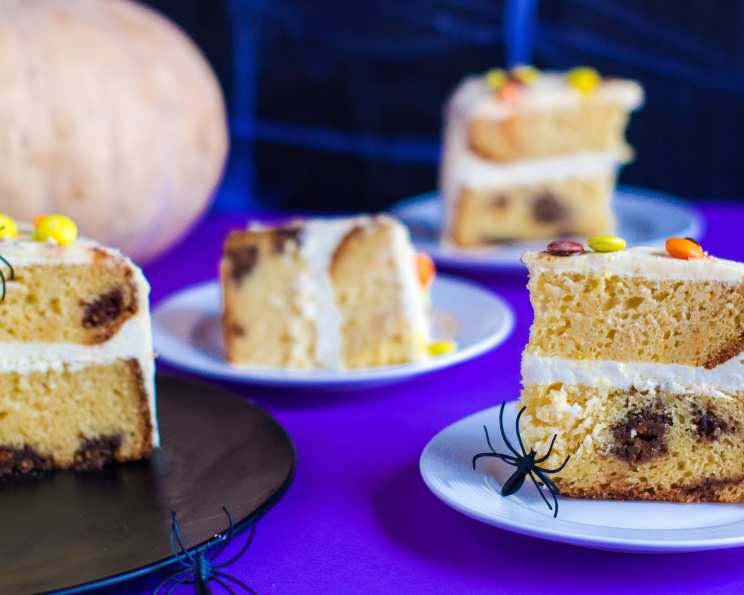
Reese’s Peanut Butter Cup Cake: Use Up That Halloween Candy!
I still remember the sheer, unadulterated joy of Halloween as a child. Not just the costumes, the spooky decorations, or the neighborhood camaraderie, but the overflowing pillowcases of candy. The real treasure was always the Reese’s Peanut Butter Cups – that perfect balance of salty peanut butter and smooth chocolate. I’d strategically ration them out for weeks, making them last as long as possible, but inevitably, there were always a few lurking at the bottom of the bag, almost forgotten. This cake is my grown-up solution to that very happy “problem,” transforming those leftover Reese’s into a truly decadent treat.
Recipe Overview
- Prep Time: 15 minutes
- Cook Time: 45-50 minutes
- Total Time: 60-65 minutes
- Servings: 24
- Yield: 24 pieces of cake
- Dietary Type: Not specified
Ingredients
For the Cake:
- 1 (18 1/4 ounce) box yellow cake mix
- 3 eggs (or as called for by your cake mix)
- 1/3 cup oil (or as called for by your cake mix)
- 1 1/3 cups water (or as called for by your cake mix)
- 1/4 cup water, extra water
- 1 (3 1/2 ounce) package instant vanilla pudding, the small box
- 10 Reese’s Peanut Butter cups, broken into chunks
For the Frosting:
- 1 (1 lb) box powdered sugar
- 1 (8 ounce) package cream cheese
- 1 (8 ounce) container Cool Whip
- 1 cup Reese’s Pieces
Equipment Needed
- Baking pan (size depends on cake mix directions)
- Non-stick cooking spray
- Mixing bowls
- Electric mixer
- Spatula
Instructions
- Begin by preheating your oven to 350 degrees Fahrenheit.
- Prepare your baking pan by spraying it generously with nonstick cooking spray. This ensures your cake releases cleanly after baking. The specific pan size will depend on the instructions provided on your yellow cake mix box, so be sure to check those for guidance.
- In a large mixing bowl, combine the dry yellow cake mix, eggs, oil, and water. Follow the instructions on the cake mix box for specific mixing times and speeds.
- Add the 1/4 cup of extra water to the cake batter. This addition contributes to a moister crumb.
- Now, incorporate the package of instant vanilla pudding mix into the batter. This adds extra flavor and helps to create a softer, more tender cake.
- Fold in the broken Reese’s Peanut Butter cup chunks. Distribute them evenly throughout the batter, ensuring that every slice will have a delicious peanut butter cup surprise.
- Pour the batter into your prepared baking pan.
- Bake at 350 degrees Fahrenheit for 45-50 minutes, or until a wooden skewer inserted into the center comes out clean. Be mindful of your oven, as baking times can vary.
- Once the cake is baked, remove it from the oven and allow it to cool completely in the pan before frosting. This is crucial, as frosting a warm cake will cause it to melt and become messy.
- While the cake cools, prepare the frosting. In a separate mixing bowl, combine the powdered sugar, cream cheese, and Cool Whip. Use an electric mixer to blend these ingredients together until smooth and creamy.
- Once the cake is completely cooled, spread the frosting evenly over the top.
- Finally, sprinkle the Reese’s Pieces generously over the frosted cake.
Expert Tips & Tricks
- For an even richer peanut butter flavor, consider using a peanut butter-flavored cake mix instead of yellow cake mix.
- If you don’t have Cool Whip on hand, you can substitute it with whipped cream. Just be sure to use a stable whipped cream recipe that will hold its shape well.
- To prevent the Reese’s Pieces from sinking into the frosting, chill the frosted cake in the refrigerator for about 30 minutes before adding them. This will help the frosting to set slightly.
- If you are short on time, a store-bought frosting can be used. Opt for vanilla or chocolate frosting and stir in a few tablespoons of peanut butter for an added boost of flavor.
Serving & Storage Suggestions
This Reese’s Peanut Butter Cup Cake is best served slightly chilled, but it can also be enjoyed at room temperature. For an extra decadent treat, serve it with a scoop of vanilla ice cream or a dollop of whipped cream.
To store leftovers, cover the cake tightly with plastic wrap or place it in an airtight container. It will keep at room temperature for up to 2 days, or in the refrigerator for up to 5 days. For longer storage, you can freeze the cake for up to 2 months. Thaw it in the refrigerator overnight before serving.
Nutritional Information
| Nutrient | Amount per Serving | % Daily Value |
|---|---|---|
| Calories | 326.9 kcal | N/A |
| Calories from Fat | 127 g | 39% |
| Total Fat | 14.2 g | 21% |
| Saturated Fat | 6.3 g | 31% |
| Cholesterol | 34.2 mg | 11% |
| Sodium | 264.3 mg | 11% |
| Total Carbohydrate | 47.7 g | 15% |
| Dietary Fiber | 0.5 g | 2% |
| Sugars | 39 g | 156% |
| Protein | 3.5 g | 7% |
Note: Nutritional information is an estimate and may vary based on specific ingredients and portion sizes.
Variations & Substitutions
- Chocolate Lover’s Dream: Use a chocolate cake mix instead of yellow, and add chocolate chips to the batter along with the Reese’s cups.
- Peanut Butter Overload: Stir a cup of peanut butter chips into the batter and drizzle melted peanut butter over the frosted cake.
- Caramel Swirl: Add a swirl of caramel sauce to the top of the cake before baking for a sweet and salty twist.
- Gluten-Free Option: Substitute the yellow cake mix with a gluten-free cake mix and ensure all other ingredients are also gluten-free.
FAQs (Frequently Asked Questions)
Q: Can I use a different size baking pan?
A: Yes, but you may need to adjust the baking time accordingly. A larger pan will result in a thinner cake that will bake faster, while a smaller pan will require a longer baking time.
Q: Can I make this cake ahead of time?
A: Absolutely! The cake can be baked a day or two in advance and stored, well-wrapped, at room temperature. Frost it just before serving.
Q: What can I do if my frosting is too thick?
A: Add a tablespoon or two of milk or cream to thin it out. Mix well until you reach your desired consistency.
Q: Can I use regular pudding instead of instant pudding?
A: No, instant pudding is required for this recipe. Regular pudding will not provide the same thickening effect and may result in a soggy cake.
Q: How do I prevent the cake from sticking to the pan?
A: Be sure to generously grease and flour your baking pan before adding the batter. Alternatively, you can use a baking spray that contains flour.
Final Thoughts
So, there you have it – the perfect way to transform that post-Halloween candy stash into a show-stopping dessert. This Reese’s Peanut Butter Cup Cake is a crowd-pleaser, guaranteed to bring a smile to everyone’s face. Don’t be afraid to get creative with variations and substitutions to make it your own. I encourage you to bake up a batch and share your delicious creation with friends and family. And, most importantly, have fun! Please let me know how this recipe turned out for you!