
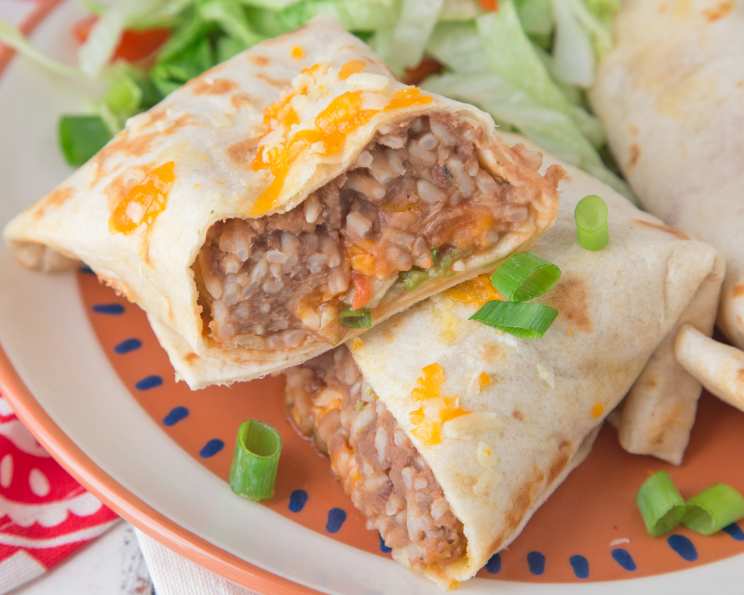
Refried Bean Burritos: A Taste of Home
My abuela, bless her heart, wasn’t one for fancy cuisine. Her kitchen was a realm of simple, honest flavors, where love was the secret ingredient in every dish. I remember as a child, the aroma of simmering beans would fill her tiny apartment, a promise of the warm, comforting refried bean burritos we’d devour, crammed around her kitchen table, laughter echoing through the air. They weren’t gourmet, but those burritos were a symphony of love, family, and simple joy that still resonate with me today, a comforting taste of home. These burritos are my modern homage to that memory, a faster, customizable way to share that feeling with my own family.
Recipe Overview
- Prep Time: 10 minutes
- Cook Time: 10 minutes
- Total Time: 20 minutes
- Servings: 5
- Yield: 5 burritos
- Dietary Type: Vegetarian (easily made vegan)
Ingredients
For the Filling:
- 1 (14 ounce) can refried beans (I prefer fat free)
- 1 teaspoon chili powder or 1 teaspoon ground dried chile
- ½ teaspoon ground cumin
- ½ teaspoon dried oregano
- 3-5 dashes garlic powder
- Hot sauce, to taste
- 1 cup hot cooked rice (optional)
- 8 ounces cheddar cheese or 8 ounces Monterey Jack pepper cheese, shredded or thinly sliced (I use low fat)
- Your favorite salsa
To Assemble:
- 1 package flour tortillas (10-inch)
Toppings (Optional):
- Chopped tomato
- Shredded lettuce
- Sliced black olives
- Sliced scallion
- Sliced jalapeno
- Sour cream
- Guacamole
Equipment Needed
- Microwave-safe dish or saucepan
- Skillet (optional)
Instructions
-
Prepare the Bean Mixture: Place the refried beans in a microwave-safe dish. Stir in the chili powder (or ground dried chile), ground cumin, dried oregano, garlic powder, and hot sauce.
-
Heat the Bean Mixture: Heat the bean mixture in the microwave on medium power for about 3 minutes, stirring halfway through to ensure even heating. Alternatively, heat over low heat on the stovetop until warmed through. If the mixture becomes too thick, add a tablespoon or two of water to reach your desired consistency.
-
Incorporate Rice (Optional): If you’re using it, mix the hot cooked rice into the heated bean mixture. Stir until well combined.
-
Warm the Tortillas: While the bean mixture is heating, prepare your flour tortillas. There are several methods for warming tortillas to make them pliable and prevent tearing. My preferred method is to heat them one at a time in a dry skillet over medium heat for about 20-30 seconds per side, or just until they become soft and easily foldable. You can also wrap them in a damp paper towel and microwave for 30 seconds.
-
Assemble the Burritos: Lay a warm tortilla flat. Place about 1/3 cup of the bean mixture in the center of the tortilla. Top with shredded cheese, your favorite salsa, and any desired toppings such as chopped tomato, shredded lettuce, sliced black olives, sliced scallion, or sliced jalapeno.
-
Roll the Burritos: Fold in the sides of the tortilla and then tightly roll it up from the bottom.
-
Bake for a Crisper Burrito (Optional): If you prefer a firmer or crispier burrito, place the assembled burritos on a baking sheet and bake in a preheated oven at 350 degrees Fahrenheit for 10-15 minutes, or until lightly golden and crispy. I often skip this step when I’m short on time, but it does add a nice textural element.
-
Serve: Serve immediately with your favorite toppings like sour cream and guacamole.
Expert Tips & Tricks
- Spice it Up: Adjust the amount of chili powder and hot sauce to your desired level of spiciness. For a smoky flavor, try adding a pinch of smoked paprika to the bean mixture.
- Prevent Soggy Burritos: To prevent soggy burritos, avoid overfilling them with too much wet filling. Also, make sure your tortillas are warm and pliable before rolling.
- Cheese Placement: For optimal melting, place the cheese directly on top of the warm bean mixture before adding other toppings.
- Make-Ahead Tip: The bean mixture can be made ahead of time and stored in the refrigerator for up to 3 days. Simply reheat before assembling the burritos. You can also assemble the burritos ahead of time and store them in the refrigerator for a quick and easy meal.
- Homemade Tortillas: For the best flavor and texture, consider making your own homemade flour tortillas. While it requires a bit more effort, the results are well worth it.
- Rice Variation: Try using brown rice or quinoa instead of white rice for a healthier option. Cilantro-lime rice also adds a delicious burst of flavor.
Serving & Storage Suggestions
Serve the refried bean burritos hot, immediately after assembling (or baking, if you choose to bake them). Offer a variety of toppings so everyone can customize their own burrito. Sour cream, guacamole, extra salsa, chopped tomatoes, lettuce, olives, and jalapenos are all great choices.
Leftover burritos can be stored in the refrigerator for up to 3 days. To reheat, wrap the burrito in a damp paper towel and microwave for 1-2 minutes, or until heated through. You can also reheat them in a skillet over medium heat, flipping occasionally, until heated through and slightly crispy. I find that the microwave can sometimes make the tortillas a bit soft, so the skillet method is generally preferable. I recommend adding sour cream after reheating, rather than before, to maintain its texture. While I haven’t tested it, others have reported successfully freezing these burritos. If freezing, wrap them tightly in plastic wrap and then in a freezer bag. Thaw overnight in the refrigerator before reheating.
Nutritional Information
| Nutrient | Amount per Serving | % Daily Value |
|---|---|---|
| Calories | 546.5 kcal | N/A |
| Calories from Fat | 209 g | 38% |
| Total Fat | 23.2 g | 35% |
| Saturated Fat | 11.7 g | 58% |
| Cholesterol | 47.7 mg | 15% |
| Sodium | 1233.2 mg | 51% |
| Total Carbohydrate | 60.7 g | 20% |
| Dietary Fiber | 7.2 g | 28% |
| Sugars | 2.4 g | 9% |
| Protein | 23.4 g | 46% |
Note: Nutritional information is an estimate and can vary based on specific ingredients and portion sizes.
Variations & Substitutions
- Vegan Burritos: To make these burritos vegan, simply omit the cheese or substitute with a vegan cheese alternative. Use a vegan sour cream alternative for topping. Ensure your tortillas are vegan-friendly as some may contain lard.
- Gluten-Free Burritos: Use gluten-free tortillas to make this recipe gluten-free.
- Different Beans: Experiment with different types of beans, such as black beans or pinto beans, for a different flavor profile.
- Add Veggies: Sauté some onions, bell peppers, and zucchini to add extra vegetables to the filling.
- Spicy Bean Dip Burritos: Instead of individual spices, use a spicy bean dip as the base for your filling.
- Breakfast Burritos: Scramble some eggs and add them to the burrito along with bacon or sausage for a hearty breakfast burrito.
FAQs (Frequently Asked Questions)
Q: Can I use canned beans instead of refried beans?
A: While you can use canned beans, the texture will be different. If you do, mash them slightly before adding the spices and heating.
Q: How do I keep the burritos from falling apart?
A: Make sure to warm your tortillas before rolling them, as this will make them more pliable. Also, avoid overfilling the burritos.
Q: Can I make these ahead of time?
A: Yes, you can assemble the burritos ahead of time and store them in the refrigerator for a quick and easy meal. You can also make the bean mixture ahead and store it separately.
Q: What’s the best way to reheat these burritos?
A: Microwaving is quickest, but a skillet provides better texture. Wrap in a damp paper towel for the microwave.
Q: Can I freeze these burritos?
A: Yes, wrap them tightly in plastic wrap and then in a freezer bag. Thaw overnight in the refrigerator before reheating.
Final Thoughts
These Refried Bean Burritos are a testament to the fact that delicious food doesn’t have to be complicated. They’re quick, easy, customizable, and packed with flavor. Whether you’re looking for a simple weeknight meal, a satisfying lunch, or a taste of home, these burritos are sure to hit the spot. Don’t be afraid to experiment with different toppings and variations to create your own signature burrito. I hope you enjoy making and eating them as much as I do! Let me know in the comments what variations you tried, and what toppings you added!