
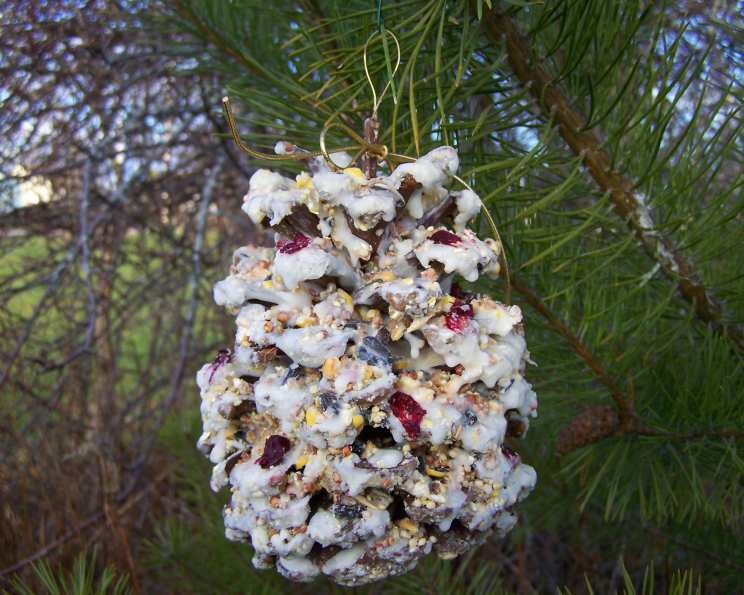
Rendering Beef Fat for Suet Cakes and Cones: A Bird-Lover’s Delight
I can still remember the delight of my grandmother’s garden, not just for the flowers and vegetables, but for the flurry of birds it attracted. Every winter, she’d spend an afternoon in the kitchen, a mysterious alchemy of melting and stirring, transforming simple ingredients into something magical for her feathered friends. The scent of warm fat and nutty seeds would fill the house, a promise of the vibrant activity that would soon grace her snowy backyard. That memory, of nurturing nature through simple, homemade offerings, is something I cherish and am happy to share with you.
Recipe Overview
- Prep Time: 30 minutes
- Cook Time: 40 minutes
- Total Time: 1 hour 10 minutes
- Yield: Approximately 12 cups rendered fat, yielding 14 cakes and 12 cones (yields will vary)
- Dietary Type: High Fat
Ingredients
For Rendering the Beef Suet:
- 2 lbs beef suet
For Peanut Butter Suet:
- 2 cups fat, rendered
- ½ cup peanut butter, crunchy
- ½ cup unsalted peanuts, chopped
- 2 cups mixed bird seed
For Fruit and Nut Suet:
- 2 ½ cups fat, rendered
- ½ cup unsalted peanuts, chopped
- ½ cup unsweetened dried cranberries, chopped
- ½ cup dried apple, chopped
- 2 ½ cups mixed bird seed
Equipment Needed
- Large Knife
- Heatproof (glass or ceramic) containers with lids or plates
- Glass measuring cups
- Thin wire or string
- Microwave
- Dairy containers (250ml, e.g., sour cream, cottage cheese) or pine cones
Instructions
- Begin by preparing the beef suet. It’s easiest to work with when it’s frozen, so keep it in the freezer until you’re ready to start.
- Using a large, sturdy knife, carefully cut the frozen raw suet into chunks. Aim for pieces that are roughly 1-2 inches in size.
- Place about 2 cups of these chunks into a heatproof (glass or ceramic) container. Cover the container with a lid or a dinner plate to prevent splattering.
- Microwave the covered container on HIGH for 5-8 minutes. Keep a close watch; the cooking time will depend on the power of your microwave. The goal is to melt the fat completely.
- Carefully pour or strain the liquid fat into another heatproof container (glass measuring cups work well). This separates the rendered fat from any remaining solid bits.
- Set aside the container of rendered fat.
- Repeat steps 3-6 until all of the raw suet has been processed.
- Discard the solid bits that remain after rendering. These are the impurities you want to eliminate. Now you should have several containers of beautifully rendered fat!
- At this point, you can either proceed immediately with making the suet cakes and cones or refrigerate the fat for later use. If refrigerating, allow the fat to solidify, then store in an airtight container for up to several weeks.
- If making suet cones: Prepare the pine cones by using lengths of thin wire or string to create a hanger. Starting at the base of the cone, weave the wire around the cone towards the top. Leave enough wire to form a loop, then weave back down to the base. Tie the wire to secure it.
- To make the suet cakes or cones, begin by melting the specified amount of rendered fat in the microwave. Heat in short intervals (30 seconds at a time) to prevent overheating and splattering.
- As the fat begins to cool, it will become cloudy and thicken. This is the ideal point to add the remaining ingredients for your chosen suet recipe (Peanut Butter Suet or Fruit and Nut Suet).
- Stir the mixture thoroughly to ensure all ingredients are evenly distributed in the rendered fat.
- While the mixture is still pliable, immediately press it into the molds (dairy containers) or pine cones. Pack it firmly to ensure a solid, well-formed suet treat.
- Place the filled molds or cones in the freezer for at least 30 minutes to allow them to harden completely.
- Once hardened, unmold the cakes and wrap them individually in waxed paper. The cones don’t need wrapping.
- These suet cakes and cones can now be stored indefinitely in the freezer until you’re ready to offer them to your feathered friends.
Expert Tips & Tricks
- Freezing is key: Freezing the raw suet before cutting makes the process much easier and cleaner.
- Double rendering: For an even harder and more heat-resistant suet, consider melting and cooling the rendered fat two or three times. Each melting/cooling process removes more impurities.
- Temperature matters: The “cloudy” stage of the cooling fat is critical for incorporating the other ingredients. If the fat is too hot, the seeds and nuts will sink to the bottom. If it’s too cold, the mixture will be difficult to work with.
- Customize your suet: Feel free to experiment with different combinations of seeds, nuts, and dried fruits. Sunflower seeds, millet, and chopped walnuts are all great additions.
- Avoid adding salt: Never add salt to bird food, as it can be harmful to birds.
- Molds: Think beyond dairy containers! Silicone molds, cookie cutters, and even muffin tins can be used to create fun and decorative suet cakes.
Serving & Storage Suggestions
Hang your suet cakes and cones in a shady spot in your yard or garden, away from direct sunlight. Direct sunlight will soften the suet, making it less appealing to birds.
Unused suet cakes and cones should be stored in the freezer for long-term preservation. They can be kept frozen indefinitely without significant loss of quality. If you prefer, you can store them in the refrigerator for up to a week.
Once hung outside, suet cakes and cones will last for varying lengths of time depending on the weather and the number of birds visiting your feeder. Monitor them regularly and replace them as needed.
Nutritional Information
Please note that the nutritional information below is an estimate and will vary based on the specific ingredients used, especially the seed and nut mixtures.
| Nutrient | Amount per Serving (estimated) | % Daily Value (estimated) |
|---|---|---|
| Calories | 1273 kcal | 64% |
| Total Fat | 142 g | 218% |
| Saturated Fat | 72 g | 360% |
| Cholesterol | 122 mg | 41% |
| Sodium | 53 mg | 2% |
| Total Carbohydrate | 6.4 g | 2% |
| Dietary Fiber | 1.5 g | 6% |
| Sugars | 2.7 g | N/A |
| Protein | 5.2 g | 10% |
Variations & Substitutions
- Vegetarian Suet (for ethical considerations): While traditional suet relies on beef fat, you can create a similar product using a blend of vegetable shortening, coconut oil, and peanut butter. Adjust the ratios to achieve the desired consistency.
- Spice it up: Add a pinch of cayenne pepper to your suet mixture. Birds are not sensitive to capsaicin, but squirrels are, so this can help deter squirrels from raiding your suet feeder.
- Seasonal variations: In the fall, consider adding dried berries or pumpkin seeds to your suet. In the spring, you can add dried insects or mealworms to provide extra protein for nesting birds.
FAQs (Frequently Asked Questions)
Q: Why render beef suet instead of using lard or shortening?
A: Rendered beef suet creates a harder, more heat-resistant suet cake that is less likely to melt or go rancid in warmer weather. Lard and shortening tend to soften more quickly.
Q: Where can I find beef suet?
A: Beef suet is typically found at the meat counter of your local grocery store or butcher shop. You may need to ask the butcher to order it for you if it’s not readily available.
Q: Can I use salted peanuts in my suet recipe?
A: No, it’s best to use unsalted peanuts, as salt can be harmful to birds.
Q: How often should I replace the suet cakes in my feeder?
A: Replace suet cakes as needed, depending on the weather and the number of birds visiting your feeder. If the suet becomes soft or moldy, replace it immediately.
Q: Can I make suet cakes without nuts if I have a bird allergy?
A: Yes, you can omit the nuts and simply use a combination of rendered fat and bird seed. You could also add dried fruits or other bird-friendly ingredients.
Final Thoughts
Rendering beef fat for suet cakes and cones is a simple yet rewarding way to connect with nature and provide essential nourishment for birds during the colder months. Whether you’re a seasoned birder or just starting to appreciate the beauty of these creatures, I encourage you to give this recipe a try. Share your creations with your bird-loving friends, experiment with different flavors, and enjoy the vibrant activity that your homemade suet will bring to your backyard. Happy birding!